


However, the photos you put in an album don’t need to be tagged or starred. When you need a folder for a special stash of digital photos, the Organizer’s albums feature is there for you.
How to create an album
With albums and star ratings, you can further break down a collection into groups that you might want to mark for printing, sharing, or onscreen slideshows.To create an album, follow these steps:
1. Sort photos in the Media Browser to determine what photos you want to include in a new album.
In our example, we clicked the third star to sort photos ranked with three or more stars.
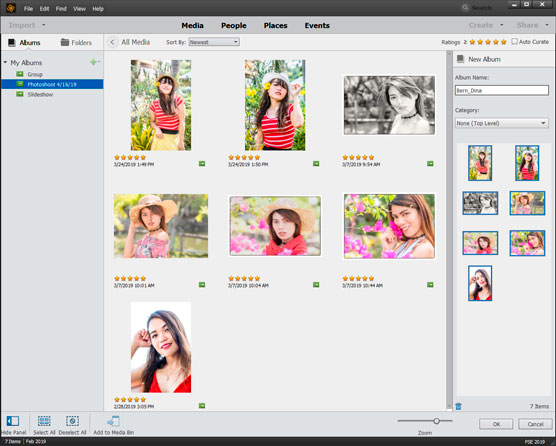
2. Click the plus (+) icon next to Albums at the top of the left panel, as shown. From the drop-down list, choose New Album. Click the plus (+) icon to open the drop-down list and then choose New Album.
3. Name the new album.
In the Panel Bin, you see the Add New Album panel. Type a name for the album in the Album Name text box in the New Album panel on the right side of the Organizer window, as shown.
 Drag photos to the items window in the Add New Album Content panel.
If you didn’t sort files in Step 1, you can do so now or simply pick and choose which photos to add to the new album from photos appearing in your catalog.
4. Drag photos from the Media Browser to the Content tab in the Add New Album panel, as shown.If photos are sorted and you want to include all photos in the Media Browser, press Ctrl+A/Command +A to select all the photos or choose Edit --> Select All. After the files are selected, drag them to the Content pane in the Add New Album panel.
If you don’t have files sorted, click one or more photos and drag them to the Content pane. Repeat dragging photos until you have all photos you want to include in your new album.
5. Click Done at the bottom of the panel.Your new album now appears listed in the Albums category on the Import panel.
That’s it! Your new album is created, and the photos you dragged to the album are added to it. You can display all the photos within a given album in the Media Browser by clicking the album name in the Albums panel.Creating multiple albums uses only a fraction of the computer memory that would be required if you wanted to duplicate photos for multiple purposes, such as printing, web hosting, sharing, and so on.
Use albums for temporary work
You can add an album for temporary work and then delete the album when you no longer need it.For instance, you may want to explore some of the creation and sharing items in the Create and Share panels. Before you peruse the options, create an album and add photos to it. Then proceed to use the sharing feature that interests you. When you finish, right-click to open a contextual menu and choose Delete
Edit an album
After creating an album, you may want to change the album name, add more photos to an album, delete some photos from an album, change the album category, or make some other kind of edit.Your first step in performing any kind of edit to an album is to look at the left side of the Organizer. In the Import panel, you see a list of albums under the Albums category. To edit an album, right-click the album name and choose Edit. After clicking Edit, the album appears in the Panel Bin on the right side of the Organizer. Drag images from the Media Bowser to the album. You can also drag images from the Media Browser to an album name to add photos to an album.
To delete photos from an album, right-click an album name and choose Edit from a context menu. When the album opens as a panel on the right, select a photo and click the Trash icon at the bottom of the panel. Note that you cannot drag a photo to the Trash icon. You must select a photo and click the Trash icon.
Other commands are available in the context menu you open from an album name in the Import panel. You can rename an album, delete an album, explore some export options, share an album, and add more media to your album.
If you want to use the context menu commands, you must close the Add New Album panel in the Panel Bin. While this panel is open, you cannot open a context menu on an album name. Click either Done or Cancel to close the Add New Album panel in the Panel Bin.
More about sharing your albums
An album is a starting point for many exciting things you can do with a collection of photos. Albums help you assemble a collection of photos that can be viewed on many devices and shared with others. Later in this book, we explore many ways you can share your albums with friends, family, and even the world, if you like:- Host albums online for others to view your photos.
- Save the albums to a file on your hard drive.
- Organize an album for sharing photos with others.
- View albums as slideshows.
