


Use Sidecar to add an iPad to your screen
In the Mac’s System Preferences, you see Sidecar (assuming that your hardware and OS meet the requirements named in the following section). When you open Sidecar, you see a list of all compatible iPads that are either directly connected to or on the same network as your main computer. (That’s the one on which you opened System Preferences.)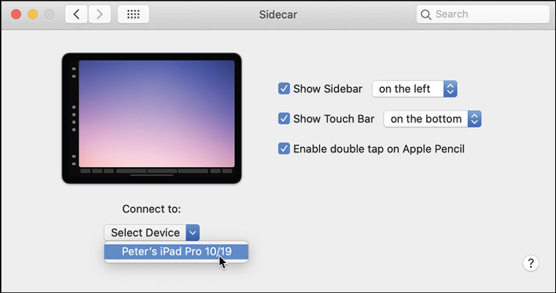 You open Sidecar through System Preferences on the Mac.
Sidecar System Requirements
Needless to say, Sidecar is an Apple-only feature. Your Mac must be using macOS Catalina (or newer). Computers that work with Sidecar include MacBooks and MacBook Pros from 2016 on; MacBook Airs from 2018 and newer; iMacs from 2017 and later, as well as the iMac Retina 5K, 27-inch from the later part on 2015 and newer; Mac Minis from 2018 on; and Mac Pros from 2019 and newer.On the iPad side of the equation, you need an iPad Pro (all models); iPad sixth generation or later; iPad Mini fifth generation or later; or an iPad Air third generation or later. (If you’re not sure what iPad you have, you can go online to Apple support and check by the model number or serial number.) Regardless of which iPad you’re using, it must be running iPadOS 13 or later.
If you have a cable with the proper connectors, you can plug your iPad into your laptop rather than connect wirelessly for Sidecar. The advantages are that the iPad remains charging while you work and, if you’re not at home or work, you don’t need to rely on a network over which you don’t have control.
Arranging your iPad’s screen
After selecting your iPad in Sidecar, click the box in the upper left (its icon has 12 dots) to return to the main System Preferences dialog. Click Displays and then Arrangement (as shown).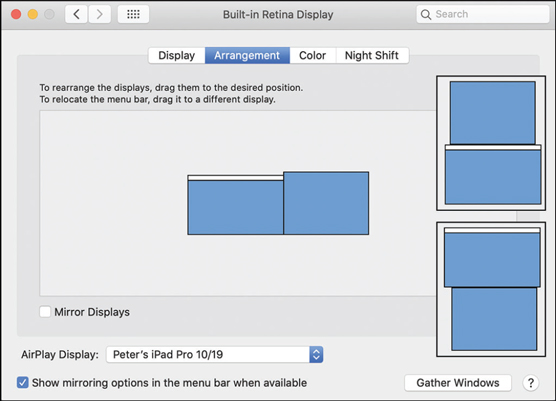 Set up multiple screens on the Arrangement tab.
Typically, the iPad is shown to the right of the primary monitor but, as you can see in the insets to the right, you can also elect to have the iPad’s screen become part of your workspace above or below the primary screen. (You can also, of course, arrange it to the left if that suits your needs — especially handy for southpaws.)
When set up, your cursor simply flows from one screen to the other as you move it. You can use your Apple Pencil on the iPad screen for painting, selecting, and anything else you do with a mouse or trackpad.
Mirroring the Screens
In Displays, you also have the option of “mirroring” the screens. Whatever is shown on your main monitor is also shown on the iPad. You might want to do this, for example, when showing work to a client or a student. It can also come in handy in a collaborative workflow when office (or cubical) space is limited.Maximize the screen space
Okay, so now you have your iPad set up to extend your monitor or screen. What to do with all that extra space? You might have Photoshop on your main screen and Bridge open on the iPad. Or, you might want to hog all the space for Photoshop. In the following figure, you see how Photoshop’s panels can be on one screen and the working image on the iPad. The iPad is extending the screen space, arranged (for convenience) to the right in System Preferences.
In the figure, the laptop’s screen is completely full of all the Photoshop panels that might come in handy while working with that particular image. The image itself is on the iPad’s screen, which enables you to use the Apple Pencil as a pressure-sensitive drawing stylus. And, in all honesty, this iPad’s screen is much better than the laptop’s screen in terms of resolution and color fidelity.
Make use of Photoshop on the iPad
Photoshop on the iPad is actually Photoshop, not some watered-down app. Although the interface is significantly different and not all of Photoshop’s features have yet been added, this is actually Photoshop running on the iPad. Unlike many apps, including Lightroom on the iPad, Photoshop on the iPad enables you to composite images with layers, make adjustments, and use many of your favorite Photoshop tools. Which features are available depends on when you’re reading this article. Progress is continuous, and as the engineers get features ready and stable, they’re available through updates.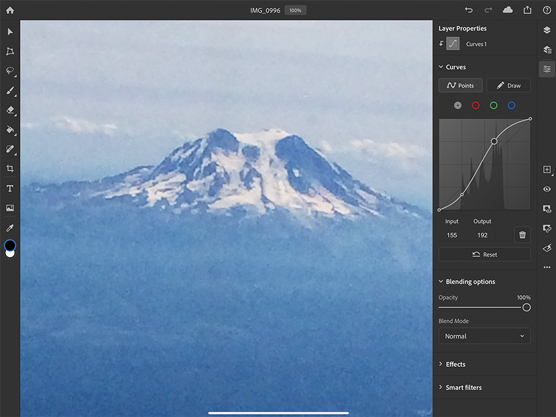 Photoshop on the iPad has a very different interface but many of the same features.
Also in flux is access to Photoshop on the iPad. If you have a subscription to Adobe’s full Creative Cloud, you definitely have access to Photoshop on the iPad. If you have the Photography package or subscribe only to Photoshop, you probably also get Photoshop on the iPad. And if you need only Photoshop on the iPad, not any of the desktop programs, you can likely purchase it separately through the App Store. But that’s subject to change as the program matures.
Working with the Apple Pencil’s pressure sensitivity in Photoshop on the iPad is quite a step up from using a trackpad or mouse. If you have a keyboard that connects to your iPad, most of your familiar Photoshop shortcuts are there at your fingertips (pun intended). But in the Department of Extra Cool is the use of gestures with Photoshop on the iPad. Tap with two fingers to undo; tap with three fingers to redo. Double-tap or long press on tools that have a triangle in the corner to reveal more tools. Those are just a few of the gestures you can use with Photoshop on the iPad, and more are being added regularly.
To see what gestures and shortcuts are current, click the gear icon in the upper-right corner and then tap Input. You can also adjust the pressure sensitivity of your Apple Pencil in that section.
The Cloud with Photoshop on the iPad and desktop
When working with Photoshop on the iPad, any document you create from scratch is automatically saved as a Cloud document. You can access Cloud docs both from the iPad and Photoshop on your desktop or laptop. Changes are automatically synced through the Cloud.To access existing documents in the Cloud (saved there, perhaps, from your laptop while on the road), open Photoshop on your iPad and open the home screen. If the image with which you want to work isn’t listed among the recent documents, click Import and Open in the lower-left corner. You can access Photos on your iPad, click Files to navigate through your iCloud docs, or even click Camera to access the iPad’s camera and take a new photo.
If you’re not able to access your iCloud docs, make sure that you’re logged in to your Adobe account. Click the gear icon in the upper right; then click Account to log in. You can also see how much Cloud storage is already used and how much is available. (You can change your subscription to increase your storage if necessary.)
Other Adobe iPad apps
The availability of other iPad apps from Adobe is another moving target: Apps come and they go; they gain and lose features as Photoshop on the iPad matures. Photoshop Express and Photoshop Fix for simple retouching, as well as Lightroom for Mobile, are the basic tools. But after you start working with Photoshop on the iPad, you’ll probably use the other apps only on other mobile devices.Among the apps available for smartphones (iOS and Android) are Photoshop Express, Photoshop Mix, Photoshop Fix, Photoshop Camera, and Illustrator Draw.
Does the iPad replace a Wacom tablet?
Not only does the iPad not make your Wacom tablet expendable, you can use them together. After adding the iPad through Sidecar, you need to reopen the Wacom Preferences (through System Preferences) and redefine the corners of the screen to include the iPad. You can use the Wacom stylus in addition to your Apple Pencil (just as you can use it with your trackpad or mouse), but remember which works with which. You can’t use your Apple Pencil on the Wacom tablet, and you can’t use the Wacom stylus on the iPad’s screen.One of the better ways, at least for me, to keep things straight is to arrange the iPad screen to the top or bottom of the main screen (see the insets to the right in the figure, shown previously) and keep the tablet to the side. (I’m right-handed, so I keep the tablet to the right. Lefties probably want to swap sides for ease of use.)
Do not leave the stylus on top of the tablet or the Apple Pencil on top of the iPad. These are input devices and as long as they’re in contact with the appropriate surface, they’re sending signals to the computer. Make it a habit to use the pen stand for your stylus and to keep the Apple Pencil on the desk or attached to the iPad on the magnetic side to keep it charged.
Wacom tablet preferences for touch keys and touch ring
Remember, too, that (depending on your model), Wacom tablets offer Touch Keys and the Touch Ring. If you’re used to using these, you definitely want to keep the tablet in your workflow along with your iPad. If you don’t use them, it’s time to learn. Wacom offers lots of information on its website to help you get started, but remember that you need to set up these features to use them.After downloading and installing the latest version of the Wacom driver for your tablet, open the Control Panel and customize your tablet. (On a Mac, choose System Preferences → Wacom Tablet. In Windows, choose Start→ All Programs → Wacom Tablet → Wacom Tablet Properties.) When you install your tablet’s driver, a special Wacom button is added to System Preferences, enabling you to program many features, and you can program different features for different programs. The Control Panel enables you to assign a specific function or keystroke to each of the ExpressKeys, Touch Ring, and Touch Strips (not available on all models), as well as to program your various pens and mouse.
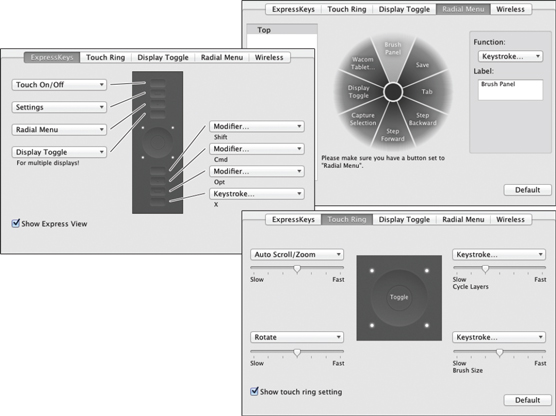 You can program different features for various programs.


