


The first time you launch the Camera Raw Editor, a Setup Camera Raw screen opens and prompts you to make a choice for the UI you want to use. In this figure, you can see the initial screen after launching the Camera Raw Editor.
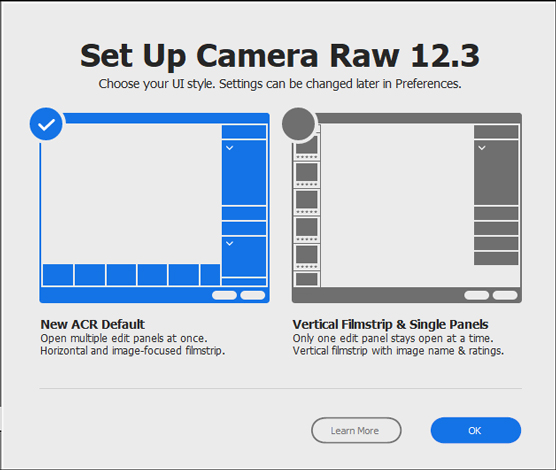 The Camera Raw Editor Setup screen
As shown, you have a choice to use the new Adobe Camera Raw (ACR) or use the legacy UI. The new UI displays the film strip at the bottom of the ACR window by default, and you can view multiple panel settings simultaneously in the Panel Bin. You can change the filmstrip orientation from horizontal to vertical.
The legacy UI displays the filmstrip, by default, on the left side of the ACR window, and you can work in only a single panel at a time.
Here, we look at using the new ACR UI. The new ACR UI is the default. Double-click a raw file or choose File→ Open in Camera Raw Click in the Photo Editor. The fist screen you see is the Camera Raw Set Up screen, shown. Click OK to accept defaults and open the raw file in the Raw Editor. As you can see, much has changed in the user interface. All the features and tools you may have used in previous versions of the Camera Raw Editor are available in this upgrade. The settings have just been moved around a bit.
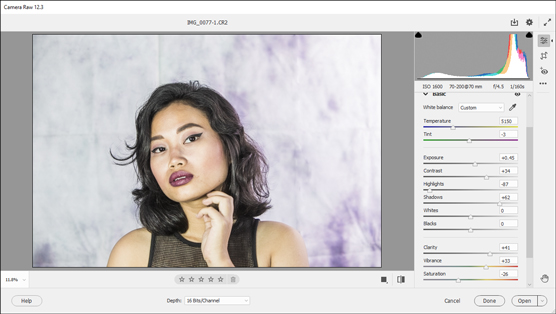 The Camera Raw Editor user interface
Camera Raw files
First and foremost, a Camera Raw file is a file format. Most DSLRs, many mid- to high-end mirrorless cameras, and more than 20 different cells phone cameras can save data in the Camera Raw format. Unfortunately, almost all developers use their own unique file extension when saving files. For example, Canon raw files are saved ascrw or .cr2, Sony’s files are saved as .arw, Nikon’s files are saved as .nef, and Fuji files are saved with an .raf extension. Likewise, other developers use unique naming conventions.Dealing with myriad different raw file formats has been a challenge for Adobe. With each release of the Camera Raw Editor, Adobe needs to ensure compatibility with all the developers supporting camera raw.
One solution provided by Adobe is Adobe’s own raw file format, which uses a .dng extension (Digital Negative). In the event that you acquire an update to Lightroom, Photoshop, or Photoshop Elements and your camera’s raw format is not supported, you can download the free DNG converter from Adobe. You may be able to convert to DNG until Adobe supports your camera’s raw files.
Raw file format attributes
There are several reasons you should make all your first attempts at improving your images in the Raw Editor. These include:- Working with non-destructive editing. When you open a Camera Raw image in the Raw editor, all the edits you make for everything, including brightness/contrast, color corrections, tonal corrections, cropping, straightening, sharpening, and so on, are nondestructive. This means that you can always return to the original raw image, dismiss all previous edits, and start over. You don’t need to save a copy. Moreover, you can share the raw file with another user, who can work with your edited image or also dismiss all the edits and start with a fresh unedited version.
- Working with higher bit depths. Inasmuch as you can also use some editing features in the Elements Photo Editor on 16-bit images, in the Raw editor, all the edits you make can be made on either 8-bit or 16-bit images. To understand more about bit depth, you first need to understand dynamic range.
Dynamic range is the range of f-stops between the brightest areas of a photo (the highlights) and the darkest areas (the shadows) where you can detect detail. The human eye can detect roughly 18 different f-stops. Translated into practical terms, this means that we can see some detail in the lightest areas of things like cloud formations, and we can see some detail in some dark shadows, as in a tunnel.
Higher-end DSLR and mirrorless cameras capture an average of 10–12 f-stops. One camera that captures 15 stops is the Sony A7RIV. The Canon 5D Mark IV captures 12 stops; the Nikon D810 captures 14.8 stops. Smartphones cameras are becoming increasingly better, capturing images at higher dynamic ranges as well. For example, some iPhone, Google, and Samsung devices capture respectable dynamic ranges. Improvements in technology are bringing cameras closer to capturing detail in highlights and shadows that approach the ability of the human eye — but they’re not there yet.
When you take a picture in Raw format, your camera captures all the data the sensor can handle. You open the higher bit image in the Raw editor and decide on the compromises you’re willing to make, such as more detail in shadows or more detail in highlights. Your final images need to be reduced to 8-bit for printing or sharing on social media websites, so you must make some decisions about where to clip the image. In other words, you decide what parts of the data you will cut off.
Because Raw editing is a post-processing task, you start with all the original data and decide what data remains and what data are tossed. Sixteen-bit images offer you much more data to work with than 8-bit images do. JPEG images, on the other hand, are processed by the camera, and many of those decisions are made for you. You have more limited control over the data with JPEG files than with Raw files. Furthermore JPEG files are only 8-bit and hold much less data than the raw files do.
- All editing is accessible in a single dialog box. If you consider the Raw Editor as a dialog box for the moment, all image editing is handled within the editor. In the Elements Editor in Expert mode, you need to address several different menu commands to perform edits in different dialog boxes. The Raw Editor offers you a panel with sliders, where you can make changes to white balance, contrast, exposure, highlights, shadows, saturation, vibrance, and more, all from within a single panel and without the need to open multiple dialog boxes.
Opening images in the Camera Raw Editor
From the desktop, you can open Camera Raw images by double-clicking the mouse button on a raw image. The image opens in the Raw Editor. If you see a dialog box indicating that the image can’t be opened, it means that Adobe has not yet included support for your camera. This is sometimes the case with new Camera Raw Editor releases. If your camera isn’t supported, you can convert the image to a DNG file and open the DNG in the Raw Editor.You can also open the Elements Photo Editor and choose File→Open or press Ctrl/Command + O, select a raw image, and click OK, and the image opens in the Raw Editor.
You also have a File→Open in Camera Raw menu command. You can open JPEGs, TIFFs, and PSD files in the Camera Raw Editor. Files saved as TIFF and PSD as 16-bit images can be edited in 16-bit. JPEG files are always 8-bit.
You may see some YouTube videos or read articles in which authors claim that the difference between JPEG and Raw is that Raw files are not compressed and JPEG files are compressed. This is not true. Today, Raw files can be compressed with lossless or lossy compression.
The distinguishing factor between JPEG and Raw is that Raw holds all data captured from the image sensor, and the camera does not process the file. JPEG files are processed by the camera, and data are clipped. When the files are saved, they are always saved with lossy compression, meaning that additional data loss occurs.


