

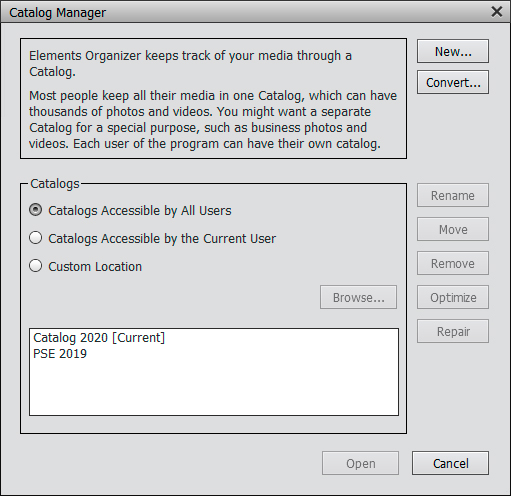
 The Catalog Manager dialog box
To keep your photos organized and your catalog files small, you can start a completely new catalog before you import photos. Follow these steps:
1. Choose File → Manage Catalogs and click the New button in the Catalog Manager dialog box, as shown.
2. When the New Catalog dialog box opens, type a name for the new catalog in the File Name text box.
3. (Optional) If you want to add the free music files that installed with Elements, select the Import Free Music into All New Catalogs check box.
We recommend selecting the Import Free Music into All New Catalogs and Import Music Files check box. The Organizer ships with free music files that you can use in a variety of creations.
4. Click OK to create the new catalog.
5. Choose File → Get Photos and Videos →From Files and Folders to add files to the new catalog. Alternately you can click the Import button above Albums and Folders in the left panel.
The Get Photos and Videos from Files and Folders dialog box opens.
6. Navigate your hard drive and select the photos you want to add. After you identify all the files, click Get Media.
The selected photos are added to your new collection of media contained in the catalog.
How to work with catalogs
After you create different catalogs for your images, the following tips for working with catalogs will come in handy:- Understanding how you want to organize your photos before creating your first catalog: Unfortunately, Elements doesn’t provide you with a command to split large catalogs into smaller ones. However, if you’ve created a large catalog and want to split it into two or more separate catalogs, you can manually add new photos to a new catalog and delete photos from the older catalog.
- Switching to a different catalog: When you need to open a different catalog file, choose File→ Manage Catalogs and select the name of the catalog you want to open. Click Open at the bottom of the dialog box to open the selected catalog. The Organizer window changes to reflect files contained in that catalog.
- Fixing a corrupted catalog: Notice the Repair button in the figure. If you can’t see thumbnail previews of images or open them in one of the editing modes, your catalog file might be corrupted. Click the Repair button to try to fix the problem.
- Improving catalog performance: When catalogs get sluggish, you might need to optimize a catalog to gain better performance. You should regularly optimize your catalog (by clicking the Optimize button in the Catalog Manager) to keep your catalog operating at optimum performance.
How to back up your catalog
Computer users often learn the hard way about the importance of backing up a hard drive and the precious data they spent time creating and editing. We can save you that aggravation right now, before you spend any more time editing your photos in Elements.The standard rule is that if you spend sufficient time working on a project, and it gets to the point where redoing your work would be a major aggravation, it’s time to back up files.
When organizing your files, adding keyword tags, creating albums, and creating stacks and version sets, you want to back up the catalog file in case it becomes corrupted. Fortunately, backing up catalogs is available to both Windows and Mac users. For optimum performance, backing up to a 1TB USB drive will serve you best.
Here’s how you can use Elements to create a backup of your catalog:
1. Choose File→Backup Catalog to open the Backup Catalog Wizard.
This wizard has two panes that Elements walks you through to painlessly create a backup of your files.
2. Select the source to back up.
The first pane in the Backup Catalog to Hard Drive Wizard offers these options:
-
- Catalog-only Backup: This item is new in Elements 2021. In contrast to this type of backup, a full backup backs up keywords, tags, places, events, and so on. It also includes backing up photos and videos. If you have a large catalog with many photos and videos, that backup will take a long time. If you don’t need to back up your photos and videos, you can choose this option instead, which backs up all data except the photos and videos. This option runs much faster than the full backup.
- Full Backup: Use this choice when you want to back up everything, including your photos and videos.
- Incremental Backup: Select this radio button if you’ve already performed at least one backup and you want to update the backed-up files.
3. Click Next and select a target location for your backed-up files.
Active drives, external hard drives attached to your computer, or mounted network drives available to your computer appear in the Select Destination Drive list. Select a drive, and Elements automatically assesses the write speed and identifies a previous backup file if one was created.
The total size of the files to copy is reported in the wizard. This information is helpful so that you know whether more than one drive is needed to complete the backup (on Windows) or a backup drive has enough space to complete the backup.
4. If you intend to copy files to your hard drive or to another hard drive attached to your computer, click the Browse button and identify the path.
5. Click Save Backup.
The backup commences. Be certain to not interrupt the backup. It might take some time, so just let Elements work away until you’re notified that the backup is complete.
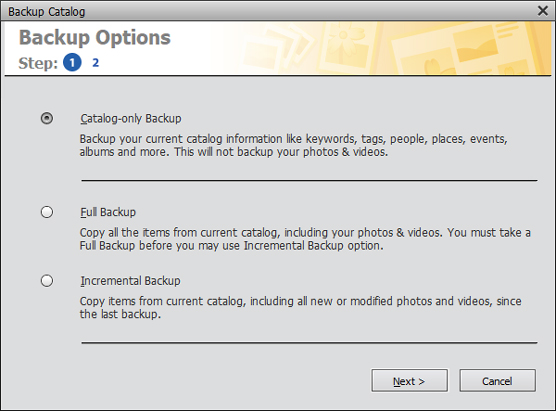 The wizard provides options for selecting the destination media for the backup.
How to back up photos and files
With files stored all over your hard drive, manually copying files to a second hard drive, CD, or DVD would take quite a bit of time. Fortunately, Elements makes finding files to back up a breeze.Choose File →Copy/Move to Removable Drive and then, in the dialog box that opens, select the Copy Files check box and click Next. Select a hard drive, type a name for the backup folder, and click OK. Elements goes about copying all files shown in the Organizer to your backup source.
Mac users don’t have an option for backing up photos from the Organizer to CDs or DVDs. On the Mac, you can create a burn folder in the Finder, select all photos in the Organizer, and drag the selected files to the burn folder. Click the Burn button, and the files are copied to a CD or DVD.


