

Here’s how to use the Select Subject command:
1. In either Expert or Quick mode, choose Select → Subject.
You can also click the Select Subject button in the Tool Options of the Quick Selection, Selection Brush, Magic Wand, Refine Selection, and Auto Selection Tool, as shown.
2. If your selection needs some cleanup after Step 1, add to or subtract from your selection using any of the selection tools.
Our favorite tool for small cleanups is the Lasso tool, found in the Tool Options of the Auto Selection Tool.
-
- To add to your selection, press the Shift key while dragging across your desired image areas.
- To delete from your selection, press the Alt key (Option key on the Mac) while dragging across your unwanted image areas.
You can also select the Add to Selection and Subtract from Selection options in the Tool Options.
3. If you need to fine-tune your selection further, click the Refine Edge option in the Tool Options and adjust the settings as desired.
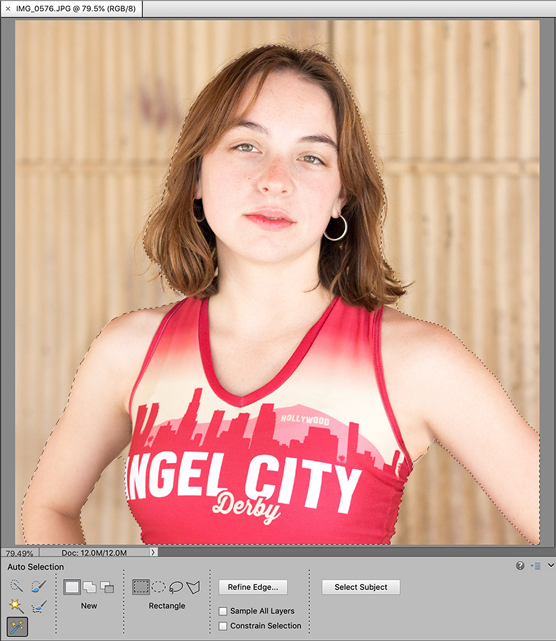 The Select Subject command analyzes and selects people, animals, cars, and other objects.
Refining the edges of a selection
The Refine Edge option enables you to fine-tune the edges of your selection. It doesn’t matter how you got the selection, just that you have one. You can find the command in the Tool Options of the Magic Wand, Lasso, and Quick Selection tools. And, of course, you can find it on the Select menu. Here’s the scoop on each setting for this option, as shown:- View Mode: Choose a mode from the pop-up menu to preview your selection. Hover your cursor over each mode to get a tooltip. For example, Marching Ants shows the selection border. Overlay lets you preview your selection with the edges hidden and a semi-opaque layer of color in your unselected area. On Black and On White show the selection against a black or white background. Show Original shows the image without a selection preview. Show Radius displays the size of the area in which the edge refinement is happening.
- Smart Radius: Select this option to have Elements automatically adjust the radius for hard and soft edges near your selection border. If your border is uniformly hard or soft, you may not want to select this option. This enables you to have more control over the radius setting.
- Radius: Specifies the size of the selection border you will refine. Increase the radius to improve the edge of areas with soft transitions or a lot of detail. Move the slider while looking at your selection to find a good setting.
- Smooth: Reduces jaggedness along your selection edges.
- Feather: Move the slider to the right to create an increasingly softer, more blurred edge.
- Contrast: Removes artifacts while tightening soft edges by increasing the contrast. Try using the Smart Radius option before playing with Contrast.
- Shift Edge: Decreases or increases your selected area. Slightly decreasing your selection border can help to defringe (eliminate undesirable background pixels) your selection edges.
- Decontaminate Colors: Replaces background fringe with the colors of your selected element. Because decontamination changes the colors of some of the pixels, you will have to output to, or create, another layer or document to preserve your current layer. To see the decontamination in action, choose Reveal Layer for your View mode.
- Amount: Changes the level of decontamination.
- Output To: Choose whether you want to output your refined, decontaminated selection to a selection on your current layer, layer mask, layer, layer with layer mask, new document, or new document with layer mask.
- Refine Radius tool: Select the Paintbrush tool on the left and brush around your border to adjust the area you’re refining. To understand exactly what area is being included or excluded, change your View mode to Marching Ants. Use the right and left brackets to decrease and increase the brush size.
- Erase Refinements tool: Use this tool (which looks like an Eraser), also located on the left, to clean up any unwanted refinements made with the Refine Radius tool.
- Zoom tool: Allows you to zoom in to your image to see the effects of your settings.
- Hand tool: Enables you to pan around your image window to see the effects of your settings.
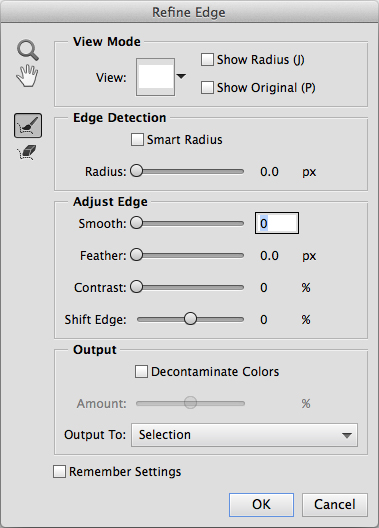 Fine-tune your selection with Refine Edge.


