

Adobe has made a couple of changes to the Organizer in Photoshop Elements 2019. The new Auto Curator checkbox (I in the figure) was changed from the old Smarts Picks checkbox, and the Slideshow button (U in the figure) activates a new project called Memories, which displays images as a video.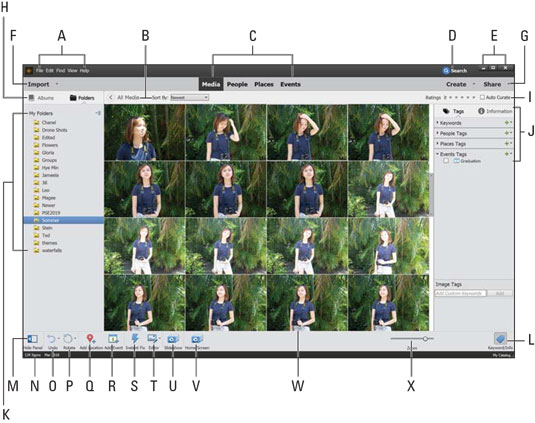 Photoshop Elements 2019 Organizer workspace.
Photoshop Elements 2019 Organizer workspace.The various items in the Organizer include the following:
- (A) Menu bar: The Organizer menus appear in the top-left section of the menu bar. In Windows, the menus belong to the application. On the Mac, the menu bar is part of the operating system’s menus.
- (B) All Media/Sort By: When you click a folder as you see in item K, the thumbnail images shown in the Media Browser (item V) display only those photos within the selected folder. The figure shows the CameraClub folder selected. If you click the All Media button, you leave the selected folder and see all photos from all folders in the Media Browser. Next to the All Media button is a Sort By drop-down list where you can sort the thumbnails in the Media Browser according to Newest, Oldest, and Batches of photos that you imported.
- (C) Media/People/Places/Events: At the top of the Organizer window, you find five tabs:
- Media: The first tab is Media. Click the Media tab to display thumbnails of photos either in a folder or in the entire catalog.
- People: Click this tab to display photos where you have tagged faces.
- Places: Click this tab, and a Google map appears in the Panel Bin. You can tag photos according to map coordinates by using Google Maps. Click the Add Location button (item Q) to tag an image with a place on the map.
- Events: Click this tab to display photos that have been tagged as Events. To tag a photo with an event, click the Add Event button (item R).
- (D) Search: Click this button to open the Search pane.
When you click the Search button, a window opens where you can choose from a number of different search options.
- (E) Features buttons: In Windows, you find Maximize, Minimize, and Close buttons in the top-right corner of the Organizer. On the Mac, in the top-left corner you find Close, Minimize to Dock, and Maximize.
- (F) Import: From the drop-down menu, you can choose to import photos from Files and Folders, Camera or Card Reader, or Scanner. Another option enables you to search your hard drive.
- (G) Create/Share: These two items are drop-down lists. You choose a menu item that takes you either to the Photo Editor or to a wizard where you work step-by-step to complete a task.
- (H) Albums/Folders tabs: Click Albums to view any Photo Albums you have created. Click Folders to display a folder view as shown in Figure 6-1.
- (I) Ratings/Auto Curator: Ratings are denoted as stars from 1 to 5. Click a star and those images identified with a given rating are displayed in the Media Browser. Check the Auto Curator checkbox to automatically choose the best photos displayed in the Media Browser. This item was changed from Smart Picks to the new Auto Curator checkbox.
- (J) Panel Bin: The current view in Figure 6-1 shows the Panel Bin collapsed. When you click the Keyword/Info button at the lower right of the Media Browser window, a panel opens providing you with a number of different ways to tag photos and an Information pane where information about a selected photo is displayed.
- (K) Folders view: Click a Folder name to display just the photos within the respective folder. Click All Media to display all images from all folders.
- (L) Keyword/Info: Click the Keyword/Info button to open the Panel Bin and choose options from the Tags or Information panel.
- (M) Hide Panel: Click this button to hide the left panel. If you click this button and the Tags/Info button (item K), you can hide both panels. Doing so provides you a maximum viewing area for the photo thumbnails.
- (N) Status bar: The bottom of the Organizer window provides information. On the left, you see the number of items in your catalog and the date you created the catalog. On the far right, you see the name of your catalog.
- (O) Undo/Redo: Click the tiny arrow, and a pop-up menu displays Undo and Redo. Choose an item to undo or redo your last action.
- (P) Rotate: When you click the arrow, you can choose to rotate a photo clockwise or counterclockwise. To use either tool, you must first select a thumbnail in the Media Browser.
- (Q) Add Location: When you click Add Locations, a window opens atop the Organizer. Type a location name (as it appears on a map), and the new location is added to the Places panel.
- (R) Add Event: Add Event is yet another item that helps you organize your photos. You can add tags for people, places, and then events to help narrow down a large collection of photos. Each of these items can be sorted by clicking the respective tab at the top of the Organizer.
- (S) Instant Fix: Click this button to apply Quick Edit fixes to your photographs. You can crop, adjust lighting, fix red-eye problems, and apply some smart fixes to your photographs without opening them in the Photo Editor.
- (T) Editor: Click to return to the Photo Editor.
- (U) Slideshow: Click this button and you begin a new project called Memories. Memories displays selected images as a video.
- (V) Home Screen. Click this button and the Home Screen appears.
- (W) Media Browser: The Media Browser shows thumbnail displays of your images.
- (X) Zoom: Adjust the slider to see thumbnails larger or smaller.
This overall description of the Organizer can be helpful when you perform tasks related to the Organizer. Earmark this page and use it as a reference to quickly identify items contained in the Organizer.


