


The engineers at Adobe didn’t just make improvements and add features to Photoshop, the Camera Raw plug-in got some love, too. There are new features, improved performance, and changes such as moving the Upright adjustments from the Lens Correction panel to the new Transform tool.
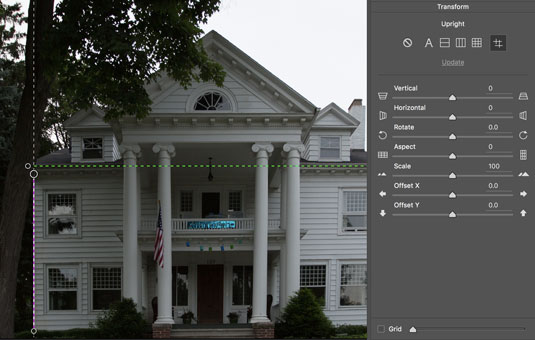 Guided Upright uses up to four lines to straighten an image.
- Additional camera support: As soon as Adobe has a handle on a new camera’s Raw capabilities and format, it’s added to Camera Raw. You’ll also find lots of new lens profiles.
- Pressure-sensitive device support: Wacom tablets and Windows Surface Pro devices can now take advantage of pressure sensitivity for the Local Adjustment Brush and the Eraser tool (if you’re using a stylus with an eraser, of course). Set the flow to maximum value and control how it behaves with lighter or heavier pressure.
- Guided Upright in the Transform panel: With the Transform tool selected, you can adjust perspective with up to four lines drawn on your photo. Photoshop uses these to straighten and align objects in an image (see the figure). The original manual transform controls for rotating, adjusting vertical and horizontal lines, rotation, scale, and aspect — and the Level, Vertical, Auto, and Full Upright modes — have been moved from the Lens Control panel to Transform.
- Interface control: Selections you make in Photoshop’s Interface dialog box are now also applied to Camera Raw.
- Boundary Warp: The Panorama Merge preview now includes a Boundary Warp slider that enables you to straighten and minimize areas of transparency when creating a panorama.
- Dehazing local areas: Use the Dehaze slider with the Radial Filter, Graduated Filter, or the Adjustment Brush to localize and control fog-like softening in your image. Haze is most often found in scenic photos.
- Black and White sliders: When working with the Radial Filter, Graduated Filter, or the Adjustment Brush, you can now use sliders to adjust the black and white points in your image.
- GPU acceleration: Camera Raw got speedier now that it can use your computer’s graphics processing unit. It’s enabled by default, but if you see problems, you can disable it in Photoshop CC →Preferences → Camera Raw.
- HDR and panoramas in Camera Raw: You can now create high dynamic range images and panoramas right in Camera Raw. Open the source files, select them in the left column (Filmstrip), right-click one of them, or open the menu in the upper-right corner and select Merge to HDR or Merge to Panorama. Make any necessary adjustments, click Merge, click Save, click Done. Note that the Select All, Select Rated, and Sync Settings commands are now accessed through the menu or by right-clicking an image.
Guided Upright uses up to four lines to straighten an image.