


In the figure below, the lower part of the Save As dialog box shows the yellow warning triangles that identify options being used in the image that are not available when saving as a JPEG.
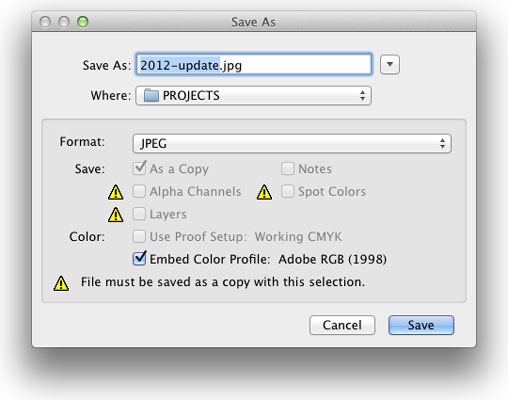 Photoshop shows you which image features are not available in your selected file format.
You can go ahead and save the image in that format, but your file will no longer contain those unsupported features. In the example shown, you can click the Save button and create a JPEG file, but that JPEG won’t have the alpha channel (a saved selection) or the spot colors (a custom printing color) and it will be flattened to a single layer. If you want to retain those features in the file, you need to choose a different file format, such as Photoshop’s own PSD format.
No matter which of the file formats you choose, if you add layers, type, adjustment layers, channels, or paths to your image, keep the original as an unflattened/unmerged (all the layers are preserved) Photoshop (PSD) or layered TIFF file. In the future, should you ever need to make changes to the image or duplicate an effect in the image, you won’t need to start from scratch.
Depending on the type of content you're creating, you may need to save as a different file format each time. Here are some of the most common examples.
Photoshop file formats for digital photos
If you print your images yourself at home or the office, you can stick with the PSD Photoshop format when saving. (Remember that you cannot re-save in a Raw format after opening in Photoshop.) If you send the photos to the local camera shop (or discount store) for printing, stick with JPEG — or, if the folks doing the printing accept it, TIFF. Here are the pros and cons of the major formats that you should consider for photos when saving:- PSD: Photoshop’s native file format is great for saving your images with the most flexibility. Because the PSD format supports all of Photoshop’s features, you don’t need to flatten your images — and keeping your layers lets you make changes later. If your file size is very large (400MB or larger), make a TIFF or JPEG copy before printing, flattening all the layers. Don’t send PSD files to the local shop for prints.
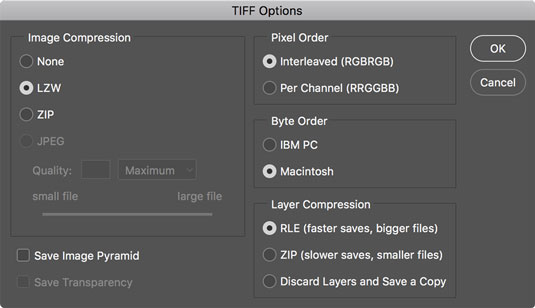
- TIFF: Although the TIFF file format (as you use it in Photoshop) can save your layers and most other Photoshop features, make sure to choose Layers→ Flatten Image before sending files for printing. Layered TIFF files generally are compatible only with programs in the Creative Cloud. The TIFF Options dialog box is shown.
- JPG: JPEG, as it’s called, is actually a file compression scheme rather than a file format, but that’s not important. What is important is that JPEG throws away some of your image data when it saves the file. Save important images in PSD or TIFF and use JPEG only for copies.
When should you use JPEG? When sending images to a photo lab that doesn’t accept TIFF files, uploading to most social media sites, and when sending images (perhaps by e-mail or on CD) to people who don’t have Photoshop. Unlike PSD and TIFF, you can open JPEG images in a web browser and print from there. When saving JPEGs, the lower the Quality setting you choose in the JPEG Options dialog box, the smaller the file, but also the more damage to the image. I discuss saving as JPEG in more detail in the sidebar “Resaving images in the JPEG format.”
- JPS: Jpeg Stereo is used to create stereoscopic images that use the left half as one copy and the right half as another. It’s a specialty format for creating 3D-looking photos. You may or may not ever use the file format, but who knows what’s right down the road? (Remember the “old days” when only a few cameras could capture Raw and when nobody knew what HDR stood for?)
- PDF: It’s easy to overlook Adobe’s PDF format when talking about photos, but you should consider using this format. Although the local photo lab probably won’t accept it, it’s a great format for sharing your pictures with folks who don’t have Photoshop. Unlike JPEG, your images won’t be degraded when saving as PDF; and like JPEG, just about anyone with a computer can view the files. (Either Adobe Reader or the Mac’s Preview, which you can also use with PDFs, is found on just about every computer now, just like web browsers for JPEG.) Keep in mind, however, that PDF files are larger than JPEGs.
- Large Document Format (PSB): Really, really, really big pictures — more than 30,000 pixels wide or long or both — must be saved in the PSB or TIFF file formats. Will you ever need this format? Consider that 30,000 pixels at a photo-quality resolution of 300 ppi is 100 inches long. At a resolution of 85 ppi, more appropriate for a long banner to hang in a hallway, you’re talking about artwork that stretches almost 30 feet! Can your printer do that? If not, you probably don’t need the PSB file format.
 Remember to flatten TIFF files before saving when using them outside the Creative Cloud.
You could theoretically use a number of other available formats, such as DCS (never Photoshop Raw), but there’s no real need with the more common and more versatile formats about which you just read.
The JPEG file format doesn’t support 16-bit color, but even when working with a 16-bit image (perhaps a Raw image from your digital camera), JPEG is available as a file format in Photoshop’s Save As dialog box. The image is automatically converted to 8-bit color. It’s more convenient — saving you a trip to the Image→Mode menu to select 8-Bits/Channel — but the JPEG Options dialog box won’t give you an estimate of the file size. Don’t forget to save in a format that supports 16-bit color, such as PSD or TIFF, before creating the JPEG copy.
Photoshop file formats for web graphics
For those who design for the web, there are many more factors to consider, including what content management system is being used. In any case, here are the three most commonly used file formats that you need for the web:- JPG: Use JPEG for photos. Remember to resize the photo so that it fits on a web page. When selecting a Quality setting, you need to balance image appearance with file size. A smaller file will download (and display in a web browser) faster, but a larger file generally looks better. If you reduce the Quality setting until just before the image doesn’t look great, you’ve hit the sweet spot — the compromise between file size and image quality.
- GIF: GIF is more appropriate for items like web banners and buttons than it is for photos. If you save a photo that’s more than perhaps 100x100 pixels in size, you might see some degradation of the image quality as similar colors become one color. When you save an image as GIF, it can contain no more than 256 distinct colors. JPEG and the other common file formats can have thousands of different colors.
- PNG: PNG comes in two types: PNG-8 (which is a substitute for GIF) and PNG-24 (which is a substitute for JPEG). PNG has a couple of advantages for web designers, such as support for transparency.
Photoshop file formats for commercial printing
Let's say you’re the Photoshop master of your office. Everyone knows that you understand everything about digital images. So you’re the right person to create the company’s new brochure. Except you’re a photographer. Or you’re a web designer. Or you’re actually pretty new to Photoshop. And you don’t have a clue about preparing images for a commercial printing press.Here’s what you need to know about file formats for those CMYK (cyan/magenta/yellow/black) color images that you’re sending to the print shop:
- TIFF: TIFF is generally a solid choice. Use TIFF for photographic images that don’t contain any type layers.
- EPS: Choose EPS if your image has type. Don’t flatten or merge the type layers before using Save As to create the EPS. In the EPS Options dialog box, make sure to select the Include Vector Data check box to ensure that your type prints perfectly.
If you reopen an EPS file in Photoshop, your type layers get merged. Don’t! Instead, make sure to save your original file as PSD and, should you need to make changes, open the PSD and create a new EPS file when you’re done editing.
- PDF: PDF offers support for spot color channels, alpha channels, and paths — options not supported by EPS. (Spot channels are used with custom colors, and alpha channels store information about transparency in the image.) If your file uses any of these features, choose PDF over EPS, if your print shop accepts PDFs. When saving as PDF, the PDF Options dialog box offers Preserve Photoshop Editing Capabilities. If you select the option, the PDF file reopens in Photoshop with layers and editable type.
- PSD: Use PSD only if you’re adding the image file to a project in Adobe InDesign CC. Don’t send PSD files to a print shop unless specifically requested to do so by the print shop.
