

Typically, when people send anyone content, that content is sent as attachments to an email message. Most of the time those emails contain long explanations and descriptions about what that content entails.
Besides being inconvenient for the recipient, the problem with this method of information delivery is that typically no one person is responsible for purchasing decisions in companies anymore. Often a committee is involved. It’s then up to the original recipient to forward the email and attachments. The accompanying messages may get lost in the shuffle, and things can quickly get confusing. This is what PointDrive sets out to avoid.
Instead of having to open a number of attachments in an email message, leads just click the PointDrive link you send them. It really couldn’t be any easier or more straight-forward.
Creating presentations with PointDrive
How does one go about using PointDrive to create professional-looking content? Follow these steps:- From any page in Sales Navigator, navigate to PointDrive by clicking the grid icon in the main navigation menu bar and selecting the PointDrive option.
You are taken to your PointDrive home page.
 The PointDrive home page after adding presentations.
 - Click the New Presentation button that appears in the top-right corner of the screen underneath your profile photo.
The screen showing a blank presentation template appears.
 Start creating a new presentation.
 - To add your first piece of content, click the Insert Content button.
A new page appears where you can decide on the type of content you want to add. This content module is also called an asset. You can add a file, link, video, or map.
 Adding assets to your new presentation.
 - Click to select whatever option applies to the content you want to create.
If you are uploading a file, you can pull it from your computer or a cloud-storage solution such as OneDrive, Dropbox, or Box.
- Customize the presentation by adding a title, changing the colors, and/or adding a personalized message that is sent to the lead along with the link to the presentation.
You should always add a personalized message to your presentation. It serves as a reminder about who you are and what type of information the recipient is about to view.
- (Optional) If you want to add more content (assets), click the “+Add New Entry” button underneath the file selection box.
Try adding no more than four or five pieces of content at a time to keep the presentation a reasonable length. You don’t want to annoy your lead by sending hundreds of pages of content!
- Click the Preview button in the top-right corner of the screen.
You should always preview your content before sending it out to ensure it looks professional and how you intend it to look.
- If all looks well, click the Get Link button.
The Get Link button is next to the Preview button in the top-right corner of the screen. When clicked, Sales Navigator generates a link to the presentation that can be shared through email or InMail messages.
Viewing team members’ PointDrive presentations
PointDrive is a shared option, so everyone on your Sales Navigator Team or Enterprise account can use it to create and send content.By default, your own presentations are private; however, you can click the check box that says “Visible in Team Presentations” underneath each presentation’s thumbnail on your PointDrive home page to let other team members access it on the Team Presentations page. For example, there may be times when a team member wants an extra set of eyes on a presentation he or she created. To access a team member’s page, click the Team Presentations link located on the left side of your PointDrive home page underneath the top menu bar. Once clicked, you see a screen like the one below.
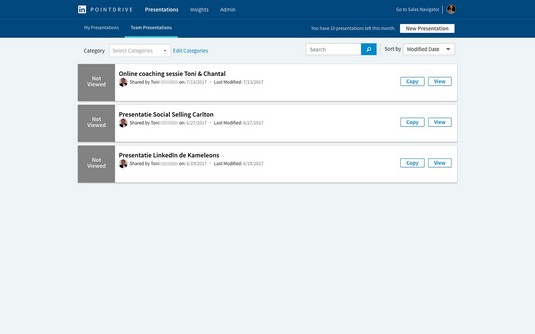 View other team members’ presentations here.
If you find that your team isn’t making the best use of PointDrive, you can shut off access to it through your Sales Navigator Admin Settings page.
With the Team-level Sales Navigator plan, LinkedIn only grants you ten PointDrive presentations per month. If you haven’t used them all by the end of the month, you’ll lose those unused slots on the first of every month. To avoid that, simply set a reminder in your calendar toward the end of the month to save the unused PointDrive presentations. What I recommend you do is click the New Presentation button and then changing the title to “Placeholder.” This automatically saves the presentation and I can then change the title later when I run of of PointDrive slots.
Tracking customer interactions with PointDrive Insights
When leads click the unique PointDrive link you provide them, they’re taken to your presentation. On the back end, Sales Navigator collects valuable data about when leads view and interact with your presentation that it calls PointDrive Insights.PointDrive Insights give you the following information about the viewers of your presentations:
- The number of times a lead clicked your PointDrive link
- The amount of time the lead spent viewing the presentation
- The time of day the presentation was accessed
- The location where the lead viewed the presentation based on IP address
- Whether the person viewed the presentation on a computer or a mobile device
- The browser type used by the person to view the presentation
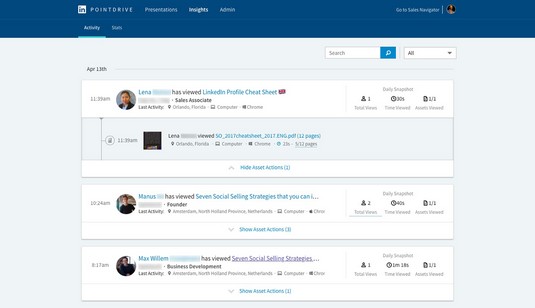 These leads viewed presentations.
If you click the Stats link that appears to the right of the Activity link (on the left side beneath the top menu bar), you’re taken to a screen similar to the one below. This Stats page gives you a quick look into your PointDrive usage by showing you the number of presentations you’ve created and which content received the most views.
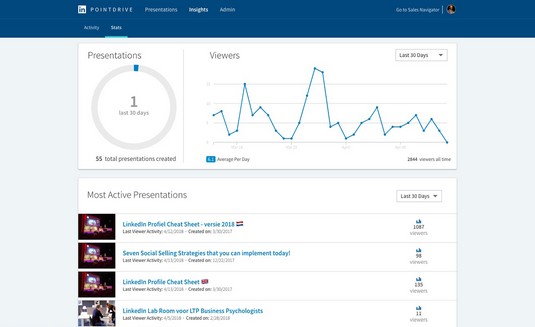 A quick snapshot of your PointDrive stats.
It’s important to keep abreast on what presentations are performing the best so you can continue to use that one and maybe review and revise ones that aren’t such high performers. Furthermore, taking a regular look at PointDrive Insights can give you a good idea into who has taken an interest in your product or service. If you see that certain leads watch it straight through multiple times, chances are good they like what they see!
Keep track of who views your presentations because you should follow up with them shortly afterward.
