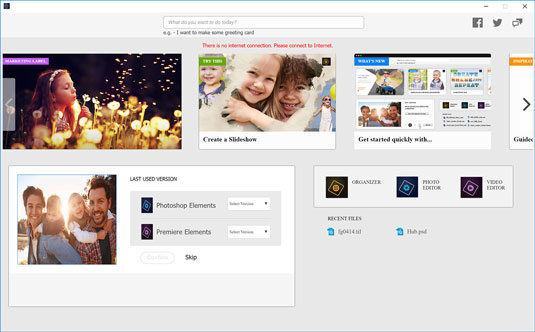
In this version of Photoshop Elements, Adobe introduces a completely new Home screen, or Hub as Adobe calls it. After installing Elements, launch the Elements application, and you arrive at the Home screen, shown here.
 The Photoshop Elements Home screen.
From the Home screen, you have the following options:
- Search: At the top of the window, you can search for a task and have help returned to you.
- What’s New: Click a thumbnail that shows a What’s New banner, and you can review the new features of the current release.
- Create a Slide Show: Click this option and you launch the Elements Organizer where you can select photos for a slideshow.
- Guided Edits: The thumbnails with the Try This banner is a quick launch to the Guided Edits in the Photo Editor.
- Right pointing chevron (>): Click the right chevron and many other options are available for sharing and making creations.
- Add More Photos/Videos: Click the button to add more photos to the Organizer.
- Application Launcher: Click one of the three icons to launch the Elements Photo Editor, the Organizer, or Adobe Premiere Elements (Premier Elements must be installed to launch this item.).
- Recent Files: Click an image in the Recent Files list and the file opens in the Photo Editor.
How to launch the Elements Photo Editor
Photoshop Elements has two separate components:- The Organizer is where you manage photos. It’s full of tools for tagging, rating, sorting, and finding your images.
- The Photo Editor is where you correct photos for brightness and color, add effects, repair images, and so on.
- Double-click the Photoshop Elements shortcut on your desktop or in your Applications folder (Mac) to launch the Home screen.
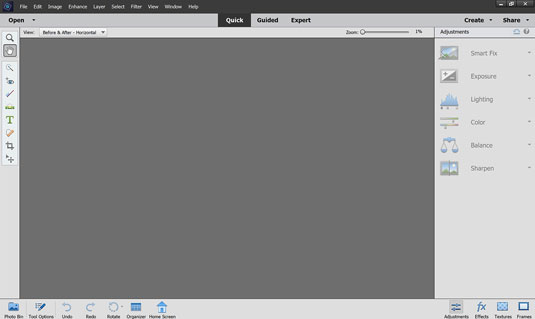
- Click the Photoshop Elements button shown in the Home screen. The Photo Editor workspace loads and appears, as shown here. By default, you see the Quick tab selected at the top of the Photo Editor workspace, which means you’re in Quick mode (or right where you want to be). Quick mode offers a limited number of tools for adjusting brightness, contrast, color, and sharpness.
 The default Photo Editor workspace with the Quick tab selected.
On the right side of the workspace, you see the Adjustments panel docked in an area dubbed the Panel Bin. When in any one of the three editing modes (Quick, Guided, Expert), you find different panels always on the right side of the window. On the left side of the workspace, you see a Tools panel. Interacting with the items in the Panel Bin and using tools in the Tools panel provides you an enormous number of options for editing, improving, and stylizing your pictures.
How to make basic edits in Elements' Quick Mode
For beginning users, the Quick mode in the Photo Editor is both powerful and easy to use. Follow these steps to make some simple changes to an image:- Open the Photo Editor and make sure the Quick tab is selected at the top.
- Choose File→ Open. If Elements is your default editing application, you can also double-click your photo file in Windows Explorer or the Mac Finder, and the file opens in Elements.
- In the Open dialog box that appears, navigate your hard drive to locate the file you want to open, select the file, and click Open.
- From the View drop-down list (in the upper left of the image window), choose Before & After – Horizontal, as shown.
 The before and after views in Quick mode.
 - Make edits to your photo. Here’s an introduction to two simple edits you can make in Quick mode:
- Apply a Smart Fix: Click Smart Fix in the Panel Bin to see the options. To begin with, click Auto at the bottom of the Smart Fix panel and select the After view to see whether you like the changes.Several items are listed in the Panel Bin below the Smart Fix option similar to options when you use the Crop tool, as shown . Click an item to expand it and move the sliders, or click the thumbnail images to tweak the overall brightness, contrast, and color. In many cases there isn’t a right or wrong adjustment. Play with the options to bring it close to your overall vision for the picture.
- Crop the photo: In the Tools panel on the left side of the window, click the Crop tool. You immediately see a rectangle on top of the photo. Move the sides to crop the image to your liking. When finished, click the green check mark, as shown, to accept your edit. elements-crop-tool The Crop tool sized on a photo.
When making any one of a huge number of edits to your pictures, you often see icons on top of the image similar to what’s shown. The green check mark accepts the edit you’re making at the time the icons appear. The circle with a diagonal line is the Cancel button. Click this button when you don’t want to apply the recent edit.
- Choose File→ Save As and, in the Save As dialog box that opens, provide a new name for the photo. Click Save. Note: When you use Save As and give your image a new name, you don’t destroy your original image. You save a copy of the original with the new edits applied.


