


One of the best things about recording with MIDI (the Musical Instrument Digital Interface) is that, aside from being able to change the sound at any point without any compromises to the performance, you have immense control over nearly all aspects of your musical performance.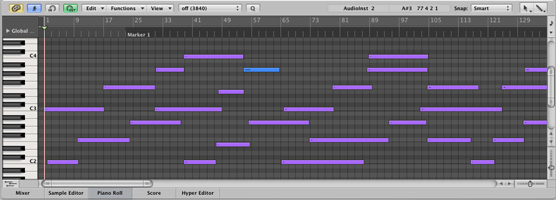 The piano-roll window lets you do a variety of editing functions.
 The Score menu shows you your MIDI data in musical score form and allows you to edit them.
 A program-change event appears in the track’s playlist in Program Change view.
In most newer sequencer programs, you have two main windows from which to do your editing. These are:
- Piano-roll graphic window: This is the most common way to edit MIDI performances. Look at the following figure. In this window, the horizontal bars in the center are the MIDI notes recorded on the track. Each of these notes can be lengthened, shortened, and moved. The top of this window contains navigation tools, editing options, and quantization values (the note value used to adjust the timing of a performance). Just select the note, and you can use any of these editing functions.
The piano-roll window lets you do a variety of editing functions.You can also view detailed note data including the note’s start time and length, pitch, velocity (volume—both on and off), and MIDI channel by double-clicking a note in the grid.
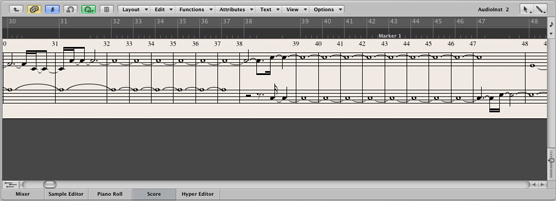
- Score window: If you read music, the score window may be your choice for editing. This window looks just like a piece of sheet music (as shown). Within this window, you can move notes around in much the same way as the piano-roll window. The only difference is that you can see the musical score as you edit your performance. Some sequencers allow you to print the score as well. This can be handy if you’re composing music that you want other people to play.
The Score menu shows you your MIDI data in musical score form and allows you to edit them.Selecting track material
You can select track material the same way you select material from audio tracks — well, okay, with a few variations. The following sections tell you about those variations.Selecting notes with the Pencil tool
You select notes with the Pencil tool by clicking the notes. (No big deal, right?) To select more than one note, press the Shift key while you click each note. Selected notes become highlighted.Using the Selector tool
When you use the Selector tool to select notes, certain conditions apply. They’re pretty straightforward:- Before a note can be included in a selection, its start point must be in the selection range.
- Notes with end points outside the selection range are still selected.
- When you select notes with the Selector tool, you also select (automatically) all the underlying automation and controller data pertaining to the notes.
Setting MIDI patches on tracks
You can change the default program (sound patch) in use with your MIDI tracks so your MIDI device automatically resets to the program you want for your track. Here’s how to make it happen in Pro Tools (other programs have similar steps):- Click the Program button in the Track Controls section of the Edit window. The Patch Select dialog box opens.
- Click the patch number or name that you want from the list in the main section of the dialog box. It becomes highlighted. Depending on your MIDI device, you might need to specify a bank along with the patch number. The bank number is entered in one of the Controller fields at the top of the dialog box. Check the specification for your device to see what to enter in this field.
- Click Done. The Patch Select dialog box closes, and the patch number/name is displayed on the Program button of the Track Controls section.
Adding MIDI events
You can add MIDI notes or controller data (collectively called MIDI events) to a MIDI or Instrument track by using the Pencil tool. (See the preceding section for more about the Pencil tools.) This section shows you how most programs perform this procedure.Inserting notes
To use the Pencil tool to insert a note, do the following:- Click and hold the Pencil icon and then choose the Pencil tool you want to use from the Pencil Tool drop-down menu that appears.
- Locate the place you want to add your MIDI note in the track’s playlist area.
- With the Pencil tool you select in Step 1, click in the playlist to insert a note with a duration equal to the grid value.
Drawing velocity or continuous controller data
To draw velocity or continuous controller data in a track’s playlist, do the following:- Click and hold the Pencil icon and then choose the Pencil tool you want to use from the menu that appears.
- Locate where you want to enter your MIDI data in the track’s playlist.
- With the Pencil tool you choose in Step 1, click and drag in the track’s playlist to sketch in the velocity or the controller level you want to draw.
- Release the mouse button when you reach the end point of your edit.
Inserting program changes
To insert MIDI program changes, do the following:- From the Track View drop-down menu, set the track to Program Change view.
- Click and hold the Pencil icon and then choose the Pencil tool you want to use from the menu that appears.
- Click in the track’s playlist where you want the change to occur. The Patch Select dialog box opens.
- Click the patch number or name in the main section of the dialog box to select it.
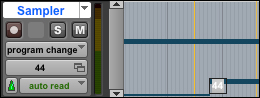
- Click Done. The program change is inserted, as shown.
A program-change event appears in the track’s playlist in Program Change view.Deleting MIDI notes
To delete a MIDI note, do the following:- Using the Selector tool, select the note in the playlist you want to delete.
- Press Delete/Backspace on your keyboard or choose Edit→Clear from the main menu.
In some programs, deleting the note also deletes all automation and controller data.

