


 Establishing field properties.
These properties determine what can and can’t be entered in the different fields of a database table. Some of the settings are invaluable. The Field Size property, for example, determines how many characters can be entered in a field. In a State field where two-letter state abbreviations are to be entered, make the Field Size property 2 to be certain that no one enters more than two characters. If the majority of people you’re tracking in an address database live in New York, enter NY in the Default Value property. That way, you spare data-entry clerks from having to enter NY the majority of the time. They won’t have to enter it because NY is already there.
The Lookup tab in the Field Properties part of the Design view window is for creating a data-entry drop-down list. It, too, is invaluable. If you happen to know that only four items can be entered in a field, create a drop-down list with the four items. That way, data-entry clerks can choose from a list of four valid items instead of having to enter the data themselves and perhaps enter it incorrectly.
A look at MS Access Field Properties settings
Especially if yours is a large database, you’re encouraged to study the field properties carefully and make liberal use of them. The Field Properties settings safeguard data from being entered incorrectly. Following is a description of the different properties (listed here in the order in which they appear in the Design view window) and instructions for using them wisely. Which properties you can assign to a field in Access depends on which data type the field was assigned.Field Size
In the Field Size box for Text fields, enter the maximum number of characters that can be entered in the field. Suppose that the field you’re dealing with is ZIP code, and you want to enter five-number ZIP codes. By entering 5 in the Field Size text box, only five characters can be entered in the field. A sleepy data-entry clerk couldn’t enter a six-character ZIP code by accident.For Number fields, select a value for the field size from the drop-down list. The table below describes these field sizes.
| Field Size | Description |
| Byte | An integer that holds values from 0–255. |
| Integer | An integer that holds values from –32,768– +32,767. |
| Long Integer | An integer that holds values from –2,147,483,648– +2,147,483,647. |
| Single | A floating point number that holds large values up to 7 significant digits. |
| Double | A floating point number that holds large values up to 15 significant digits. |
| Replication ID* | A globally unique identifier (GUID) required for replication; this number is generated randomly. |
| Decimal | A number with defined decimal precision. The default precision is 0, but you can set the scale up to 28. |
.accdb file format.
The Single, Double, and Decimal field size options hold different ranges of numbers. For now, if you need to store numbers after the decimal point, choose the Double field size so that you cover most situations.
Format
Click the drop-down list and choose the format in which text, numbers, and dates and times are displayed.Decimal Places
For a field that holds numbers, open the Decimal Places drop-down list and choose how many numbers can appear to the right of the decimal point. This property affects how numbers and currency values are displayed, not their real value. Numbers are rounded to the nearest decimal point. The Auto option displays the number of decimal places permitted by the format you chose on the Format drop-down list.Input Mask
For Text and Date field types, this feature provides a template with punctuation marks to make entering the data easier. Telephone numbers, social security numbers, and other numbers that typically are entered along with dashes and parentheses are ideal candidates for an input mask (another ridiculous database term!). On the datasheet, blank spaces appear where the numbers go, and the punctuation marks stand at the ready to receive numbers.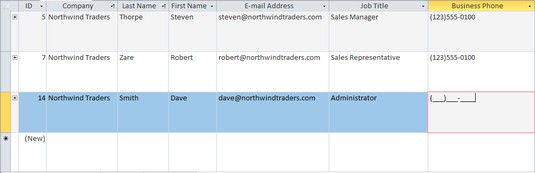 Input masks make data entry easier.
In the Input Mask text box, enter a 0 where numbers go and enter the punctuation marks where they go. For example, enter (000) 000-0000 or 000/000-0000 to enter an input mask for a telephone number. You can also create input masks by clicking the three dots beside the Input Mask text box. Doing so opens the Input Mask Wizard dialog box, where you can fashion a very sophisticated input mask.
Caption
If the field you're working on has a cryptic or hard-to-understand name, enter a more descriptive name in the Caption text box. The value in the Caption property appears as the column heading in Datasheet view, as a label on forms, and on reports in place of the field name. People entering data understand what to enter after reading the descriptive caption.Default Value
When you know that the majority of records require a certain value, number, or abbreviation, enter it in the Default Value text box. That way, you save yourself the trouble of entering the value, number, or abbreviation most of the time because the default value appears already in each record when you enter it. You can always override the default value by entering something different.Validation Rule
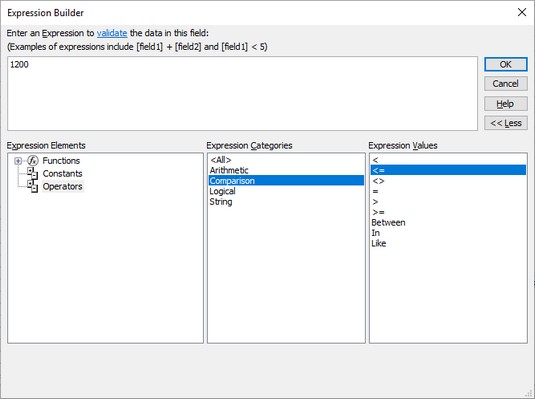
As long as you know your way around operators and Boolean expressions, you can establish a rule for entering data in a field. For example, you can enter an expression that requires dates to be entered in a certain time frame. Or you can require currency figures to be above or below a certain value. To establish a validation rule, enter an expression in the Validation Rule text box. To use dates in an expression, the dates must be enclosed by number signs (#). Here are some examples of validation rules:| >1000 | The value you enter must be over 1,000. |
| <1000 | The value you enter must be less than 1,000. |
| >=10 | The value you enter must be greater than or equal to ten. |
| <>0 | The value you enter cannot be zero. |
| >=#1/1/2019# | The date you enter must be January 1, 2019, or later. |
| >=#1/1/2019# And <#1/1/2020# | The date you enter must be in the year 2019. |
 Creating a validation rule.
Validation Text
If someone enters data that violates a validation rule that you enter in the Validation Rule text box, Access displays a standard error message. The message reads, “One or more values are prohibited by the validation rule set for [this field>. Enter a value that the expression for this field can accept.” If this message is too cold and impersonal for you, you can create a message of your own for the error message dialog box. Enter your friendly message in the Validation Text text box.Required
By default, no entry has to be made in a field, but if you choose Yes instead of No in the Required box and you fail to make an entry in the field, a message box tells you to be sure to make an entry.Allow Zero Length
This property allows you to enter zero-length strings in a field. A zero-length string — two quotation marks with no text or spaces between them (“”) — indicates that no value exists for a field. To see how zero-length strings work, suppose that your database table calls for entering email addresses. If you didn’t know whether one person has an email address, you would leave the E-Mail Address field blank. If, however, you knew that the person didn’t have an email address, you could indicate as much by entering a zero-length string. Choose Yes on the drop-down list to permit zero-length strings to be entered in the field.Indexed
This property indicates whether the field has been indexed. Indexes make sorting a field and searching through a field go faster. The word No appears in this text box if the field has not been indexed.Unicode Expression
Choose Yes from the Unicode Expression drop-down list if you want to compress data that is now stored in Unicode format. Storing data this way saves on disk space, and you probably don't want to change this property.Smart Tags
If you intend to enter Smart Tags in the field, indicate which kind you enter by clicking the three dots next to the Smart Tags box and choosing an option in the Action Tags dialog box.Text Align
This property determines how the text is aligned in a column or on a form or report. Select General to let Access determine the alignment, or select Left, Right, Center, or Distribute.Text Format
Available on Long Text fields, this drop-down list lets you choose to allow rich text in the field. With this property set to Rich Text, you can make different words bold, italic, underline, and change font sizes and colors. Set it to Plain Text for plain, boring text with no formatting.Append Only
Available on Long Text fields, this property lets you add data only to a Long Text field to collect a history of comments.Show Date Picker
This property is available on Date/Time fields. Choose For Dates to place a button next to the column that data-entry clerks can click to open a calendar and select a date instead of typing numbers.IME Mode/IME Sentence mode
These options are for converting characters and sentences from East Asian versions of Access.Creating a lookup data-entry list in MS Access
Perhaps the best way to make sure that data is entered correctly is to create a data-entry drop-down list. That way, anyone entering the data in your database table can do so by choosing an item from the list, not by typing it in. This method saves time and prevents invalid data from being entered. Access offers two ways to create the drop-down list:- Create the list by entering the items yourself: Go this route when you’re dealing with a finite list of items that never change.
- Get the items from another database table: Go this route to get items from a column in another database table. This way, you can choose from an ever-expanding list of items. When the number of items in the other database table changes, so does the number of items in the drop-down list because the items come from the other database table. This is a great way to get items from a primary key field in another table.
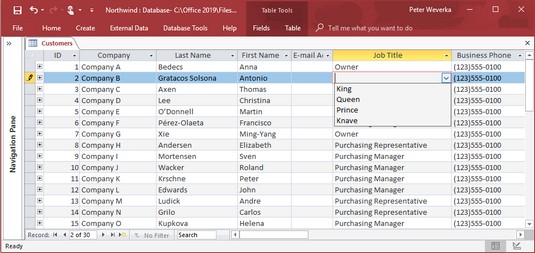 A so-called lookup list.
Creating a drop-down list on your own
Follow these steps to create a drop-down, or lookup, list with entries you type:- In Design view, click the field that needs a drop-down list.
- Open the Data Type drop-down list and choose Lookup Wizard, the last option in the list.The Lookup Wizard dialog box appears.
- Select the second option, I Will Type in the Values That I Want, and click the Next button.
- Under Col1 in the next dialog box, enter each item you want to appear in the drop-down list; then click the Next button.You can create a multicolumn list by entering a number in the Number of Columns text box and then entering items for the list.
- Enter a name for the field, if necessary, and click the Finish button.
Switch to Datasheet view and open the drop-down list in the field to make sure that it displays properly.
To see what’s on a drop-down list, select the field for which you created the list, switch to Design view, and select the Lookup tab in the Field Properties pane. You can edit the list by editing or removing items in the Row Source text box. Be sure that a semi-colon (;) appears between each item.
 Lookup field properties.
Getting list items from a database table
Before you can get list items from another database table, you might want to define a relationship between the tables; it’s not required, but it’s recommended. Follow these steps to get items in a drop-down list from another database table:- In Design view, click the field that needs a list, open the Data Type drop-down list, and choose Lookup Wizard.The Lookup Wizard dialog box appears.
- Select the first option, I Want the Lookup Field to Get the Values from Another Table or Query, and click Next.You see a list of tables in your database.
- Select the table with the data you need and click the Next button.The dialog box shows you a list of available fields in the table.
- Select the field where the data for your list is stored.
- Click the > button.The name of the list appears on the right side of the dialog box, under Selected Fields.
- Click the Next button.
Normally, lists are displayed in ascending order, but you can select a field and click the Ascending button to reverse the order of the list. (Note that the button turns into the Descending button.)
- Click the Finish button.If you’re so inclined, you can change the width of the list before clicking Finish, but you can always do that on the datasheet.
Suppose that you obtain the items from the wrong field or wrong database table. To fix that problem, select the field for which you created the list, and in Design view, select the Lookup tab. Choose Text Box instead of Combo Box on the Display Control drop-down list and start all over.


