One of the simplest, yet most useful, ways to collaborate with others is to ask them for information. For example, you might ask your customers for feedback about a product or service, or you might ask coworkers for feedback about an event you hosted. Want to know what people think about a topic? Send them a survey. Want to measure how much people know about a subject? Give them a quiz.
“Sounds great,” I hear you thinking, but it also sounds like a ton of work. It certainly would be if you have to build the necessary forms with the sweat of your own brow. Fortunately, you can build forms sweat-free with Google Forms. Whether you modify an existing template or construct a form from scratch, Forms makes it easier than you might think to publish professional-looking feedback forms, registration forms, evaluations, surveys, quizzes, and much more.
The Google Forms website
When you feel up to it, use either of the following techniques to get the Forms home page in sight:- Convince your web browser to take you to Google Forms.
- If you're in a G Suite app that has the Google Apps icon (such as Gmail or Calendar), click Google Apps and then click Forms.
The Forms home page
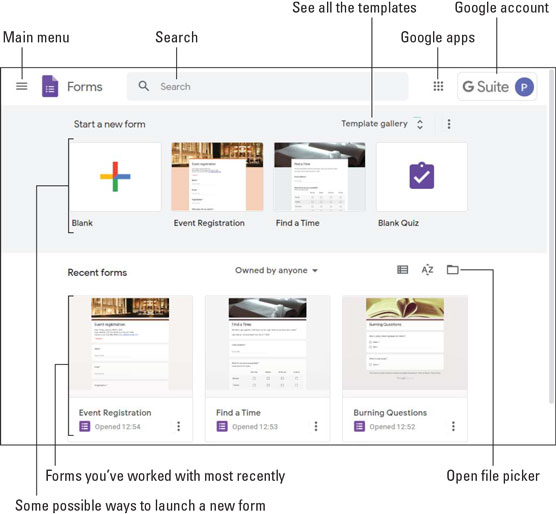
When you first get to Forms, you see the home page, which looks similar to the page shown here. The home page is your Forms jumping-off point.
Take a quick trip around the screen so that you know what's what here (the figure points out the features in the list that follows):
- Main menu: Click this icon to open the Main menu, which gives you access to other G Suite apps (such as Docs and Sheets), Settings, and Drive. To close the menu, click any empty space outside of the menu.
- Search: Search Forms for the item you want.
- Google apps: Display icons for all the Google apps.
- Google account: Gain access to your Google account.
- Start a new form: Display a few templates that you can use to start a new form. A template is a document that comes with predefined text, formatting, and (sometimes) images to get you off to a good start.
- Template gallery: Click here to see the complete list of Forms templates.
- Recent forms: These are the three forms you've worked on most recently.
- Open file picker: Click this icon to open a file from Drive or upload a file from your computer.
Create a new form
Once you land on the Forms home page, you'll want to create a new form. You have two ways to ask Forms to create a new document for you:- To open an empty form (that is, a form with no predefined text or formatting), click Blank.
- To open a form that has some ready-to-edit text and formatting, either select one of the template tiles shown in the Start a New Form section or click the Template Gallery button and then choose a template from the long list of possibilities that Forms displays.
The Untitled Form screen
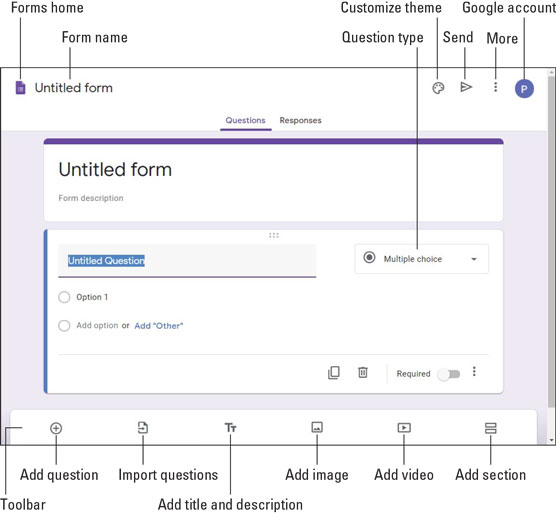
When you create a form from scratch, you end up at the Untitled Form screen, shown in the following figure, which includes the following features:- Document area: Where you add, edit, and format your document text.
- Forms home: Takes you back to the Forms home page.
- Form name: The name you've given the form. When you start a new form, the area says Untitled form.
- Customize theme: Enables you to modify the overall look of the form.
- Send: Ships out the form when you're done.
- More: Displays a menu of commands.
- Google account: Gives you access to your Google account.
- Toolbar: Offers quick access to some useful form features.
 A new form and the features that surround it.
Fabricate a form
With your new form waiting for your input, here are the general steps to go through to build a working form:- Enter a title for the form.
- Enter a description for the form.
- Replace the Untitled Question text with the question you want to ask.
- Use the Question Type list (refer to the preceding figure) to select the format of the question.
There are ten question formats in all, including Multiple Choice (respondents choose one out of a group of possible answers), Checkboxes (toggle answers on and off), Drop-down (choose an answer from a list), Short Answer, and Paragraph (a longer answer).
The response controls you see depend on the question format. (For example, Multiple Choice uses radio buttons.)
If you want to reuse questions you added to a previous form, don't enter them from scratch. Instead, click Import Questions, select the form that contains the questions, and then click Select.
- Enter the text for the first answer option, if required by the question format.
- Add more options, as needed for the question.
- Click the Add Question icon.
For longer forms, or forms that cover multiple subjects, it often helps to break up the form into multiple sections. To add a section to your form, click the Add Section icon.
- Repeat Steps 3–6 for the new question.
- Repeat Steps 7 and 8 until your form is complete.
- Give your new form a trial run by clicking the More icon and choosing Preview from the menu that appears.
Construct a quiz
If you want your form to be a quiz, you need to make a couple of adjustments:- Click the More icon, and then choose Settings from the menu that appears so that you can open the Settings dialog box. Select the Quizzes tab and then click the Make This a Quiz toggle. By default, Forms shows the user their score immediately after they submit the quiz. If you prefer to review the quiz first, click the Later, After Manual Review option. Click Save to convert your form to a quiz.
If you're starting your quiz from scratch, the easiest way to go is to select the Blank Quiz template in the Template Gallery.
- For each question, you now see an Answer Key link. Click Answer Key, set the number of points you want to assign to the question, choose which option is (or options are) the correct answer, and then click Done.
How to add form collaborators
Why build a form yourself when you can cajole other people in (and out) of your organization to chip in and help? I can't think of a reason! To bring one or more collaborators on board, click the More icon and then choose Add Collaborators from the menu that appears. In the Sharing Settings dialog box that drops by, you have two ways to entice people to work on your form:- Share a link: Under Who Has Access, click Change to open the Link Sharing dialog box, select who you want to share the form with, and then click Save. Copy the address that appears in the Link to Share box, and then paste the address in an email, a text, a web page, or wherever.
- Invite people via email: Use the Invite People text box to enter the names or email addresses of the people you want to invite to collaborate. If you want to include a custom message in your email, click Add Message and then enter your message in the text box. Click Send to fire off the invitations.
Send your form
When your form (or quiz) is complete and you've previewed it successfully, it's time to make the form available to its respondents. You have three ways to make a form available: email, link, and web page.Actually, there's a fourth way to share your form: via social media. As pointed out in the following figure (see the following section), you can click either the Facebook icon or the Twitter icon to share a link to your form on those sites.
Emailing a form
If you want only select people in your organization to fill out the form, send the form via email by following these steps:- Click Send.
- In the Send Via section, click the Email icon.
 In the Send Form dialog box, use the Email interface to share your form via email.
 - Use the To field to select each person in your organization that you want to fill out the form.
- Edit the Subject line, if needed.
- Edit the Message field, if you want to.
- Click Send. Forms ships out the email, which includes a Fill Out Form button that users click to go to the form.
Sharing a link to a form
If you want to share your form not only via email but also via text, chat, or any other text medium, you need to get a link to the form and send the link to your peeps. Here's how it's done:- Click Send.
- In the Send Via section, click the Link icon. The Send Form dialog box shows the link to the form.
Form addresses tend to be quite long. If you prefer to send a shorter version of the address, click the Shorten URL check box.
- Click Copy. Forms copies the form address to your computer's Clipboard.
- Paste the link into whatever media you want to use to share the form.
- Click Close (X).
Embedding the form in a web page
If you want to make your form available to anyone who has access to a particular web page and you know how (or know someone who knows how) to add HTML to the page, follow these steps to embed the form's HTML code in the page:- Click Send.
- In the Send Via section, click the Embed HTML icon. The Send Form dialog box shows the HTML code for the form.
- Use the Width and Height text box to specify the dimensions of the frame that holds the form.
- Click the Copy button. Forms copies the form HTML to your computer's Clipboard.
- Paste the HTML into your web page code.
- Click Close (X).


