


In this list, you investigate ten ways to enhance the security and privacy of your Google account and your G Suite apps. Yep, it takes a bit of time to implement these measures, but the time you spend will prove to be an excellent investment.
Ensure your Wi-Fi network is locked up tight
The first step in securing G Suite actually doesn't have anything to do with G Suite directly. Instead, this step is all about securing the network that you use to access the Internet (and, hence, G Suite): your Wi-Fi network. If you access your G Suite stuff only through a big-time corporate network, then of course you can merrily skip over this section, because the nerds over in IT have it covered. However, if you, like most people, do some (or a lot of) G Suite work at home, you need to take action to batten down your Wi-Fi hatches.A secure Wi-Fi network is necessary because of a practice called wardriving, where a dark-side-of-the-Force hacker drives through various neighborhoods with a portable computer or another device set up to look for available wireless networks. If the miscreant finds an unsecured network, they use it for free Internet access (such a person is called a piggybacker) or to cause mischief with shared network resources. That can mean accessing G Suite applications that are running on a network computer.
The problem is that wireless networks are inherently vulnerable because the wireless connection that enables you to access your G Suite apps from the kitchen or the living room can also enable an intruder from outside your home to access the network. Fortunately, you can secure your wireless network against these threats with a few tweaks and techniques, as spelled out in the following list.
Most of what follows here requires access to your Wi-Fi router’s administration or setup pages. See your router’s documentation to learn how to perform these tasks.
- Change the router’s administrator password. By far the most important configuration chore for any new Wi-Fi router is to change the default password (and username, if your router requires one). Note that I’m talking here about the administrative password, which is the password you use to log on to the router’s setup pages. This password has nothing to do with the password you use to log on to your Internet service provider (ISP) or to your wireless network. Changing the default administrative password is crucial because it’s fairly easy for a nearby malicious hacker to access your router’s login page and because all new routers use common (and, therefore, well-known) default passwords (such as “password”) and usernames (such as “admin”).
- Change the Wi-Fi network password. Make sure your Wi-Fi network is protected by a robust, hard-to-guess password to avoid unauthorized access.
- Beef up your Wi-Fi router’s encryption. To ensure that no nearby mischief-maker can intercept your network data (using a tool called a packet sniffer), you need to encrypt your wireless network. Some older routers either have no encryption turned on or use an outdated (read: not secure) encryption called Wired Equivalent Privacy (WEP). The current gold standard for encryption is Wi-Fi Protected Access II (WPA2), so make sure your router uses this security type.
- Check your network name for identifying info. Make sure the name of your Wi-Fi network — known as its service set identifier (SSID) — doesn’t include any text that identifies you (for example, Joe Flaherty’s Network) or your location (123 Primrose Lane Wi-Fi).
- Update your router’s firmware. The internal program that runs the Wi-Fi router is called its Reputable router manufacturers release regular firmware updates to not only fix problems and provide new features but also plug security holes. Therefore, it’s crucial to always keep your router’s firmware up-to-date.
Secure your Google account with a strong password
Your experience with Gmail, Calendar, Drive, and all the other G Suite apps is only as secure as your Google account. Therefore, it’s vital to ensure that your account is locked down. Fortunately, that requires just two things: giving your account a strong password (as I describe in this section) and turning on Google's 2-step verification feature (which I discuss in the next section).Your Google account’s first line of defense is a strong password. After you have a bulletproof password figured out, follow these steps to change your existing Google password:
- Access your Google account settings. Either of these methods is sure to work for you:
- Sign in to any G Suite app, click the Google Account button in the top right corner, and then click Manage Your Google Account.
- Surf directly to myaccount.google.com and sign in to your account.
- Click Security.
- In the Signing In to Google section, click Password. Google, ever cautious, asks you to sign in again.
- Enter your password and click Next. Google displays the Password page, shown.
- Type your new, strong password in the New Password text box. Before proceeding, make sure the Password Strength indicator reads strong, as shown.
 Use the Password page to modify your Google account password.
 - Reenter the same password in the Confirm New Password text box.
- Click the Change Password button. Google applies the new password to your account.
Enable Google’s 2-Step Verification
A password made of steel is a necessary security feature, but, sadly, it’s not a sufficient security feature. Malicious users may still worm their way into your account with guile or brute force, so you need a second line of defense. That line is a feature that Google calls 2-step verification (which is a more comprehensible name than what the rest of the Internet most often uses for the same feature: two-factor authentication). The 2-step part means that getting access to your Google account requires two separate actions:- Sign in using your Google account credentials.
- Verify that you’re authorized to access the account by entering a verification code that Google sends to you.
Here are the steps to follow to enable 2-step verification and tell Google how you want to receive your verification codes:
- Access your Google account settings. Either of these methods works fine:
- Sign in to any G Suite app, click the Google Account button in the top right corner, and then click Manage Your Google Account.
- Surf directly to Google's My Account page and sign in to your account.
- Click the Security tab.
- In the Signing In to Google section, click 2-Step Verification. Google displays an overview of the 2-step verification process.
- 4. Click the Get Started button. Google prudently asks you to sign in again.
- Enter your password and click Next. Google displays the Let's Set Up Your Phone page, shown.
 Use this page to specify how you want to receive your 2-step verification codes.
 - Enter your phone number.
- Click the Text Message radio button. If, for some reason, you don't want to (or can't) receive your verification code via text, click the Phone Call radio button instead.
- Click Next. Google sends you a verification code via text message (or phone call, if you went that route).
- Use the Enter the Code text box to type the code you received, and then click Next. If the code you get looks like G-123456, just enter the numbers into the text box. Google asks if you want to turn on 2-step verification.
- Click Turn On. The 2-step verification feature is now active on your Google account.
Set Up Your Contact Verification Methods
There’s an old saying in the security industry: "When everyone is out to get you, being paranoid is just good thinking." Okay, well not everyone is out to get you (unless there's something you haven't told me), but there are enough malefactors and miscreants out there who are out to get you that "being paranoid" is just a synonym for "having common sense."So, in that vein, your next bulletproofing chore for your Google account is to set up some methods for Google to contact you either to verify that it's really and truly trying to sign in to your account or to notify you when it thinks it has spotted suspicious activity on your account. (Yes, this is the paranoid part.)
Follow these steps to configure your account with a phone number and an email address that Google can use to verify you:
- Access your Google account settings. Which of the following methods you use is up to you:
- Sign in to any G Suite app, click the Google Account button in the top right corner, and then click Manage Your Google Account.
- Surf directly to Google's My Account page and sign in to your account.
- Click Security.
- In the section named Ways That We Can Verify That It's You, click Recovery Phone. Google tirelessly asks you to sign in again.
- Enter your password and click Next. Google displays the Recovery Phone page.
- Click the Add Recovery Phone button. The Add Phone Number dialog box appears.
- Type your phone number and then click Next. Google lets you know that it will send a verification code to your phone.
- Click the Get Code button. Google sends you a verification code via text message.
- Use the Enter the Code text box to type the code you received, and then click Next. If the code you get looks like G-987654, just enter the numbers into the text box.
- Click the Verify button. Google adds the recovery phone number to your account.
- Click Back (the left-pointing arrow) to return to the Security page.
- In the section named Ways That We Can Verify That It's You, click Recovery Email. Google yet again asks you to sign in.
- Enter your password and click Next. Google displays the Recovery Email page.
- Click Edit (the Pencil icon).
- Enter the email address you want to use for verification purposes, and then click Done. Be sure to use an address other than your G Suite address (such as a personal email address). Google adds the recovery email to your account.
Hide Images in Gmail Messages
You can make your G Suite email address more private and secure by thwarting the external images that have been inserted into some of the email messages you receive. An external image is a picture file that resides on an Internet server computer instead of being embedded in the email message. A special code in the message tells the server to display the image when you open the message. This is usually benign, but the same code can also alert the sender of the message that your email address is working. If the sender is a spammer, this usually results in your receiving even more junk email. You can prevent this by disabling external images.Here are the steps to follow to configure Gmail not to display external images in the messages you receive:
- Choose Settings→Settings. Gmail opens the Settings page, with the General tab displayed.
- For the Images setting, click the Ask Before Displaying External Images radio button, as shown. To revert to always showing external images, click the Always Display External Images radio button instead.
 Click the Ask Before Displaying External Images radio button to hide server images in the emails you receive.
 - Click the Save Changes button at the bottom of the Settings page. Gmail asks you to confirm.
- Click Continue.
- If the message is clearly (or even possibly) spam, leave the images hidden and thank yourself for being proactive about your security.
- If you're sure the message is safe, click Display Images Below to unhide the images.
- If you know the sender and trust them completely, click the Always Display Images from Address link, where Address is the address of the person or entity who sent the message. This tells Gmail to always display images in messages sent from this address.
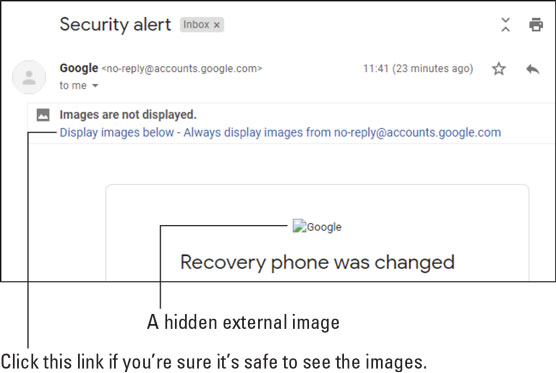 With external images hidden, you see this notification in any message that comes your way with external images.
Blocking Senders in Gmail
If you’ve tried out any of the G Suite collaboration features that I go on and on about in Part 3, here's hoping you've discovered that your peers and colleagues are a welcoming, supportive bunch. You might already have made quite a few new friends. However, within any group of people, no matter how amiable and helpful that group might be overall, there are always one or two bad seeds. It might be Boring Bill, who goes on and on about nothing, or Insufferable Sue, who boasts about even the most minor accomplishment. Or, it might be something more serious, such as someone who sends you vaguely (or even overtly) creepy or menacing messages.Whatever the reason, life's too short to deal with such nuisances, so you should follow these steps in Gmail to block that person from sending you more messages:
- In Gmail, display a message from the person you want to block.
- Click More (the three vertical dots to the right of the Reply icon).
- Click Block "Name," where Name is the name of the social pariah you want to shun. Gmail asks you to confirm the block. g-suite-block-command Use the Block command to prevent some misfit from sending you messages.
- Click Block. Gmail adds the person's address to the Blocked Senders list. Future messages from that person will go automatically to Gmail's Spam label.
If you have a change of heart (or the person promises to mend their ways), you can unblock the person by clicking the Settings menu, choosing the Settings command, selecting the Filters and Blocked Addresses tab, and then clicking the Unblock link beside the sender you want to put back into your good books. When Gmail asks if you're sure about this, click Unblock.
Choose Who Can See Your Personal Info
Your Google account contains quite a bit of sensitive data, including personal data such as your birthday and gender. Normally, combining sensitive data with the Internet is a privacy nightmare come true, but, fortunately, Google comes with a decent set of tools that enable you to choose what you share and with whom.For privacy purposes, Google divides your world into three sharing categories:
- Only You: The data can be seen by only you.
- Your Organization: The data can be seen by only you and by each person in your G Suite organization.
- Anyone: The data can be seen by everyone who cares to look.
- Access your Google account settings. Pick your poison:
- Sign in to any G Suite app, click the Google Account button in the top right corner, and then click Manage Your Google Account.
- Surf directly to Google's My Account page and sign in to your account.
- Click Personal Info.
- In the Choose What Others See section, click Go to About Me. Google opens the About Me page.
 Use the About Me page to specify who can see your info.
 - Click an item in your personal info.
- Click who can see the info: Only You, Your Organization, or Anyone. Note that these options aren’t available for all your personal info.
- Click Back (the left-pointing arrow).
- Repeat Steps 4–6 for the rest of your personal info.
Manage Your Activity Controls
Google keep tracks of various activities while you're online, including where you go on the web, which G Suite apps you use, where you're located in the real world while you're online, and what you watch on YouTube. Google says this is for "better personalization across Google," whatever that really means.If you're not comfortable with Google tracking some or all of these activities, you can use your account's activity controls to decide what, if anything, Google saves about you. Here's what to do:
- Access your Google account settings. Choose whichever option seems appealing at the moment:
- Sign in to any G Suite app, click the Google Account button in the top right corner, and then click Manage Your Google Account.
- Surf directly to Google's My Account page and sign in to your account.
- Click Data & Personalization. The Activity Controls section shows a summary of what Google is tracking about you.
 The Activity Controls section shows you what Google monitors about you.
 - If you don't want Google to monitor your web and G Suite app shenanigans, click Web & App Activity and then click to toggle the Web & App Activity switch to Off. Google asks if you're sure about this.
- Click Pause. Google asks if you're really, really sure about this.
- Say "Grrr" and click Pause.
- Click Back (the left-pointing arrow).
- Repeat Steps 3–6 for the Location History and YouTube History activities.
Manage Your Devices
Even with your Google account locked down behind a strong password, a nefarious user might still gain access to the account. The most common way that someone can gain access is if you use the same login credentials on another website and that site is hacked and its users’ login data stolen. That data is then usually sold or posted online, and before long some stranger logs in to your formerly secure Google account.If you want to check whether your Google login credentials have been compromised, go to the Have I Been Pwned? site and then enter your Google login email address. (Pwned — it’s pronounced “owned” — is hacker-speak for having been defeated or controlled by someone else.)
You certainly don’t want any unauthorized reprobate to access your account, so you should do three things:- Use a unique password for your Google account.
- Activate 2-step verification, as I describe earlier in this chapter.
- Periodically check your account to see whether a device you don’t recognize has logged in to the account.
- Access your Google account settings. You can do it either way:
- Sign in to any G Suite app, click the Google Account button in the top right corner, and then click Manage Your Google Account. or
- Surf directly to Google's My Account page and sign in to your account.
- Click Security.
- In the Your Devices section, click Manage Devices. Google offers up the Where You're Signed In page, an example of which is shown.
 The Where You're Signed In page shows all devices that are currently signed in to your Google account.
 - If you don't recognize a device, click its More icon (the three vertical dots) and then click the Don't Recognize This Device? command. Google opens the Let's Secure Your Account dialog box, which sensibly tells you to change your password.
- Click Change Password and then follow the prompts to configure your account with a new password.
Manage Third-Party Apps
It's fairly common to give non-Google apps and services access to G Suite apps such as Docs, Sheets, and Drive. That access is often convenient, but if you stop using a particular third-party app, or if you change your mind about offering that access, you should revoke the app's access to your Google account for security purposes. Here's how:- Access your Google account settings. Go with one of these methods:
- Sign in to any G Suite app, click the Google Account button in the top right corner, and then click Manage Your Google Account. or
- Surf directly to Google's My Account page and sign in to your account.
- Click the Security tab.
- In the Third-Party Apps with Account Access section, click Manage Third-Party Access. Google offers up the Apps with Access to Your Account page.
- In the Third-Party Apps with Account Access section, click the app that has the access you want to revoke. Google displays the access you've given the app.
 Click an app to see what access it has.
 - Click Remove Access. Google asks if you're sure about this.
- Click OK. Google revokes the app's access to your account.


