


You can use the Keep app, one of G Suite's set of collaboration tools, to create simple text documents for things such as to-do lists and meeting notes. A word processing app such as Docs is useful for creating complex and lengthy documents. However, this powerful tool feels like overkill when all you want to do is jot down a few notes. For these simpler text tasks, the Keep app that comes with G Suite is perfect because it offers a simple interface that keeps all your notes together.
 The Keep home page.
The Keep home page
Are you ready to see what Keep can do? That's the spirit. Accompanied by an optional fist pump, use either of these techniques to land safely on the Keep home page:- Go to the Keep app.
- If you're in a G Suite app that has the Google Apps icon (such as Forms or Groups), click Google Apps and then click Keep.
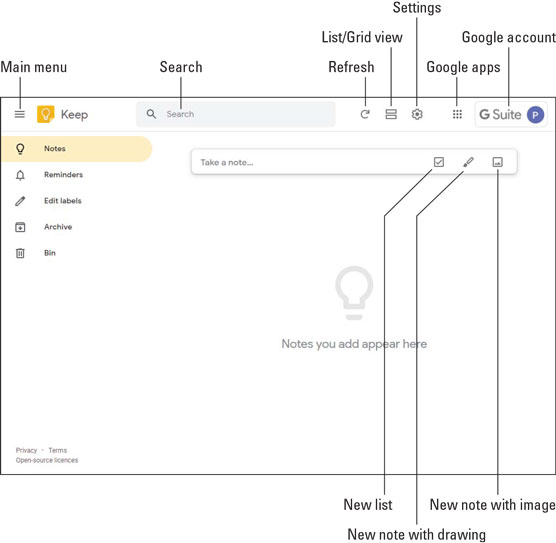
The Keep home page.Let's take a quick trip around the screen so that you know what's what here (refer to the figure, which points out the features in the list that follows):
- Main menu: Click this icon to toggle Keep's Main menu between icons only and icons with titles.
- Search: Search Keep for the note you want.
- Refresh: Ask Keep to check for new or changed notes.
- List/Grid view: Toggle the notes display between a list and a grid.
- Settings: Display a menu of Keep settings.
- Google apps: Display icons for all Google apps.
- Google account: Gain access to your Google account.
Create a new note
As shown, the Keep home page includes a box with the textTake a note that's awfully tempting. When you can't take it any longer, follow these steps to create a note:
- Click inside the Take a Note text box. Keep opens the new note for editing, as shown here.
 An empty note, yearning to be filled.
 - Use the Title text box to enter a title for your note.
- Use the Take a Note text box to enter your note text. If all you want to do is create a basic note, you're pretty much done, so feel free to skip way down to step 10.
- If you want to be reminded about your note, click Remind Me and then select the time you want to be reminded.
- To set the background color of the note, click the Change Color icon and then choose the color you prefer from the palette that appears.
- To insert an image into the note, click Add Image, select the image file in the Open dialog box that appears, and then click Open.
- To add a label to your note, click the More icon, choose Add Label from the menu that appears, enter your label name, and then press Enter.
- To add a drawing to your note, click the More icon, choose Add Drawing from the menu that appears, create your drawing in the window that appears, and then click Back (the left-pointing arrow).
- To add check boxes to the note, click the More icon and choose Show Tick Boxes from the menu that appears.
- When you're done, click Close. Keep saves your note.
If a note contains information you want to refer to often, or if you know you need to add info to a note frequently, you can keep the note handy by clicking the Pin Note icon. Keep creates a new Pinned section at the top of the window and adds the note to that section.
If you want to create a note that includes elements other than plain text, Keep gives you three slightly quicker methods to get the note off the ground:- To start a new note that has a list of check boxes, click the New List icon.
- To start a new note that has a drawing, click the New Note with Drawing icon.
- To start a new note that has an image, click the New Note with Image icon.
How to add note collaborators
Notes are such simple affairs that the idea of collaborating on a note might seem odd. However, consider these ideas:- If you have no artistic skill whatsoever, but a colleague does, it would make sense to ask that colleague to add a drawing to a note.
- If a colleague has an image you need for a note, the easiest way to use that image would be to add that colleague as a collaborator.
- If you and some members of your team are brainstorming a topic, you can all record your ideas in a shared note.
- Select the note you want to share.
- Click the Collaborator icon. Keep opens the Collaborators dialog box.
- Enter the name or email address of a person in your organization you want to collaborate on the note.
- Click the Add Collaborator icon (the check mark).
- Repeat Steps 3 and 4 until you've specified all the collaborators you want to work on your note.
- Click Save. Keep shares the note with the people you specified. For people in your organization or people with a Google account, the note appears automatically in the person's Keep window.
If someone shares a note with you but you don't want to contribute to the note, you can take yourself off the list of collaborators. Select the note, click the More icon, choose Remove Myself from the menu that appears, and then, when Keep asks you to confirm, click Delete.


