


Yep, sure, lots of the settings should be labeled For Nerds Only. However, there's a veritable treasure trove of settings available that are actually useful in the real world and can help you be more productive, more efficient, healthier, wealthier, and wiser. (Well, maybe not those last three; but you never know!)
Take a tour of ten eminently useful and practical Gmail settings related to the two main Gmail tasks: sending messages and reading messages. Prepare to be amazed!
5 splendiferous Send settings
Sending email seems like such a simple thing: You click Compose, insert an address or three, conjure up a snappy Subject line, write the message itself, and then click Send. What more could there be to say about such a straightforward procedure?Well, quite a bit, as it turns out. Gmail actually comes with quite a few settings that can make sending stuff even more useful. This section takes you through a half dozen (minus one) settings and features that you'll want to add to your sending toolkit.
Sending a message as plain text
You can use one of two message modes when you send an email:- Rich text: This mode enables you to dress up your message text with fonts, colors, and styles such as bold and italics. This is Gmail's default format, and almost all messages these days use this format.
- Plain text: This mode doesn't offer any formatting for your text: no fonts, no type sizes, no italics.
- Create, address, and compose your email.
- Click More Options. More Options is the three vertical dots near the bottom right corner of the New Message window. (It's pointed out in the figure.)
- From the menu that appears, click to select Plain Text Mode. Gmail adds a check mark to the left of the command, as shown. Gmail also removes all formatting from your message text.
When you choose the Plain Text Mode command, Gmail strips out all your existing text formatting and throws it away. You might think that turning off plain-text mode would restore your previous formatting, but no, that's not happening. Therefore, if you have an elaborately formatted message, think twice before turning on the Plain Text Mode command.
- Click Send. Gmail sends your plain-text message.
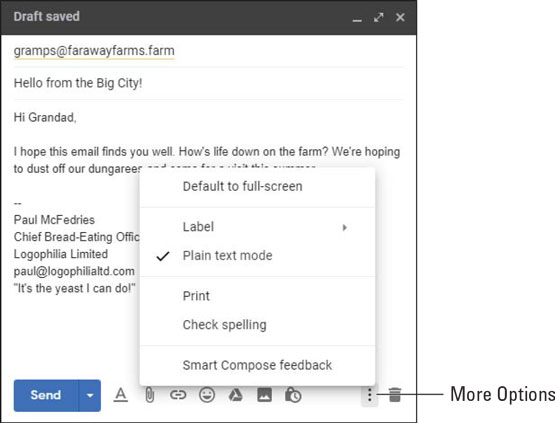 To send your message with no text formatting, choose the Plain Text Mode option.
Setting the default reply behavior
As you learn a bit later in this chapter, when you open a message, Gmail offers a Reply button that you click to send a response to the person who sent the message. If the message was sent to two or more people and you want to send your response to everyone, you have to click the More button and then click Reply All.Lots of people find that they use Reply All more often than Reply, so that extra click of the More button becomes a bit of a bother. Fortunately, you can ask Gmail to switch things around and make Reply All the default button and make Reply the button you access by first clicking More. Here's how:
- Choose Settings→Settings. Gmail opens the Settings page, with the General tab displayed.
- For the Default Reply Behavior setting, click the Reply All radio button, as shown. To revert to having Reply as the default, click the Reply radio button instead.
- Click the Save Changes button at the bottom of the Settings page.
 Click the Reply All radio button to make this command Gmail's default reply behavior.
Replying and archiving in one fell swoop
Archiving a message—moving the message to Gmail's All Mail folder—is a 2-step affair:- Click Reply to send a response to the sender of the message.
- Click Archive to move the received message to the All Mail folder.
- Choose Settings→Settings. Gmail opens the Settings page, with the General tab displayed.
- For the Send and Archive setting, click the Show "Send & Archive" Button in Reply radio button. To revert to the default behavior, click the Hide "Send & Archive" Button in Reply radio button instead.
- Click the Save Changes button at the bottom of the Settings page.
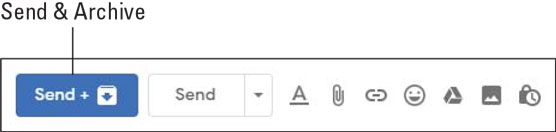 Click the Send & Archive button to automatically archive the original message.
Setting the default text style
Earlier in this chapter, I talk about how you can format your message text with a different font, text size, color, and other attributes. If you find that you're continually making the same text formatting adjustments, you can save some wear-and-tear on your fingers by setting those adjustments in the Gmail equivalent of stone. Gmail offers a Default Text Style setting that includes the font, type size, and text color. Here are the steps to follow to change this setting to something that suits your typographical style:- Choose Settings→Settings. Gmail opens the Settings page, with the General tab displayed.
- For the Default Text Style setting, use the Font, Size, and Text Color controls to format the text as preferred. Under these controls, the text This is what your body text will look like shows the result of your labor. If you make a mess of it, you can start from scratch by clicking the Remove Formatting icon (pointed out in the figure).
- Click the Save Changes button at the bottom of the Settings page.
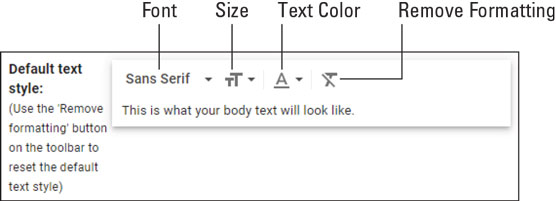 Use the Default Text Style controls to customize your email text.
Preventing Gmail from creating contacts automatically
One of Gmail's default settings is that when you send a new message to — or reply to a message from — someone not in your Contacts app, Gmail automatically adds that person's email address to the Other Contacts section of the Contacts app.Why would Gmail do this? Because, that way, the next time you start to enter that person's email address in the To, CC, or BCC field, Gmail displays the address so that you can select it rather than type the whole thing. This is called auto-completing the address.
That's a laudable reason, for sure, but it does mean that you'll end up with tons of potentially useless addresses in the Contacts app. Sure, those addresses are tucked away in the Other Contacts section, but if you really don't want all those addresses accumulating, you can turn off address auto-completing by following these steps:
- Choose Settings→Settings. Gmail opens the Settings page, with the General tab displayed.
- Scroll down to the Create Contacts for Auto-Complete setting and then click the I'll Add Contacts Myself radio button, as shown.
- Click the Save Changes button at the bottom of the Settings page.
 Click the I'll Add Contacts Myself radio button.
5 stupendous Read settings
Reading messages in Gmail seems like another just-this-side-of-trivial task. After all, to read a message, you click it and then peruse the text, in either the message window or the reading pane. Done and done, right? Not so fast. Gmail has lots of settings you can use to customize the reading experience to suit your style. The rest of this chapter takes you through five of the most useful.Turning off Conversation view
By default, Gmail organizes messages by conversation, which refers to an original message and all of its replies, replies to replies, and so on. That's a sensible setup because it makes it easy to see the trend of the conversation and locate a particular reply. Conversations also keep your inbox neat, because the entire conversation resides within a single "message" in the inbox.Still, many people don't like organizing messages by conversations because all the messages are "hidden" within the original message. These people prefer to see all their messages out in the open.
If you fall into this camp, you can follow these steps to turn off Gmail's default Conversation view:
- Choose Settings→Settings. Gmail opens the Settings page, with the General tab displayed.
- Scroll down to the Conversation View setting and then click the Conversation View Off radio button, as shown.
- Click the Save Changes button at the bottom of the Settings page.
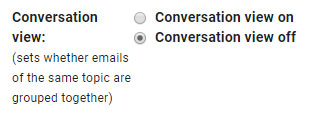 Click the Conversation View Off radio button.
Adding importance markers
Gmail monitors how you use the app and the messages you receive as a way of figuring out which messages are important and which aren't. If Gmail's analysis tells it that a message is important, Gmail automatically adds the Important label to the message, which means that you can view the message outside of the noise of your inbox by selecting the Important label on the main menu.That's mighty handy, but there's a fly in this soup: The only way to know whether Gmail has declared a message to be important is to view the contents of the Important label. That is, Gmail offers no indication in the inbox about which messages are important and which aren't.
If that seems just plain wrong to you, here's how to fix it:
- Choose Settings→Settings. Gmail opens the Settings page, with the General tab displayed.
- Click the Inbox tab.
- For the Importance Markers settings, click the Show Markers radio button, as shown.
If you think it's creepy that Gmail is analyzing your messages for importance, I hear you. Fortunately, you can turn off this snooping behavior. On the Inbox tab, click the Don't Use My Past Actions to Predict Which Message Are Important radio button, and then click Save Changes.
- Click the Save Changes button at the bottom of the page.
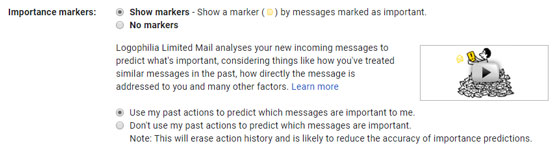 Click the Show Markers radio button.
Setting the maximum page size
Gmail's labels can end up with a ton of messages in them. Gmail handles long message lists by dividing the list into separate pages, with up to 50 messages (or conversations, if you're still using Conversation view) per page. Depending on how you work, 50 will seem like either a ridiculously large number or a ludicrously small number.Either way, the number isn't set in stone and you can follow these steps to set a different maximum page size:
- Choose Settings→Settings. Gmail opens the Settings page with the General tab displayed.
- For the Maximum Page Size setting, use the Show X Conversations Per Page drop-down list to select how many messages (or conversations) you want per page, as shown.
- Click the Save Changes button at the bottom of the Settings page.
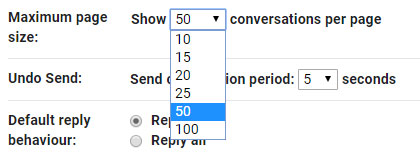 Use the Show X Conversations Per Page drop-down list to select the maximum page size.
Managing notifications
By default, Gmail doesn't display a notification on your computer's desktop when a new message comes in. That's probably just as well because many studies have shown that the notification of a newly received message (and its accompanying "ping") is a big distraction and, therefore, a major productivity killer.That said, you might want to risk the distraction anyway and give Gmail permission to display desktop notifications. It's also possible to configure Gmail to show a notification only for messages labeled as Important, so consider that a compromise worthy of consideration.
Here are the steps to follow to give Gmail permission to display desktop notifications and to configure those notifications:
- Choose Settings→Settings. Gmail opens the Settings page, with the General tab displayed.
- In the Desktop Notifications setting, click the Click Here to Enable Desktop Notifications for Company Mail (where Company is the name of your business). Your web browser asks if you want to allow mail.google.com to show notifications, as shown.
 Your browser wants to know if you'll allow Gmail to show notifications.
 - Click Allow.
- Select the desktop notification option you prefer:
- New Mail Notifications On: Click this radio button to see a desktop notification for all incoming messages.
- Important Mail Notifications On: Click this radio button (as shown) to see a desktop notification only for incoming messages that Gmail labels as Important.
- Click the Save Changes button at the bottom of the Settings page.
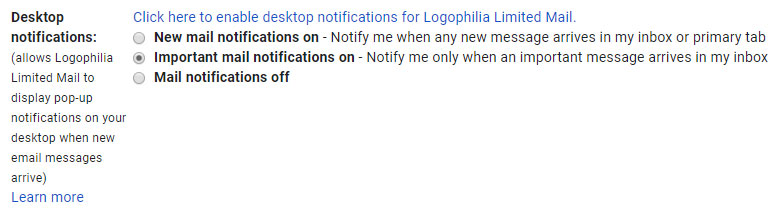 Click the Important Mail Notifications On radio button to see desktop notifications for only important messages.
Indicating messages sent only to you
If you receive a ton of mail from mailing lists and similar group messages, it's handy to differentiate between messages you receive via the list or group and messages addressed to you directly. (Differentiating messages in this way has the added benefit of improving spam detection, because many junk messages are sent as bulk mailings.)For the messages you receive, there are actually three addressing levels to differentiate here:
- Messages sent to a single address that represents a mailing list or group
- Messages sent to multiple individual addresses, including yours
- Messages sent only to your address
Gmail has a feature called personal level indicators that reflects this relevance hierarchy:
- Messages sent to a single address that represents a mailing list or group get no indicator.
- Messages sent to multiple individual addresses, including yours, get an arrow (›) indicator.
- Messages sent only to your address get a double arrow (») indicator.
- Choose Settings→Settings. Gmail opens the Settings page, with the General tab displayed.
- Scroll down to the Personal Level Indicators setting and click the Show Indicators radio button, as shown.
- Click the Save Changes button at the bottom of the Settings page.
 Click the Show Indicators radio button.


