


Need more detail in just one part of your model? There’s no need to use the Multiresolution modifier and bump up the vertex count for your whole mesh. Just enable Dyntopo and add that detail exactly where you need it.
To use Dyntopo, you need to be in Sculpt mode. While in Sculpt mode, look at the Active Tool tab of the Properties editor. A panel there is named, appropriately, Dyntopo. Left-click the check box at the top of the panel and you’re off to the races, sculpting with dynamic topology. Alternatively, you can also enable Dyntopo with Ctrl+D while in Sculpt mode. The image below shows the Dyntopo panel in Active Tool Properties.
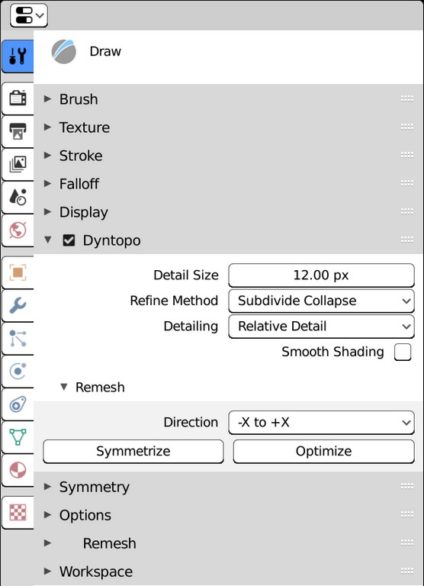 The Dyntopo panel in Active Tool Properties allows you to enable dynamic topology while in Sculpt mode.
For such a powerful Blender feature, there are relatively few options specific to Dyntopo. The following is a quick rundown of the options available in the Dyntopo panel:
- Detail Size: Dyntopo works by modifying edges within the area of your brush cursor. The Detail Size field defines a value that lets Dyntopo decide whether a specific edge gets modified, based on its length. This value can either be in screen pixels or a percentage, depending on the detail type method that you choose. While sculpting, you can adjust this value with the Shift+D hotkey so you don’t have to constantly return to the Active Tool Properties.
- Refine Method: Dyntopo can subdivide edges in your mesh and collapse them, removing additional detail. The options in this drop-down menu allow you to control which behavior you want your sculpt brush to use:
- Subdivide Edges: If an edge within your brush cursor is longer than the detail size, it’s subdivided. This refine method is great for fine details, creases, and sharp peaks.
- Collapse Edges: When you choose the Collapse Edges option, short edges get collapsed into a single edge. In the case of Dyntopo, a short edge is defined as being two-fifths (2/5) the length of the detail size. This option is great for evening out your topology and removing long skinny triangles that may render weirdly. However, the trade-off is that it also removes any fine details smaller than the detail size.
- Subdivide Collapse: The Subdivide Collapse option is the default. With this refine method, edges within the area of your brush cursor are subdivided and collapsed, relative to the detail size. This behavior makes the Subdivide Collapse option well-suited for quickly roughing the general forms of your sculpt.
- Detailing: When sculpting, it’s common for artists to arbitrarily navigate around their model as they work, orbiting, panning, and zooming to get the best view of the section that they’re sculpting. Zooming specifically presents an interesting challenge for Dyntopo because sometimes you want the detail size to remain the same regardless of how much you zoom in or out from your model; other times, you want to do more detailed work as you zoom closer. The options in this drop-down menu let you choose:
- Relative Detail: This is the default setting. Choose this option to define detail size relative to the pixels on your screen. If you zoom out far enough, all the edges in your mesh become smaller than the detail size. If you zoom in, you only subdivide smaller edges.
- Constant Detail: Choose the Constant Detail option if you want the detail size to remain the same, regardless of how much you zoom in or out from your model. With this option, detail size is defined as a percentage of the base unit you define in the Scene tab of the Properties editor (the default is 1 meter). Additionally, the Detail Size field at the top of the Dyntopo panel gets an eyedropper button. Left-click that button to sample the geometry in your mesh. This means that you can click the eyedropper on a part of your mesh and the Detail Size field is set to match the edge lengths in that region.
- Brush Detail: If you pick Brush Detail, then the Detail Size is determined by the percentage of your brush cursor. Increase the radius of your brush cursor and you increase the edge length. Reduce the brush radius and you generate more detailed topology.
- Manual Detail: Choose this value and edge length is fixed based on the Resolution value you set at the top of the Dyntopo panel. Higher Resolution values mean you sculpt with more detail, regardless of brush size or how close you’re zoomed in on your mesh.
- Smooth Shading: The Smooth Shading check box toggles between smooth shading and flat shading for your entire mesh while sculpting. This is mostly a personal preference, though some sculptors claim to have a more responsive 3D Viewport with Smooth Shading disabled.
- Remesh: The Remesh sub-panel within the Dyntopo panel should not be confused with the main Remesh panel in Active Tool Properties. This sub-panel is the one you use while working in Dyntopo to tweak the topology of your sculpt as you work, according to the detail settings you configure in the Dyntopo panel.
- Symmetrize: With Dyntopo, you can take geometry that you’ve sculpted on one half of your mesh and mirror it to the opposite side. For example, if you did some sculpting without using the features in the Symmetry panel, you may want to mirror that geometry to at least give you a detailed starting point for the other side of your mesh. Left-click the Symmetrize button to do exactly that, based on the direction (such as “from the negative X-axis side of the mesh to the positive X-axis side”) defined in the Direction drop-down menu above the buttons in the Remesh sub-panel.
- Optimize: As you sculpt with Dyntopo enabled, your brush may become less responsive, with strokes lagging behind your brush cursor as you work. If you run into that, try clicking the Optimize button. When you click, Blender recalculates and rebuilds the underlying data structure that Dyntopo uses to speedily edit the edges on your mesh, often alleviating some sculpting performance slowdowns.
- Detail Flood Fill: The Detail Flood Fill button is visible only if you have your detail type set to Constant Detail or Manual Detail. Assuming that you have chosen either of those, you can click the Detail Flood Fill button to subdivide (and/or collapse, depending on your chosen detail refine method) every edge in your mesh to match your desired detail size. This is a pretty useful tool for uniformly changing the detail in your mesh (increasing or decreasing it) all at once.
Currently, the Symmetrize feature of Dyntopo does not respect any masking that you’ve painted on your mesh. So if you’ve painted a mask in the hope that Symmetrize will only have an effect on the unmasked vertices of your mesh, you’re a bit out of luck. Symmetrize will happily mirror your mesh regardless of the mask, removing or changing those vertices that you wanted to preserve.
Of course, the power that a feature like Dyntopo presents also necessarily comes with a few caveats:- You can’t have both Dyntopo and a multires mesh at the same time. It’s kind of difficult to have fixed subdivision levels if the underlying topology is constantly changing.
- Because Dyntopo dramatically changes your mesh topology, it will not preserve additional mesh data like vertex groups, UV coordinates, or vertex colors. Also, if you have some faces on your mesh set to smooth shading and others to flat shading, that also gets changed so all faces are either one or the other, depending on whether you toggle the Smooth Shading check box in the Dyntopo panel.
- Although you can reduce vertices using Dyntopo, it’s not currently possible to sculpt a hole in your mesh.
- Unless your model is being used in a still image and never rigged for animation, it almost always will be necessary to retopologize a mesh that’s been sculpted with Dyntopo enabled.
- Start with a base mesh.Depending on what you’re modeling, the base mesh could be as simple as a sphere like you get in the default Sculpting workspace, or a somewhat more complex rough form for the model, such as a 3D stick figure to start a character model. In the ideal case, whatever your base mesh is, it should have evenly distributed faces (that is, all the faces on your base mesh should be roughly the same size).
- Sculpt with Dyntopo.With Dyntopo enabled, use the various sculpting tools to produce your impressive 3D sculpt.
- From Object mode, create a new mesh.It doesn’t much matter what kind of mesh it is. When you get into Edit mode, you’ll need to initially delete all the geometry in it so you can start the next step.
- Retopologize the sculpt using the newly created mesh.At this point, you’re basically using the sculpt as a 3D reference model to which you can snap your clean topology vertices.
- Finalize and polish the retopologized mesh.This is where details are re-added using traditional modeling techniques. In this step, you may also bake some of that additional detail from the high resolution sculpt into a texture that you apply to your retopologized mesh.


