


Not everything that reacts to physics has the internal jiggle and bounce that soft bodies have. Say, for example, that you have to animate a stack of heavy steel girders falling down at a construction site
For that animation, you don’t want to have a soft body simulation. You could technically get the correct behavior with really stiff settings in Blender’s Soft Body Edges panel, but that’s a bit of a kludge and potentially very CPU-intensive. You’d be better off with rigid body dynamics.
As their name implies, rigid bodies don’t get warped by collisions the way that soft bodies do. They either hold their form when they collide, or they break.
Like the other physical simulation types, the controls for rigid bodies are in Blender’s Physics Properties. You need only left-click the Rigid Body button.
Follow these steps to get a simple rigid body simulation with Blender’s default cube:
- Select the cube and move it up in the Z-axis by a few units.
You can move the cube using the Move tool or more quickly by using the G hotkey. Like the soft body simulation, 3 to 5 meters should be fine.
- Create a mesh plane to act as the ground (Add→Mesh→Plane) and scale it larger so that you have something for the cube to hit (S or use the Scale tool).
- With your plane still selected, add a Rigid Body panel in Physics Properties.
Unlike the soft bodies example, your ground plane should not get a collision panel. This is unique to how rigid bodies work in Blender.
- In your newly created Rigid Body panel, change the Type drop-down menu from Active to Passive.
This tells Blender that the ground plane should be part of the rigid body calculations, but that it isn’t going to be a moving object. Setting the type to Passive is basically how you set up a rigid body collider.
- Back in the 3D Viewport, select your cube.
- Make a Rigid Body panel in Physics Properties.
That’s the last required step to have your cube drop into the scene. You may want to give the cube a bit of an arbitrary rotation (use the Rotate tool or the R→R hotkey sequence) so it lands and bounces around on the plane in a more interesting way.
- Play back the animation (Spacebar) to watch the cube fall, hit the ground plane, and bounce around a bit.
Congratulations! You have a rigid body simulation.
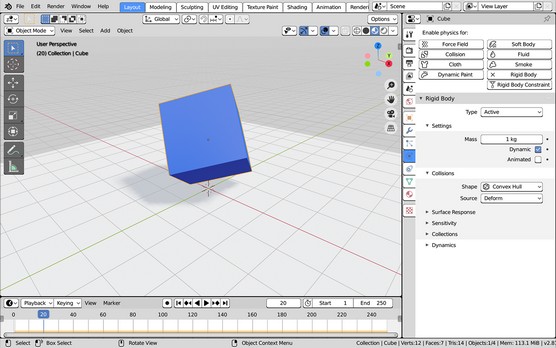 Creating a simple rigid body simulation.


