

These extended features don’t really have a place in the workflow of most Photoshop users. That doesn’t mean that you’ll never use any of these features! You might find a need to calculate a height or a distance using the measuring tools in Vanishing Point, or perhaps use the Count tool. As a photographer, you may find that a couple of the Smart Object stack modes can be used to solve a couple of photographic challenges. And who can resist the temptation to play around with 3D? This figure shows the 3D panel and menu commands.
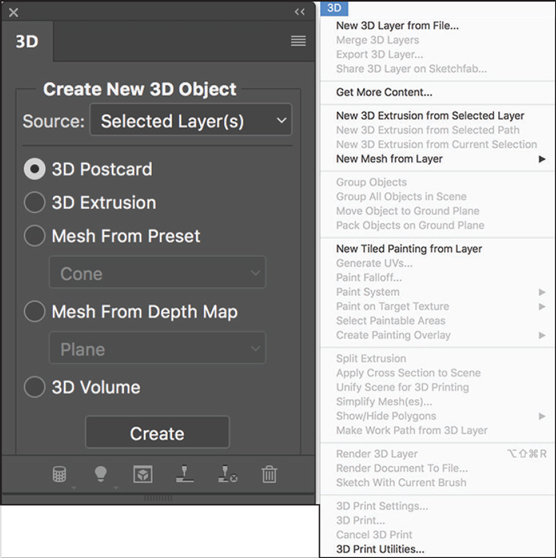 Photoshop CC includes 3D capabilities.
Using Smart Object Stack Modes
Working with Photoshop CC, you can combine a number of images into a single stack as a Smart Object. Within the pile of images, you can determine how the pixels in each interact with those in the others.Select several related or contrasting images and add them as layers to a single image, select the layers, and create a Smart Object by choosing Layer → Smart Objects → Convert to Smart Object. Return to the Layer →Smart Object submenu and take a look at the Stack Modes submenu that’s now available. These options determine how the content on the layers within the Smart Object interact to produce the appearance of the Smart Object itself. (Not quite the same, but similar to the way layer-blending modes help determine the overall appearance of your artwork.)
You can find technical explanations of each option in Photoshop’s Help. Here, you see a combination of the layers (shown to the left as thumbnails) using the stack mode Mean, which averages the values for each pixel in each channel. Not quite Merge to HDR, but with some planning and prep, it could be a supplemental technique.
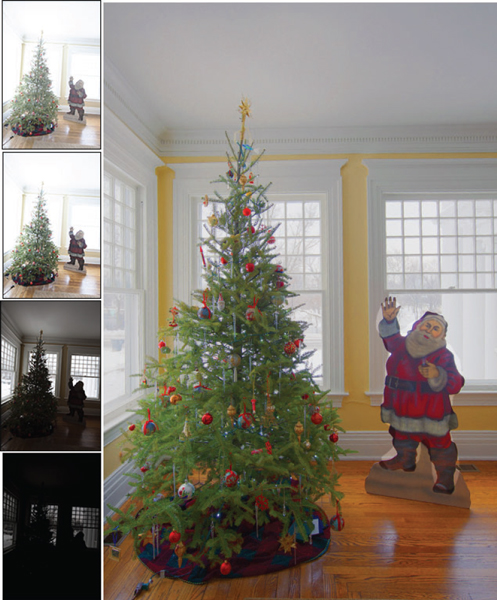 Several exposures combined into one image is just one use of Smart Objects and Stack Modes.
Photographers may also find another great use for stack modes. Using a tripod and the same exposure settings, take a number of photos of a static object with moving objects (people or cars, for example) over a reasonably short period of time (minutes, not hours, so the lighting doesn’t change much).
Select the thumbnails in Bridge and use Bridge’s menu command Tools → Photoshop → Load Files into Photoshop Layers. (If you’re not using Bridge, open the first image, then open each additional image and drag the layer Background from the Layers panel to the first image.) In Photoshop, use the menu command Select→ All Layers. (You never even noticed that command before? Now you’ll use it all the time.)
Unless you had a rock-solid tripod, choose Photoshop’s Edit→ Auto-Align Layers command with the Reposition option. Create a Smart Object from the layers by choosing Layers → Smart Objects → Convert to Smart Object. Choose the Median stack mode and watch all of those moving objects simply disappear, leaving you with just the scene, empty of traffic. The following figure shows the shots originally taken and the resulting image.
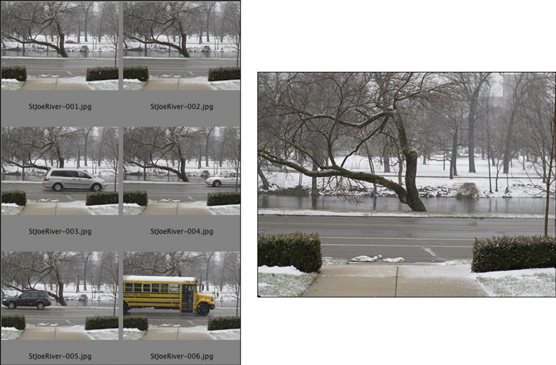 The cars on either side of the river, the bus, and even the falling snow are removed using Median.
The Mean Stack Mode
Another use of the stack mode Mean that is of value to photographers is noise reduction. Shooting in low light with a high ISO setting can result in images with a lot of noise. Using a tripod or bracing the camera, take several shots, perhaps using the camera’s burst mode. (This is a great trick for shooting in a museum that doesn’t permit flash photography.) Open the files in Photoshop layers through Bridge or manually, select all the layers, and align. Create your Smart Object from the layers and set the stack mode to Mean to minimize the noise.Working with 3D Artwork
Photoshop offers lots of 3D capabilities, including 3D extrusions from layers and paths, control over the spatial relationships among objects, improved rendering, and generally improved performance. This figure shows many of the features available when working in 3D.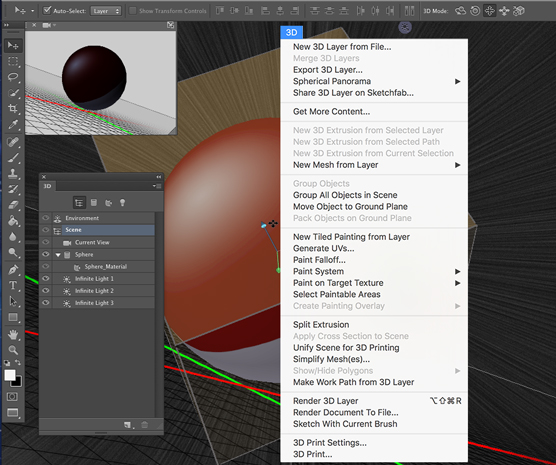 Tools, menus, and panels specially for working in 3D.
You can use the tools in the 3D Mode section of the Options bar (to the far right) to rotate and roll and drag and slide and scale 3D objects. The 3D panel offers access to each of the materials (think “textures”) used with a 3D object, as well as a tab on which you add, subtract, or alter lights used in the 3D scene.
Creating 3D objects
Working with a photo or any other 2D artwork, you can create any of a dozen different 3D shapes, from simple spheres, cubes, and cones to donuts, hats, and wine bottles. (Use the menu command 3D →New Mesh from Layer → Mesh Preset.) Working with a layer that contains areas of transparency, you can extrude shapes as well, stretching the layer content backward into a 3D shape. (Use the menu command 3D → New 3D Extrusion from Selected Layer.) Active selections on a layer and even paths can be used to create extruded objects.Importing 3D objects
Among the file formats that support 3D that you can open into Photoshop are 3D Studio, Collada DAE, Flash 3D, Google Earth 4 KMZ, U3D, and Wavefront|OBJ. Many ready-made 3D objects can be downloaded or purchased from various websites, includingYou can use Photoshop’s File →Open command, or add a 3D object to an existing project by choosing 3D →New 3D Layer from File. And you can find additional resources by using 3D→ Get More Content.
Rendering and saving 3D scenes
After you have your 3D scene looking just the way you want it to appear as a 2D image, use the command 3D→ Render, followed by File →Save As, to save in the file format of your choice. Photoshop uses the Shadow Quality and Ray Tracer High Quality Threshold settings set in the program’s Preferences → 3D.You can also use the command 3D → Export 3D Layer to save the project in any of eight 3D file formats, including Collada DAE, Flash 3D, Google Earth 4 KMZ, 3D PDF, STL, U3D, VRML, and Wavefront|OBJ.
Measuring, Counting, and Analyzing Pixels
Designed for researchers and scientists, the measuring capabilities in Photoshop are quite powerful. You can measure just about anything and count the number of whatevers in a technical image, perhaps from a microscope or telescope.Measuring length, area, and more
If you know the exact size of any element in an image, you can then discover just about anything you want to know about anything else in that image. The key is to set the measurement scale, as shown. Open the Measurement Log through Photoshop’s Window menu. Click the button in the upper-right corner to open the panel menu. From the Set Measurement Scale options, choose Custom (rather than Default). Drag the Ruler a known distance and then set the custom measurement scale. Afterward, you can use the Ruler to determine the height, width, or length of anything in the image.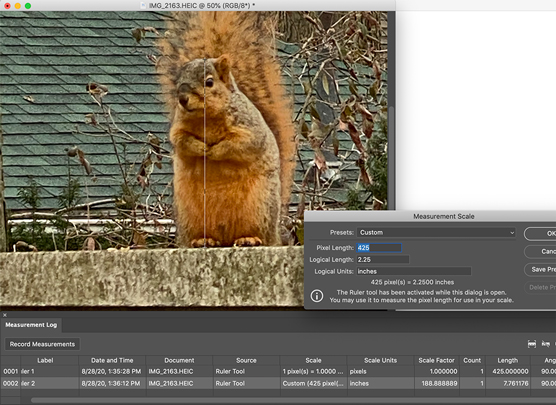 Customize the Measurement Scale.
Calculating with Vanishing Point
Photoshop also offers measurement in perspective through Vanishing Point (found in the Filter menu). Suppose, for example, you need to calculate how much wallpaper to order for the room shown in the following figure.You know the height of the window (70 inches) and using that as your known measurement, you can have Photoshop calculate the height and length of each wall. Drag the Measure tool along the edge of the window and enter the known size (70 inches) in the Length field. When you click the four corners of a surface in the image with the Create Plane tool, the length of each side is visible in boxes.
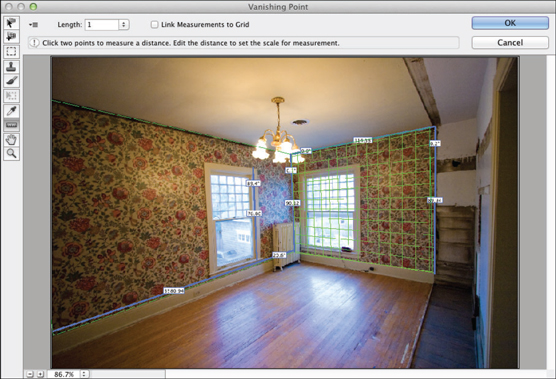 Measurements can also be made in perspective with Vanishing Point.
Counting crows or maybe avian flu
Nested with the Ruler tool and the Eyedroppers in the Toolbox is the Count tool. Zoom in and start clicking whatever you need to count, whether they’re birds in the sky or viruses on a slide. Each item you click is labeled with a number.When you want to record the count, click the Record Measurements button in the Measurement Log. You can also record and work with multiple counts. To the right of the Count Groups menu on the Options bar are buttons to show/hide the currently selected count group, to start a new count group, and to delete the current count group. Click the color swatch on the Options bar to select a new color for the count group, and you can customize both the size of the circle that marks the count and the marker number — individually for each count group.
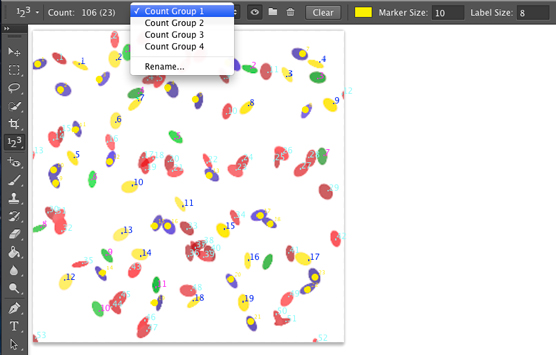 Click each item and Photoshop keeps a running tally for you.
View your DICOM medical records
If your doctor's office, hospital, or lab has sent you home with a CD (you may need to request the files), it probably contains DICOM (Digital Imaging and COmmunication in Medicine) images. It might contain the results of a CAT scan, MRI, ultrasound, or X-rays, and you can open the files and take a look right in Photoshop. Copy the files to your hard drive. (Don't open files into Photoshop directly from a CD or DVD.) Choose File→Open. In the Open dialog box, select the frames in which you’re interested and then click Open.In the next dialog box that opens (shown), the preview area is likely to be completely black. Make sure that Show Windowing Options is selected. In the Window Preset menu select the appropriate view option. Full is generally a good option, but try the others if appropriate for the image content.
If you selected multiple DICOM images in Photoshop’s Open dialog box, you can click each of the thumbnails in the stack to the left to view them one at a time. You can also use the two arrows to the right below the preview to move through the frames.
With multiple images open in the DICOM viewer window, you can click the Select All button in the upper left and then elect to open into Photoshop as layers in an image (the Import Frames as Layers option) or in a grid pattern (the N-Up Configuration option). You can also use Photoshop's File→Place command to add a DICOM image to an appropriate image.
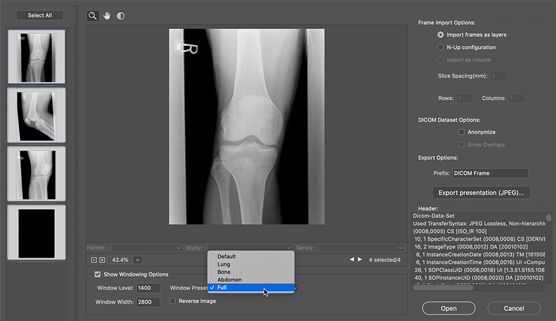 Review medical imagery right in Photoshop.


