If you want the absolutely best results from Merge to HDR Pro, keep two words in mind: manual and tripod. Those are the keys to capturing multiple exposures for use with Merge to HDR Pro. The only variable you want to change from shot to shot is the camera’s shutter speed—everything else, including focus, should remain the same.
Your tripod should be sturdy and level, and a cable release is a good idea. You can use auto focus and auto exposure to set the lens and get an exposure recommendation from the camera. But then switch the lens to manual focus and set the camera to manual exposure. Before each exposure, adjust only the shutter speed.
How many exposures do you need? Go with a minimum of three: the best exposure possible for the scene’s midtones, one “overexposed” for detail in the shadows, and one “underexposed” for detail in the highlights. Each scene differs to some degree, but you’ll want to capture as much of the tonal range as possible. It is better, however, to use seven separate exposures with Merge to HDR Pro. More than that is rarely necessary, and most scenes can be captured in five exposures.If you are familiar with exposure values, try for a range of perhaps seven, including three below and three above the “optimal” exposure. If that’s unfamiliar territory, try shooting the optimal exposure, then taking a shot at 1/4 the shutter speed of the first shot, and then taking a shot at four times the original shutter speed.
Okay, so say that you don’t have a tripod and there’s a shot that’s just crying for HDR. Set your camera to auto-bracket at the largest increment possible, set the camera to “burst” mode, get as settled as possible, frame the shot, focus, take a deep breath, let the breath out halfway, pause, then gently press and hold the shutter button.
In burst mode, three (or more, depending on your camera) shots are taken as quickly as the camera can operate. In auto-bracket mode, the exposure is automatically changed for each shot. (Note that you need to set the camera to auto exposure bracketing, sometimes seen as AEB, not white-balance bracketing. Check your camera’s User Guide.)
Alternatively, and usually with quite good results, you can change the exposure after the fact using Camera Raw. (You’ll want to use a Raw image, not a JPEG image, for this technique.) Here’s how:- Shoot the best exposure possible.
- Transfer the image to your computer.
- Open the image into Camera Raw. Make sure that Camera Raw’s Workflow Options—click the line of info below the preview (between Save Image and Open Image)—are set to 16-bit color.
- Adjust the image until it looks perfect.
- Click the Open Image button to open from Camera Raw into Photoshop.
- Copy the image into a new file and save in the TIFF format. Choose Select→ All, then choose Edit → Copy, followed by File→ Close (don’t save), and then File → New. (The preset will be set to Clipboard, so just click OK.) Choose Edit → Paste followed by File→ Save As, choose TIFF as the file format, and save. Using this procedure strips out the EXIF data, making sure that Merge to HDR Pro doesn’t use the wrong exposure value.
- Reopen the original Raw file into Camera Raw.
- Drag the Exposure slider to the left to reduce the exposure by 2. Two is just a general guideline—watch for maximum detail in the highlights.
- Hold down the Option/Alt key and click Open Image (Open Copy). Opening as a copy prevents Camera Raw from overwriting the earlier adjustment in the file’s metadata.
- Copy the image into a new file and save in the TIFF format. Repeat Step 6, using a sequence number or other change to the filename to differentiate from the first TIFF.
- Reopen the Raw file into Camera Raw a third time.
- Drag the Exposure slider to the right to increase the exposure by 2. Again, two is just a starting point—you want to see maximum detail in the shadows.
- Hold down the Option/Alt key and click Open Image (Open Copy).
- Copy the image into a new file and save in the TIFF format. Repeat Step 6, using a third filename.
Working with Merge to HDR Pro
After you have the exposures from which you want to create your HDR masterpiece, you need to put them together using Photoshop’s Merge to HDR Pro.You can open Merge to HDR Pro either through Photoshop’s File → Automate menu or you can select the images to use in Bridge and use Bridge’s menu command Tools→Photoshop →Merge to HDR Pro. If you open through Photoshop, you’ll either need to open the images into Photoshop first, or navigate to and select the images to use. In Merge to HDR Pro, if the images are already open in Photoshop, click the Add Open Files button. If the image hasn’t been opened yet, choose the Browse button. The files should all be in the same folder on your hard drive.
Be patient with Merge to HDR Pro—it has a lot of work to do before you get to play with the combined exposures. When the calculations are done, the Merge to HDR Pro window opens (as shown). If the option is offered, you can elect to manually set the exposure value (EV) for the images.
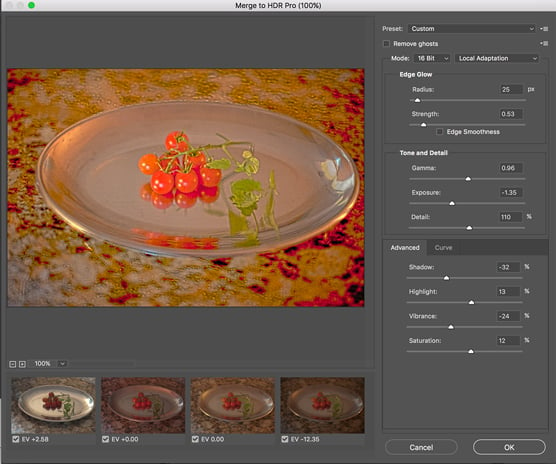 Merge to HDR opens after the images have been processed.
Each of the images in the merge is shown as a thumbnail below the preview. You can deselect each image to see what impact it has on the combined exposure. (After you click the green checkmark, give Merge to HDR Pro a couple of moments to redraw the preview.) If you’re working with seven exposures and one seems to degrade from the overall appearance, leave that thumbnail’s box deselected.
By default, Merge to HDR Pro assumes that you want control over the image right away and sets the Mode menu to 16-bit color and Local Adaptation. You then have the options shown previously, as well as a few others, including the Curve panel (as shown).
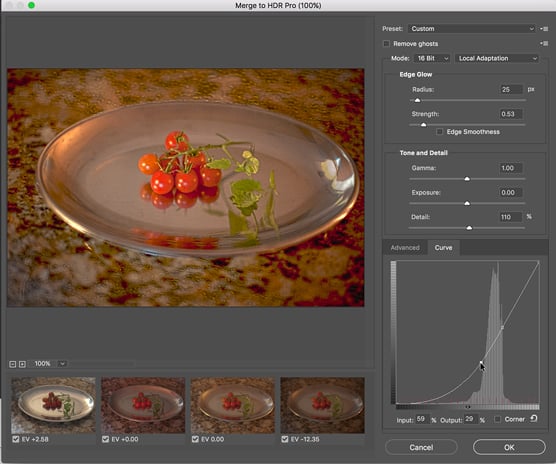 In 16-bit mode with Local Adaption, you have quite a bit of control.
So, what are all those options you see in these figures?
- Preset: If you have a series of similar images that require the same adjustments, you can save and load presets.
- Remove Ghosts: When you’re capturing multiple exposures, especially outdoors, moving objects in your image may have left “ghosts” behind. This option helps minimize those moving objects.
- Edge Glow: Use the Radius and Strength sliders in combination to increase the perceived sharpness of the image.
- Tone and Detail: Think of the Gamma slider as your contrast control. Dragging to the right flattens the contrast between highlights and shadows; dragging to the left increases the contrast. The Exposure slider controls the overall lightness (to the right) or darkness (to the left) of the image, just like the Exposure slider in Camera Raw. The Detail slider sharpens the smallest bits in the image.
- Advanced: Visible in the figure, the Advanced tab shares space with Curve in Local Adaptation. The Shadow and Highlight sliders here control the lower and upper parts of the image’s tonal range. For both sliders, dragging left darkens and dragging right lightens. The Vibrance slider controls the saturation of the near-neutral colors and Saturation controls all of the colors in the image.
- Curve: Click the curve to add an anchor point and drag up/down or enter numeric values to adjust the tonality of the image. The Corner option produces a sharp change in the angle of the curve, which is generally not desirable. The button to the right of Corner resets the curve.
Note that 16-bit and 8-bit offer the same options, but I don’t recommend converting from 32-bit to 8-bit in Merge to HDR Pro. If you need an 8-bit version of the image, work in 16-bit, and then after perfecting the image in Photoshop and saving as a 16-bit PSD or TIFF file, use the Image → Mode→8-Bits/Channel command to convert and use Save As (or the Export menu’s Save for Web command) to save the 8-bit copy.
Keep in mind that when the changes you make in Merge to HDR’s 16-bit mode are finalized, the unused parts of the 32-bit tonal range are discarded. Working in 16-bit mode in Merge to HDR Pro can be convenient, but you can also stay in 32-bit mode, open into Photoshop with the OK button, save the 32-bit image, and then do all the adjusting available in Merge to HDR Pro—and much more—in Photoshop.
Want to fine-tune or change the image sometime down the road? Sure, why not? Simply reopen the saved 32-bit image and readjust, paint, filter, whatever, and then save again. Need a 16-bit copy to share or print? Save first as 32-bit, adjust, and then use Save As to create the 16-bit copy.