

Use keyboard shortcuts on your Mac
Keyboard shortcuts can make navigating your Mac a much faster experience compared with constantly using the mouse, offering these benefits:- If you use keyboard shortcuts, your hands stay focused on the keyboard, reducing the amount of time that you remove your hand from the keyboard to fiddle with the mouse or trackpad.
- If you memorize keyboard shortcuts with your head, your fingers will memorize them, too.
- The more keyboard shortcuts you use, the faster you can do what you’re doing.
Make a list of keyboard shortcuts you want to memorize, and tape it to your monitor or where you’ll see it all the time when using your Mac.
Improve your typing skills
One way to make your Mac seem faster is to move your fingers faster. The quicker you finish a task, the quicker you’re on to something else. Keyboard shortcuts are nifty tools, but improving your typing speed and accuracy will save you even more time. As a bonus, the more your typing skills improve, the less time you’ll spend correcting errors. So you’ll finish everything even faster!The speed and accuracy that you gain have another bonus: When you’re a touch typist, your fingers fly even faster when you use those nifty keyboard shortcuts.
The best and easiest way to improve your keyboarding skills is a typing training app for your Mac such as Ten Thumbs Typing Tutor ($25.95), any of the myriad typing-instruction apps in the Mac App Store (search for typing), or a free typing-instruction website such as TypingTest (free).Change the resolution on your Mac
A setting that you can change to potentially improve your Mac’s performance is the resolution of your monitor. Most modern monitors and video cards (or onboard video circuitry, depending on which Mac model you use) can display multiple degrees of screen resolution.You change your monitor’s display resolution in the Displays System Preferences pane. First, click the Display tab and then click the Scaled button, which makes a list of resolutions appear. Select the resolution you want to try from the list below the Scaled button.
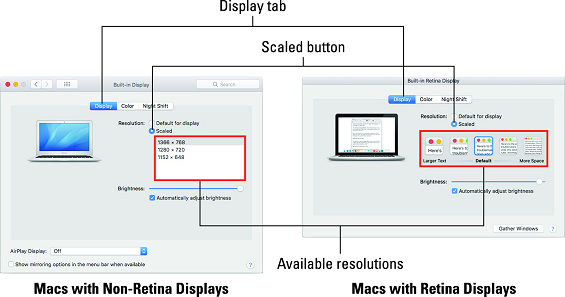 Lower resolutions make things larger on your Mac's screen.
You see many more items on the screen at native resolution, but you can make everything bigger by switching to lower resolutions.
Here’s the deal on display resolution: The first number is the number of pixels (color dots) that run horizontally, and the second number is the number of lines running vertically. It used to be that fewer pixels refreshed faster. But with LCD and LED (flat-panel) monitors and notebooks, this usually isn’t true — or if it is true, it’s almost unnoticeable.
Furthermore, because you can see more onscreen at higher resolutions, a higher resolution reduces the amount of scrolling that you have to do and lets you have more open windows on the screen.
Finally, the highest resolution is almost always the native resolution of that display, which means it will usually look the sharpest. So you could just as easily say that higher resolutions can speed up your Mac experience as well.
On the other hand, if you can’t discern icons in toolbars and other program components, using a lower resolution may actually enhance your work speed.
Choose a resolution based on what looks best and works best for you. If things on the screen are too big or too small at your current resolution, try a higher or lower resolution until you find one that feels “just right.”
And, if you have a Retina display, try all available resolutions to see which you prefer. The highest resolution on a Retina display will make everything on the screen appear very, very small, which may or may not be desirable.Finally, check out the Accessibility System Preferences pane’s Zoom tab, where you can enable keyboard shortcuts to zoom in and out instantly, and Hover Text, a highly configurable mode that enlarges only what’s under your pointer.
Purchase a faster Mac
Apple keeps putting out faster and faster Macs at lower and lower prices, and all current Macs now ship with at least 8GB of RAM. Although 4GB is officially enough RAM to run Catalina, if you like to keep more than one or two apps running all the time, it’s not enough to run it at its best.Check out the latest iMacs and Mac minis — they’re excellent values. Or if you crave portability, MacBook, MacBook Air, and MacBook Pro models are rocking good computers and have never been less expensive.
You might even consider a used Mac that’s faster than yours. eBay has hundreds of used Macs up for auction at any given time. Shopping on eBay might just get you a better Mac at an outstanding price. Or try Craigslist if you prefer to see and touch the Mac before you commit.
Another excellent option is to visit the Apple website’s refurbished and clearance section. You can frequently save hundreds of dollars by purchasing a slightly used Mac that has been refurbished to factory specifications by Apple. Another advantage to Apple refurbs is that they come with an Apple warranty. If you’re on a tight budget, definitely check it out.
Add RAM to your Mac
You get a lot of bang for your buck when you upgrade your Mac’s RAM. Get an additional 4GB, 8GB, or even 16GB; you can never have too much. Your Mac will run better with at least 8GB of RAM, which will cost you less than $100 in most cases and can be installed by anyone. Yes, anyone — the instructions are right there in your User Guide booklet, or you can find them at the Apple Technical Support pages (search for RAM upgrade and your Mac model).Unless, that is, you own one of the many late-model Macs that aren’t user-upgradeable. These models are exceedingly difficult to open, and Apple frowns upon users opening some models these days. Plus, some Macs have RAM soldered to the motherboard and can’t be upgraded at all. If your Mac is upgradeable and you're uncomfortable with upgrading RAM yourself, opt for the services of an authorized, certified Mac cracker-opener.
The bottom line is that it’s best to order your Mac with as much RAM as you can in the first place.
Add a second display to your Mac
Almost all Macs today support a second monitor, and screen real estate is among the biggest productivity enhancers — right up there with typing faster.Screen real estate is the holy grail when working in multi-windowed or multi-paletted apps such as Photoshop, Final Cut Pro, GarageBand, and iMovie. Two monitors are also great when you’re working with two or more programs at the same time. With sufficient screen real estate, you can arrange all the windows and palettes for all programs in the way that’s most expedient to the way you work.
You don’t need an expensive 4K or 5K monitor. For a couple of hundred bucks, you can find a second display that will double your screen real estate. Or, if you have an iPad of recent vintage, read the
Many Macs support three or more displays, as long as you have the proper cables and available ports.
Use your iPad as a second display for your Mac
Catalina introduces a new feature known as Sidecar, which allows you to use a late-model iPad as a second screen for your late-model Mac.The official list of supported hardware was unavailable at press time, but here’s how to see whether your Mac and iPad qualify: Connect your iPad to your Mac with the USB cable and then open System Preferences. If you see an icon named Sidecar, your gear is new enough; if you don’t, it’s not.
If you have an iPad handy, give it a try; if your Mac and iPad are up to the task, enable the Show Sidebar check box. If applicable, enable the Show TouchBar and Enable Double Tap on Apple Pencil check boxes as well. Then use the Displays System Preferences pane to arrange the iPad’s position relative to your other screen (or screens) — and you’re done.
Hope you enjoy all that extra screen real estate!
Upgrade your Mac to a solid-state drive (SSD)
The latest and greatest storage device to appear is the solid-state drive (SSD). It uses flash memory in place of a mechanical hard drive’s spinning platters, which means, among other things, that it has no moving parts. Another benefit is that an SSD performs most operations at up to twice the speed of mechanical drives.The bad news is that an SSD is more expensive — three or more times the price per gigabyte — of a mechanical hard drive or a hybrid drive with the same capacity.
That said, most users report that it’s the best money they ever spent on an upgrade. Currently, you can get a 500GB external USB 3 SSD (a Samsung T5) on sale at Fry’s Electronics for $90.
For those of you still booting from a hard disk, you can replace the SSD for under $100 and speed up your Mac in a major way.
Honestly, folks, if you’re only going to do one thing to make your old Mac faster, this is what you should do: Replace your hard drive with an SSD. Or, at the least, get an SSD and use it as your startup disk. If your Mac can’t be upgraded, consider using an external SSD as your boot disk.
After switching to an SSD startup drive — internal or external — your old Mac will feel almost new again.
Get more storage for your Mac
Your Mac will run slower and slower as its startup disk gets fuller and fuller. If you can’t afford to replace your startup disk with a bigger SSD or purchase a bigger SSD to use as a boot disk, another option is to get a big external hard disk (much less expensive per megabyte than an SSD) and move some of your data off your startup disk and onto the external disk.You can connect external hard disks (or SSDs) via USB 3 or Thunderbolt (or, to a lesser extent, FireWire). All three can be used to connect devices that require high-speed communication with your Mac — hard drives, SSDs, CD/DVD burners, scanners, camcorders, and such. Thunderbolt is today’s speed champ, but FireWire is often the fastest bus that an older Mac will support natively.
The most recent Mac models that had FireWire used the type called FireWire 800, which has a different type of connector than does FireWire 400, which was available on older Macs. If you get a device that has only FireWire 400, and your Mac has only FireWire 800 (or vice versa), everything will work as long as you get a FireWire 400–to–FireWire 800 adapter cable, available at the Apple Store and many other places.
Thunderbolt, which is available on Mac models introduced since 2012, is the fastest bus around by far. That said, there are still relatively few Thunderbolt peripherals you can get.Furthermore, the Thunderbolt devices that are out there are somewhat more expensive than their USB 3 counterparts. Although Thunderbolt shows tons of promise for the future, at present, Thunderbolt hard drives are significantly more expensive than either FireWire or USB 3 drives.
And just to confuse things, all new Macs since 2014 use USB 3 (Universal Serial Bus 3), which is many times faster than the previous generations of USB (and FireWire).
If you’re buying an external USB drive, get one with USB 3. It isn’t much more expensive than a USB 2 drive these days and is speedy on Macs with USB 3 ports. If your Mac doesn’t have USB 3, you should get a USB 3 drive anyway. It’ll run at the same speed as a USB 2 drive on your current Mac — and will run a lot faster on your new Mac when you upgrade.
If you’re not sure what generation of USB your Mac has, choose the Apple logo icon, then select About This Mac, click the System Report button to launch the System Information application, and then click USB in the hardware list on the left.The good news is that whatever connection you choose for your new disk — USB 2, USB 3, Thunderbolt, FireWire 400 or 800 — you can usually just plug it in and start using it. Unless the disk is preformatted for a PC and requires reformatting, there’s nothing more you have to do!
Speaking of which, don’t buy an external drive that's advertised as “for the Mac” or “formatted for the Mac.” You can often save $20 or more by purchasing the generic (read: Windows) version of the disk and reformatting it as HFS+ by using Disk Utility.
Almost every Mac sold today has at least one USB-C port, which is a new kind of hybrid USB/Thunderbolt port doesn't appear on Macs prior to 2018.
To make things even more confusing, the same USB-C port also supports Thunderbolt 3 (the latest and greatest connection technology for storage and other devices requiring fast transfer speeds) and recharging.Because the port is incompatible with every other type of USB cable ever made, you’ll probably need a USB-C adapter (or USB-C hub or dock) to connect your USB devices to your new computer’s USB-C/Thunderbolt port.
Whew. Now that you know all you need to know about your new external disk, the last step is to move some data from your startup disk to the new external disk. So copy the files or folders (your large files and folders are likely contained in your Pictures, Music, and Documents folders) to the new external disk; confirm that the files have been copied properly; make sure you have a backup, just in case; and then delete the files from your startup disk.
Subscribe to a free Mac newsletter
Subscribe to a once-a-week newsletter. Working Smarter Insiders email list offers hints, tips, techniques, humor, and advice on using your Mac better, faster, and more elegantly. Becoming an insider is free.Check out these other resources for Mac freaks.


