


Belly up to the toolbar
In addition to the sidebar and some good old-fashioned double-clicking, the macOS Finder window offers additional navigation aids on the toolbar — namely, the Back and Forward icons, as well as the extra-helpful view icons. You can find other handy features on the Go menu.In case you didn’t know, the toolbar is the area at the top of all Finder windows, which (among other things) displays the window’s name. On the toolbar you’ll find icons to navigate quickly and act on selected icons.
To activate a toolbar icon, click it once.
You say you don’t want to see the toolbar at the top of the window? Okay! Just choose View →Hide Toolbar or use its keyboard shortcut (Command +Option+T), and it’s gone. (If only life were always so easy!) Want it back? Choose View → Show Toolbar or use the same keyboard shortcut: Command +Option+T.
Alas, hiding the toolbar also hides the useful sidebar. If only you could choose to hide them independently… . I find this fact annoying because I use the sidebar a lot but don’t use the toolbar much. To make matters worse, View →Hide Sidebar (shortcut: Command +Option+S) lets you hide the sidebar without hiding the toolbar. It’s been like this for a long time, and for whatever reason, you still can’t hide the toolbar while keeping the sidebar visible! Boo. Hiss.
When you hide the toolbar, opening a folder spawns a new Finder window. The default, which is probably what you’re used to, is for folders to open in place, displaying their contents in a tab in the current window.
The toolbar’s default icons are shown in the preceding figure. So, if you customized your toolbar by choosing View→ Customize Toolbar, yours won’t look exactly like what's shown.Here is the lowdown on the toolbar’s default icons, from left to right:
- Forward and Back icons: Clicking the Forward and Back icons displays the folders that you’ve viewed in this window in sequential order. It's a lot like using a web browser.
Here’s an example of how the Back icon works. Say you’re in your Home folder; you click the Favorites icon, and a split-second later, you realize that you actually need something in the Home folder. Just a quick click of the Back icon and — poof! — you’re back Home. As for the Forward icon, well, it moves you in the opposite direction, through folders that you’ve visited in this window. Play around with them both; you’ll find them invaluable. The keyboard shortcuts Command +[ for Back and Command +> for Forward are even more useful (in my opinion) than the icons.
- View icons: The four View icons change the way that the window displays its contents.
You have four ways to view a window: Icon, List, Column, and Gallery. Some people like columns, some like icons, and others love lists or galleries. To each her own. Play with the four Finder views to see which one works best for you. For what it’s worth, I usually prefer Column view with a dash of List view thrown in when I need a folder’s contents sorted by creation date or size. And the Gallery view is great for folders with documents because you can see the contents of many document types right in the window, as I explain shortly.
Don’t forget that each view also has a handy keyboard shortcut: Command +1 for Icon view, Command +2 for List view, Command +3 for Column view, and Command +4 for Gallery view.
- Group By/Sort By: Click this icon to see a pop-up menu with options for grouping this window’s contents. Hold down the Option key to change the sort order (within the selected group). Note that the Group By/Sort By menu works in all four views.
- Share: Click here to share the selected items with others. A pop-up menu lets you choose to share via Mail, Messages, AirDrop, or Notes.
Big Sur’s extensible architecture lets you add other services (such as Vimeo or LinkedIn) and apps (such as Photos and Aperture) to your Share menu. To manage these extensions, choose More from the Share pop-up menu. Alternatively, you can launch the System Preferences application, click the Extensions icon, and then click the Share Menu item on the left side of the window.
- Add Tags: Click here to assign one or more colored tags to selected items.
- Action: Click this icon to see a pop-up menu of all the context-sensitive actions you can perform on selected icons, as shown.
If you see angle brackets (>>) at the right edge of the toolbar, at least one toolbar item is not visible. Click the angle brackets and a menu displays all hidden items (Group By, Share. Add Tags, and Action). Or expand the window so it’s wide enough to display all the items in the toolbar.
- Search: Click the little magnifying glass and the Search box appears. This is a nifty way to quickly search for files or folders. Just type a word (or even just a few letters), and in a few seconds, the window fills with a list of files that match. You can also start a search by choosing File --> Find (shortcut: Command +F).
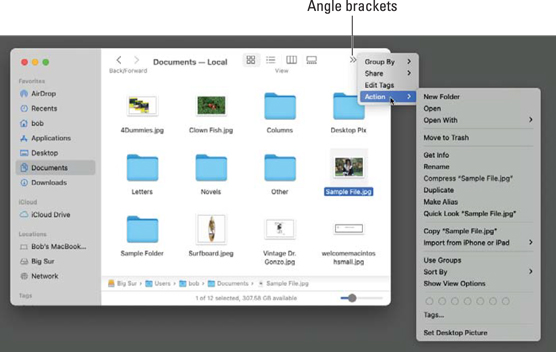 Use the Action pop-up menu to perform common actions on selected items.
What is an icon?
What’s an icon? Glad you asked. Each Finder icon represents an item or a container on your hard drive. Containers — hard drives, USB thumb drives, folders, CDs, DVDs, shared network volumes, and so on — can contain a virtually unlimited number of application files, document files, and folders (which can contain an unlimited number of application files, document files, and folders).Icons on the dock and the sidebar of Finder windows are not the same as the Finder icons. They’re simply convenient pointers to actual Finder icons. Technically, dock and sidebar icons are aliases.
Anyway, working with icons is easy:
- Single-click to select.
- Double-click to open.
- Click and drag to move.
- Release mouse button to drop.
The Finder icons in the wild
Although icons all work the same, they come in different kinds, shapes, and sizes. When you’ve been around the Mac for a while, you develop a sixth sense about icons and can guess what an unfamiliar icon contains just by looking at it.Here are the major icon types:
- Application icons are programs — the software you use to accomplish tasks on your Mac. Mail, Safari, and Calendar are applications. So are Microsoft Word and Adobe Photoshop.
Application icons come in a variety of shapes. For example, application icons are often square-ish, diamond-shaped, rectangular, or just oddly shaped. The first row of icons displays application icons of various shapes.
- Document icons are files created by applications. Letters created with TextEdit are documents. This article began life as a document created in Microsoft Word. And spreadsheet, PDF, video, image, and song files are all documents.
Document icons are often reminiscent of a piece of paper, as shown in the second row of icons.
If your document icons are generic, like the first three icons in the second row of the following figure, but you’d prefer icons that reflect their contents, like the last three icons in the second row, open View Options or use the Command +J shortcut, and then select the Show Icon Preview check box.
- Folder and disk icons are the Mac’s organizational containers. You can put icons — and the applications or documents they stand for — in folders or disks. You can put folders in disks or in other folders, but you can’t put a disk inside another disk.
Folders look like, well, manila folders (what a concept) and can contain just about any other icon. You use folders to organize your files and applications on your hard drive. You can have as many folders as you want, so don’t be afraid to create new ones. The thought behind the whole folders thing is pretty obvious: If your hard drive is a filing cabinet, folders are its drawers and folders (duh!). The third row in the following figure shows some typical folder icons.
And while disks behave pretty much like folders, their icons often look like disks, as shown in the last row of the figure.
- Alias icons are wonderful — no, make that fabulous — organizational tools.
If you’re looking for details about how to organize your icons in folders, move them around, delete them, and so on, hang in there.

