


Moving through folders fast in Column view
Column view is a darn handy way to quickly look through a lot of folders at once, and it’s especially useful when those folders are filled with graphics files. The Column view is my favorite way to display windows in Finder.To display a window in Column view, shown, click the Column view icon on the toolbar (as shown in the margin), choose View → As Columns from Finder’s menu bar, or press Command +3.
 A Finder window in Column view
Here’s how I clicked around in Column view to see the list of folders and files you see in the figure:
- When I clicked the Documents icon in the sidebar, its contents appeared in the column to the right.
- When I clicked the folder titled A Folder Full of Pictures in this column, its contents appeared in the second column.
- When I clicked A & J.jpg in the second column, the contents of that file appeared in the third column along with information about the file, such as its size (159KB) and the date and time it was created, modified, and last opened.
The third column is displaying a Preview, a feature available in all views by choosing View→ Show/Hide Preview. You can modify the information you see in the Preview by choosing View → Show Preview Options and enabling the items you want displayed in the Preview column.
Here are some helpful tips when you’re poking around Column view:- You can have as many columns in a Column view window as your screen can handle. Just drag any edge or corner of the window to enlarge it so new columns have room to open. You can also click the green Zoom (Maximize) button to make the window fill the screen. (Hint: To get out of full-screen mode, press Esc or move your cursor to the top of the screen and click the green Zoom button that appears near the top-left corner.)
If you Option-click the green Zoom button, the window will expand just enough to display all columns with content in them.
- You can use the little column divider lines at the bottom of every column to resize the column width.
You’ll see the resizer cursor when your mouse pointer is directly over a column divider line, as shown.
To be specific:
-
- If you drag the resizer left or right, the column to its left resizes.
- If you hold down the Option key when you drag a divider line, all columns resize at the same time.
- If you double-click a divider line, the column to its left expands to the Right Size, which is the width of the widest item in the column.
- If you right- or Control-click a divider line, you see a pop-up menu with four or five options: Right Size This Column, Right Size All Columns Individually, Right Size All Columns Equally, and Set Desktop Picture. You’ll see the fifth option, Import from iPhone or iPad, only if an iPhone or iPad is connected to your Mac.
- The preview column displays information about the highlighted item to its left, but only if that item isn’t a folder or disk. Why? Well, if it were a folder or disk, its contents would be in this column.
For many items, the picture you see in the preview column is an enlarged view of the file’s icon. You only see a preview when the selected item is saved in a format that Quick Look can interpret (which is to say, most image file formats, including TIFF, JPEG, PNG, GIF, and PDF to name a few, as well as many other file formats, including Microsoft Word and Pages).
If you don’t like having the preview displayed in Column view (but want it to remain in all other views), choose View → Show View Options and deselect the check box for Show Preview Column. You can do the same for any other view, or turn the preview off in all views by choosing View → Hide Preview.
Perusing in Icon view
Icon view is a free-form view that allows you to move your icons around within a window to your heart’s content. To display a window in Icon view, click the Icon view icon in the toolbar, choose View → As Icons from Finder’s menu bar, or press Command +1.The best part of Icon view, at least in my humble opinion, is the Icon Size slider in the lower-right corner of Icon view windows (or in the top-right corner if the sidebar and toolbar are hidden).
Listless? Try touring folders in List view
Now I come to my second-favorite view, List view (shown). I like it so much because of the little angle bracket to the left of each folder. These angle brackets, which were called disclosure triangles in earlier macOS releases, let you see the contents of a folder without actually opening it. This view also allows you to select items from multiple folders at once and move or copy items between folders in a single window. Finally, it’s the view used to present Spotlight search results.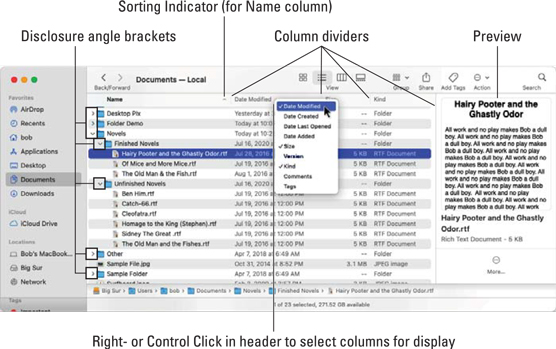 A window in List view
To display a window in List view, click the List view icon on the toolbar, choose View→ As List from the Finder menu bar, or press Command +2.
When you’re in List view, the following tips can help you breeze through your folders to find what you’re looking for:
- To disclose a folder’s contents, click the angle bracket to its left or, if it’s selected, press the right-arrow key. The figure shows the result of either clicking the angle bracket to the left of the Novels folder or selecting (highlighting) the Novels folder and pressing the right-arrow key.
I pressed Option+→ in the figure, so all the Novels folder’s subfolders (the Finished Novels and Unfinished Novels folders in this case) also expanded. And if either of these subfolders (or any other subfolder in the Novels folder) had subfolders, they too would have been expanded when I pressed Option+→.
To close an open folder, click the angle bracket again or select the folder and press left-arrow. To close all open folders in a List view window, choose Edit → Select All (or press Command +A) and then press Option+←.
The angle brackets don’t appear if you’re using groups. To see the angle brackets, choose View→Use Groups or the keyboard shortcut Command+Control+0 (zero). These are toggles, and will turn groups off if they’re enabled or on if they’re disabled. You could also choose None from the Group icon/menu in the toolbar.
Disclosure angle brackets and groups are an either/or situation—you either have disclosure angle brackets or groups but not both at the same time (in the same window).
- Click the column header to sort items in List view. Note the little upside-down v at the right edge of the selected column (the Name column in the figure). That’s the column’s sorting indicator. If the v points upward, as it does in the figure, the items in the corresponding column are sorted in alphabetical order; if you click the header (Name) again, the triangle will flip upside down and point downward and the items will be listed in the opposite (reverse alphabetical) order. This behavior is true for all columns in List view windows.
- You can change the order in which columns appear in a window. To do so, press and hold down on a column’s name, and then drag it to the left or right until it’s where you want it. Release the mouse button, and the column moves.
The exception (isn’t there always an exception?) is that the Name column always appears first in List view windows; you can move all other columns about at will. In fact, you can even hide and show columns other than Name if you like using the View Options window.
It’s even easier to hide or show columns by right- or Control-clicking anywhere on any column header (as shown below the Date Modified column in the preceding figure). Column names with check marks are displayed; column names that are unchecked are hidden.
You can fine-tune all four views and the desktop by using the View Options window. Just choose View→ Show View Options or press Command +J. The options you see apply to the active window or the desktop. Click the Use as Defaults button to apply these options to all windows in that view (that is, Icon, List, Column, or Gallery).
- To widen or shrink a column, hover the cursor over the dividing line between that column and drag left or right. When your cursor is over the dividing line in the header, it changes to a double-headed resizer.
Hangin’ in the Gallery (view)
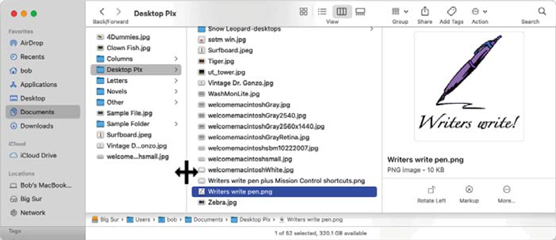
Gallery view is the latest iteration of Cover Flow view in High Sierra and earlier. To display a window in Gallery view, click the Gallery view icon on the toolbar, choose View→ As Gallery from Finder’s menu bar, or press Command +4. This figure shows Gallery view. A window in Gallery view
Although Gallery view is useful only for folders with documents or images, it does offer at least three cool features:
- The selected item (Writers Write Pen.png in the figure) appears in a preview in the top part of the window.
- The Preview column displays additional information about the selected item.
- You can quickly flip through the previews by clicking the images to the left or right of the current preview image or by pressing the left- or right-arrow keys.
What’s next on the (View) menu?
The Finder View menu offers several commands in addition to the four views. These commands might help you peruse your icons more easily:- Use Groups: Active window only. When enabled, it subdivides the items in the active window into groups, as shown, which is grouped by Date Last Opened.
- Group By: This submenu offers nine options for grouping items in the active window:
- Name (shortcut: Command +Control+1)
- Kind (shortcut: Command +Control+2)
- Application (strangely, there’s no shortcut for this command)
- Date Last Opened (shortcut: Command +Control+3)
- Date Added (shortcut: Command +Control+4)
- Date Modified (shortcut: Command +Control+5)
- Date Created (strangely, there’s no shortcut for this command either)
- Size (shortcut: Command +Control+6)
- Tags (shortcut: Command +Control+7)
- Clean Up: Clean Up is available only in Icon view or on the desktop when no windows are active. Choose this command to align icons to an invisible grid; you use it to keep your windows and desktop neat and tidy. (If you like this invisible grid, don’t forget that you can turn it on or off for the desktop and individual windows by using View Options.) If no windows are active, the command instead cleans up your desktop. (To deactivate all open windows, just click anywhere on the desktop or close all open windows.)
If any icons are selected (highlighted) when you pull down the View menu, you see Clean Up Selection rather than Clean Up. If you choose this command, it moves only the icons that are currently selected.
- Clean Up By: This command combines the tidiness of the Clean Up command with the organizational yumminess of the Sort By command,.
This command sorts the icons by your choice of criteria, namely:
-
- Name (shortcut: Command +Option+1)
- Kind (shortcut: Command +Option+2)
- Date Modified (shortcut: Command +Option+5)
- Date Created (no shortcut)
- Size (shortcut: Command +Option+6)
- Tags (shortcut: Command +Option+7)
Clean Up By is similar to the Sort By command, but unlike Sort By, Clean Up By is a one-time affair. After you’ve used it, you can once again move icons around and reorganize them any way you like.
- Sort By: This command rearranges the icons in the active window in your choice from among nine ways, which happen to be the same nine options (ten, if you count None) in the Sort By pop-up menu.
Unlike Clean Up By, which is a one-shot command, Sort By is persistent and will continue to reorganize your icons automatically. In other words, you can’t move icons around manually in an arranged window.
One last thing: The Clean Up and Clean Up By commands are available only for windows viewed as icons. The Sort By command is available in all four views and remains in effect if you switch to a different view or close the window. To stop Finder from arranging icons in a window, choose None from the View→Sort By submenu or Option + click the toolbar’s Group pop-up menu and choose None.
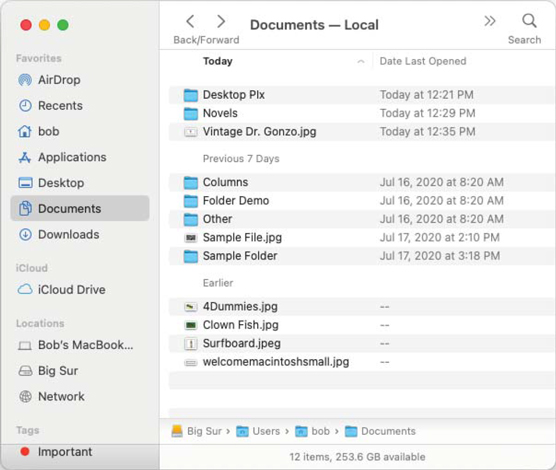 The items in this window are grouped by Date Last Opened.
If you’re like me, you’ve taken great pains to place icons carefully in specific places on your desktop. If so, the Clean Up By and Sort By commands will mess up your perfectly arranged desktop icons. And alas, cleaning up your desktop is still not something macOS lets you undo.

