


Thankfully, the newest email programs incorporate features that automatically shrink the photo display to a viewable size. But that doesn't change the fact that a large photo file means longer downloading times and, if recipients hold onto the picture, a big storage hit on their hard drives.
Sending a high‐resolution photo is the thing to do if you want the recipient to be able to generate a good print. But for simple onscreen viewing, a good practice is to limit the image size to about 1,000 pixels on the longest side. That ensures that people who use an email program that doesn't offer the latest photo‐viewing tools can see the entire picture without scrolling the viewer window.
Because you need lots of pixels if you want to produce decent prints — and adding pixels after the fact lowers image quality — always shoot your originals at a resolution appropriate for print. You can then create a low‐res copy of the picture for email sharing or for other online uses, such as posting to Facebook. (Posting only low‐res photos to Facebook and online photo‐sharing sites also helps dissuade would‐be photo‐thieves looking for free images for use in their company's brochures and other print materials.)
In addition to resizing high‐resolution images, also check their file types; if the photos are in the Raw or TIFF format, you need to create a JPEG copy for online use. Web browsers and email programs can't display Raw or TIFF files.For Raw photos or JPEG images already on your computer, you can do both bits of photo prep using Canon Digital Photo Professional 4. When you process the Raw file, just choose JPEG as the file type and set the image dimensions you want to use. Set the level of JPEG compression by dragging the Quality slider; a higher Quality value produces a larger file and better image quality. To resize a JPEG file, click the thumbnail and choose Convert and Save from the File menu. Keep the file type set to JPEG, set the image dimensions, and set the Quality slider. But before you click the Save button, be sure to give the file a new name so that you don't overwrite the original.
For JPEG images you haven't yet downloaded, you can do the job using the Resize option built into the camera. However, the smallest size copy the camera can create is 2400 x 1600 pixels, or 3.8 megapixels. That's the same size as the S2 Image Quality setting, and it's still pretty large for online use. But if you can't get to your computer, sending an S2 sized copy is better than uploading a maximum resolution original.
Like other post-capture tools, the Resize option is available through the playback version of the Quick Control screen, shown on the left, or Playback Menu 2, as shown on the right.
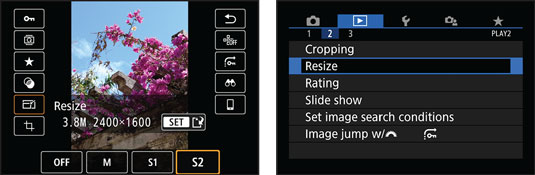 You can create low-resolution copies of JPEG images using the camera's Resize tool.
Whichever way you go, you're presented only with size options that result in a smaller file than the original. After you choose a setting, tap the Set icon or press the Set button. On the confirmation screen that appears, choose OK. During playback, you can distinguish the resized copy by looking in the lower-right corner of the screen. For the copy, you see the symbol labeled "Edited photo" as shown, while the neighboring value displays the Image Quality of the copy (S2, in the figure).
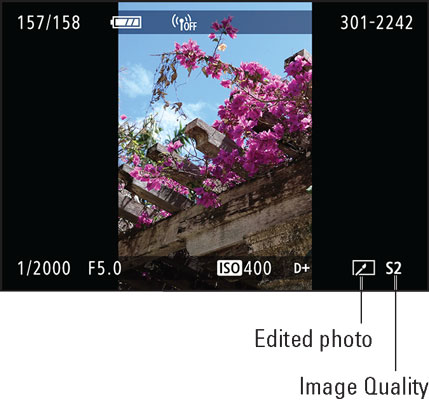 The "edited" symbol appears on the resized copy, along with the value indicating the Image Quality setting.
Keep in mind that if you have a smartphone or tablet compatible with the Canon Camera Connect app, you may want to use the app to resize JPEG photos and send them online. The app enables you to create lower-resolution copies than the in-camera Resize tool.


