


In the Basic Zone exposure modes, you have no control over how much adjustment is made. But in P, Tv, Av, and M modes, you can decide whether to enable Auto Lighting Optimizer. You also can request a stronger or lighter application of the effect than the default setting, which is Standard. The following image offers an example of the impact of each Auto Lighting Optimizer setting.
 For this image, Auto Lighting Optimizer brought more life to the shot.
Given the level of improvement that the Auto Lighting Optimizer correction made to this photo, it may seem crazy to ever disable this feature on your Canon camera. But it’s important to note a few points:
- The level of shift that occurs between each Auto Lighting Optimizer setting varies depending on the subject. This particular example shows a fairly noticeable difference between the High and Off settings. But you don’t always see this much impact from the filter. Even in this example, it’s difficult to detect much difference between Off and Low.
- Although the filter improved this particular scene, at times you may not find it beneficial. For example, maybe you’re purposely trying to shoot a backlit subject in silhouette or produce a low‐contrast image. Either way, you don’t want the camera to insert its opinions on the exposure or contrast you’re trying to achieve.
- Enabling Auto Lighting Optimizer may slow your shooting rate. That slowdown occurs because the filter is applied after you capture the photo, while the camera is writing the data to the memory card.
- In some lighting conditions, Auto Lighting Optimizer can produce an increase in image noise. Noise becomes more apparent when you enlarge a photo. It also tends to be most visible in areas of flat color.
- The corrective action taken by Auto Lighting Optimizer can make some other exposure‐adjustment features less effective. So turn it off if you don’t see the results you expect when you’re using the following features:
- Exposure compensation.
- Flash compensation.
- Automatic exposure bracketing.
- You can’t use this feature while Highlight Tone Priority is enabled. In fact, as soon as you turn on that feature, the camera automatically disables Auto Lighting Optimizer.
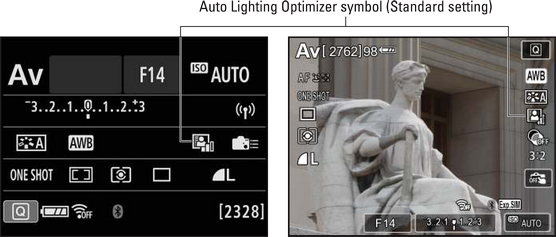 These symbols tell you the status of the Auto Lighting Optimizer setting.
Notice the vertical bars in the graphic—the number of bars tells you how much adjustment is being applied. Two bars, as you see above, represent the Standard setting; three bars, High; and one bar, Low. The bars are replaced by the word Off when the feature is disabled.
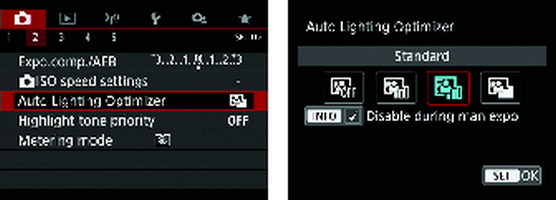
By default, the Auto Lighting Optimizer level is set to Standard for the P, Tv, and Av modes. In M mode, the feature is disabled by default. You can adjust these settings in two ways:- Shooting Menu 2: Choose Auto Lighting Optimizer, as shown on the left in the image you see next, to display the settings screen shown on the right below. Here, you can select the level of adjustment you want to apply.
 You can also adjust Auto Lighting Optimizer settings through Shooting Menu 2.
Just below the four adjustment-level symbols, notice the check box next to the Info label. This is the option that determines whether Auto Lighting Optimizer is applied in the M exposure mode. By default, the box is checked, as in the image above, telling the camera not to make the adjustment during manual exposure. If you do want to add the adjustment, tap the check box or press the Info button to toggle the check mark off.
Tap Set or press the Set button to return to Shooting Menu 2.
- Quick Control method: You also can adjust the setting using the Quick Control method. After pressing Q or tapping the Q symbol to shift to Quick Control mode, highlight the Auto Lighting Optimizer icon and press Set (or just tap the symbol). You’re presented with the same options screen you see in the image above.
If you’re not sure what level of Auto Lighting Optimizer might work best or you’re concerned about the other drawbacks of enabling the filter, consider shooting the picture in the Raw file format. For Raw pictures, the camera applies no post‐capture tweaking, regardless of whether this filter or any other one is enabled. Then, by using Canon Digital Photo Professional, the software provided free with the camera, you can apply the Auto Lighting Optimizer effect when you convert your Raw images to a standard file format.
If you want to learn more about your Canon EOS Rebel T8i/850D, check out our Cheat Sheet.


