


Give your Canon’s Set button an extra job
Normally, the main role of the Set button is to select items from the camera menus and Quick Control screens. When you shoot in the P, Tv, Av, and M exposure modes, though, you can use the button to perform one of several additional tasks. To take advantage of this feature, display Setup Menu 5 and choose Custom Functions. Next, scroll to Custom Function 13, Custom Controls, as shown on the right. You can configure your Canon's Set button to perform an extra function during shooting.
Through this screen, you can customize five buttons. For now, focus on the Set button. To move forward with assigning it a new function, press the button or tap any of the button icons in the middle of the screen. You then access the button-assignment command module, shown on the left below. Tap the Set icon or move the yellow frame over it and then press the Set button.
Now you see the screen shown on the right. The icons displayed represent the tasks you can assign to the Set button. You select the highlighted option, you can adjust the Exposure Compensation amount when shooting by holding down the Set button and rotating the Main dial. Notice the label at the top of the screen—it explains what function the icon enables the Set button to accomplish.
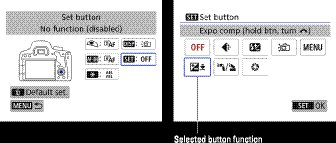 After choosing Set (left), select which function you want to assign to the button (right).
To finish, tap OK or press the Set button. Then press Menu or tap the Menu icon a couple of times to return to Setup Menu 5. Press the Menu button again to return to shooting. To reset the button to its original role, revisit the right screen and change the setting back to Off.
When you reconfigure most buttons on the camera, they cease to perform as indicated elsewhere in this book (and in the camera instruction manual). For the Set button, however, that’s not true. It can actually do dual duty. After you assign it a function, it still does its normal job of selecting the currently highlighted menu item and Quick Control option.
Customize 4 other Canon buttons
Follow the same menu path from the first image, and you can customize four buttons in addition to the Set button: The shutter button, the AF-ON button, the AE Lock/FE Lock button, and the DISP button.When you get to the screen where you select the button you want to customize, there’s a graphic that highlights the location of the button currently selected for customization. In this next image, for example, I selected the shutter button (and no, I don’t understand how that symbol in any way looks like the shutter button, which is why it’s good you get both the location graphic and a label that identifies the selected button). The label also indicates the current function of the button.
The process of setting a new function for a button is the same as just described for the Set button. There are different functions available for different buttons, and as you highlight each option, the camera indicates what the button will do if you assign it that function.
If you customize buttons, you can return to the screen shown on the right for a reminder of which task you assigned to each button. To restore all the buttons to their default assignments, visit the screen shown on the left in the image from the previous section and tap the Default Set. symbol or press the Erase button. (To get to the screen, open Setup Menu 5, choose Custom Functions, choose Custom Function 13, and press the Set button.)
Your custom button assignments are not reset when you choose the Clear All Custom Func. option, which you select by opening Setup Menu 5 and choosing Clear Settings. You have to dig into the customization screen to restore the button defaults.
Disable the AF-assist beam on your Canon
In dim lighting, your camera may emit an AF (autofocus) assist beam from the built‐in flash when you press the shutter button halfway—assuming that the flash unit is open, of course. This pulse of light helps the camera “see” its target better, improving autofocus performance.In situations where the beam may be distracting, you can disable it—but again, only when using the P, Tv, Av, and M exposure modes. Make the change via the AF-assist Beam Firing option on Shooting Menu 5. Along with the basic Enable and Disable settings, you get two options related to using an external flash. Choosing the Enable External Flash Only option permits an external flash to emit the beam but prevents the built‐in flash from doing so. The other setting, IR AF Assist Beam Only, allows an external flash that has infrared (IR) AF‐assist to use only the IR beam, which is less noticeable than the regular light.
These and other external flash options work only with certain flash units; your camera manual provides specifics on compatible models.
Create a custom menu on your Canon
Through the My Menu feature, you can create a custom menu containing up to five tabs, each of which can hold six menu items. The idea is to enable you to group your favorite menu options together in a way that makes more sense to you than the standard menu organization. In the following image, for example, the first tab contains six shooting options that appear on separate tabs in the normal menu configuration.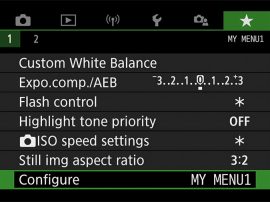 The My Menu feature lets you create a custom menu.
Having this kind of control may appeal after you’re fully aware of how all your Canon camera settings work and which features you use the most. But when you’re just beginning, stick with the standard menu structure so that what you see on your camera matches the instructions found in this book and other resources.
Two other issues to note about the My Menu feature: First, you can access it in the P, Tv, Av, and M exposure modes only. In any other exposure mode, your custom menu doesn’t appear, which means that you have to learn two menu layouts instead of just one. The other thing required before the My Menu feature appears is that you switch from the default guided menus/displays to the standard versions, which you do via the Display Level menu.
To create a custom menu, display the My Menu tab, which is marked with a white star on a green background. At first, the only option available is Configure. Select that option to display options that enable you to add items to the first tab of your menu, to sort the items you add, to delete individual items, to delete an entire tab, or to give a tab a name.
After you add six items to fill up My Menu 1, the Configure option appears at the bottom of the screen, as shown above. In fact, it appears on every tab you create so that you can always add tabs, rearrange items, and perform other menu-maintenance tasks.
Add custom folders on your Canon
Normally, your camera automatically creates folders to store your images. The first folder has the name 100Canon; the second, 101Canon; and so on. Each folder can hold 9,999 photos. However, you can create a new folder before the existing one is full at any time. You might take this organizational step so that you can segregate work photos from personal photos, for example. To create the folder, open Setup Menu 1 and choose Select Folder, as shown on the left below. On the next screen, choose Create Folder, as shown on the right.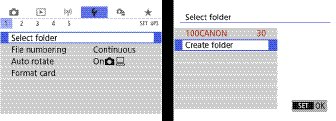 You can create a new storage folder at any time.
The camera asks for permission to create the folder. To move forward, choose OK and press Set. The folder is automatically assigned the next available folder number and is selected as the active folder—the one that will hold any new photos or movies you shoot. Press the Set button or tap the Set icon to return to Setup Menu 1.
To make a different folder the active folder, choose Select Folder again, choose the folder you want to use, and press or tap Set. When you choose a folder that contains photos or movies, the camera displays thumbnails of the first and last files in the folder on the right side of the screen, along with a total count of all the files in the folder.
If you create custom folders, several playback features enable you to limit operations to a specific folder. For example, you can choose to delete all files from a specific folder.
Turn off your Canon’s shooting settings screen
When you turn on your camera, the monitor automatically displays the screen that shows shooting settings for normal, through-the-viewfinder photography. If you prefer not to see the display upon startup, set the Mode dial to P, Tv, Av, or M, select Custom Functions from Setup Menu 5, and bring up Custom Function 12, Screen Display When Power On. Change the setting from the default, Display On, to Previous Display Status.The setting name reflects the fact that the camera remembers the current display status when you turn the camera off. Then it returns to that previous status the next time you turn the camera on. So if you don’t want the display to appear on startup, press the DISP button to shut off the display before powering down the camera.
Although disabling the automatic display saves battery power, having to remember to turn the display off each time you shut down the camera is a pain. So I stick with the default setting and then press the DISP button to toggle the screen on and off if the battery is running low. Also note that if the camera is set to any of the Basic Zone modes when you turn on the camera, the display appears regardless of the setting you choose for the Custom Function.Embed copyright notices on your Canon images
If you sell your photography or have other reasons why people need to know that you are the photographer of an image, this customization feature is definitely worth enabling. You can embed a copyright notice into the metadata—hidden text data—that’s included in every photo or movie you capture. Anyone who views your picture in a program that can display metadata can see your copyright notice.You can enter copyright data only when the camera is set to P, Tv, Av, or M exposure mode, but the information you enter is added to all new files you create, regardless of which exposure mode you used to capture them.
Follow these steps to create your copyright notice:- Open Setup Menu 5 and choose Copyright Information, as shown on the left. You see the screen shown on the right above.
 Enter your name and other copyright information that you want tagged to your images.
You see the screen shown on the right above.
- Choose Enter Author’s Name to display the digital keyboard.
 Enter the text you want to include in your copyright notice.
 - Enter your name. The easiest option is to use the touchscreen: Just tap the letters you want to enter; the characters you select appear in the text box above the keyboard. Tap the symbol labeled "Cycle through keyboards" in the figure to shift the keyboard display from letters to numbers and symbols and then to numbers and different symbols.To move the cursor in the text box, tap inside the box or tap the arrows at the end of the text box. To erase the character to the left of the cursor, tap the icon labeled "Delete character" in the figure.If you prefer button pushing to touchscreen tapping, use the Quick Control dial to highlight a key and then press the Set button. You can rotate the dial to move quickly through the keyboard or press the top/bottom/left/right edges to move character by character.
- When you finish entering your name, tap Menu or press the Menu button. Then choose OK and press Set.The camera redisplays the Copyright Information screen.
- Choose Enter Copyright Details to return to the keyboard and add any additional data you think necessary. You might want to add the year or your email address, for example. (You don’t need to enter the word Copyright—it’s added automatically.)
- Tap the Menu icon or press the Menu button to exit the text entry screen.
- On the confirmation screen, choose OK. You’re again returned to the Copyright Information screen. If you want to check your work, choose Display Copyright Info (it becomes available after you enter copyright text).
- Tap Menu or press the Menu button again to return to Setup Menu 5.
- Press the Menu button one more time to exit the menu system.
Add cleaning instructions to images on your Canon Rebel
If small spots appear consistently on your images—and you know that dirt on your lens isn’t the cause—your sensor may need cleaning. The Dust Delete Data feature, designed for use with Canon Digital Photo Professional 4, provides a stop-gap measure until you can take the camera to a service shop for sensor cleaning.You start by recording a data file that maps the location of the dust spots on the sensor. To do this, you need a white piece of paper and a lens that offers a focal length of 50mm or longer. Put the camera in the P, Tv, Av, or M exposure mode, set the lens to manual focusing, and then set the focus distance at infinity. (If you’re holding the camera in the horizontal position, turn the lens focusing ring counter‐clockwise until it stops.) Next, open Shooting Menu 4, choose Dust Delete Data, and then select OK.
Position the paper 8 to 12 inches from the camera, make sure that the paper fills the viewfinder, and then press the shutter button all the way. No picture is taken; the camera just records the Dust Delete Data in its internal memory. When you see the message “Data obtained,” choose OK. The current date appears on the initial Dust Delete Data screen.
After you create your Dust Delete Data file, the camera attaches the data to every image you shoot. To clean a photo in Digital Photo Professional 4, select the image thumbnail, open the Adjustment menu, and then click Apply Dust Delete Data. The program’s instruction manual, available for download from the Canon website, offers additional details.
Stop a retractable lens from closing on your Canon
If your lens is one that retracts—collapses from front to back to create a smaller footprint when you’re not using the camera—you can decide whether you want the lens to retract automatically every time you turn the camera off. That’s the default setting, and it makes sense unless you’re in a situation where you’re powering the camera on and off every few minutes, as you might do when preserving every ounce of battery power is critical.In that scenario, having to wait for the lens to retract and then reopen every time you power the camera down and back up again is annoying and, with some lenses, a little noisy. To prevent the auto retracting, open Setup Menu 5, choose Custom Functions, and navigate to Custom Function 14, Retract Lens on Power Off. Then change the setting from Enable to Disable.
A couple of fine points related to this issue: Even when you leave the setting at Enable, the lens doesn’t retract when the you reach the delay time selected for the Auto Power Off setting on Setup Menu 2. (That’s the setting that automatically puts the camera to sleep after a period of inactivity.) Also, never try to detach the lens when it’s not retracted. If you set the Retract Lens on Power Off setting to Disable, check the lens manual to find out how to retract the lens. (Most retractable lenses have their own switch to perform this function.)
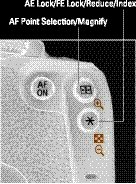
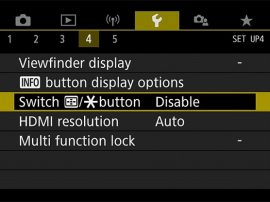
Swap the AF point selection and AE lock button functions
See the two buttons highlighted below? Normally, the top one is used to choose an autofocus point during shooting and to magnify photos during playback. The other button—often referred to as the asterisk button, for obvious reasons—has two functions during shooting and two during playback. During shooting, you press the button to lock the current autoexposure settings, preventing any further adjustment to those settings before you take the picture.When you’re using flash, you use the asterisk button for FE Lock (flash exposure lock), which sets a custom flash power based on the object at the center of the frame. When viewing your images, the button changes the playback from single-image view to thumbnails view and, when an image is magnified, reduces the magnification level. The official name of this button is the AE Lock/FE Lock/Reduce/Index button.
 You can swap the functions of these two buttons, but it's not advised.
Through the Setup Menu 4 option, you can swap the functions of these two buttons. What’s the benefit, you ask? Well, if you use the AE Lock and FE Lock features a lot, it’s easier to locate the top button and press it with your thumb than it is to find and press the lower button, which is the one that does the job by default.
 You can swap the functions of these two buttons through this Setup Menu 4 option.
Although this is a good option, it would be nice to have little stickers to cover the buttons with the markings that reflect their new functions after you make this change.
As an alternative, consider assigning the AE Lock and FE Lock functions to the AF ON button, if you don’t use that button for its intended purpose often. (By default, pressing the button does the same thing as a half-press of the shutter button: initiating autoexposure and autofocus.)


