


Teams can be accessed from the web browser, a desktop application, or a mobile app. The maximum number of users who can access the full functionality of Teams is based on the number of licensed users in the organization. Guest access is allowed, which means that users from other Office 365 tenants can be invited to an organization’s Teams hub without the need for additional licenses.
With Teams, you can conduct one-on-one or group audio and video calls. You can share screens during web conferencing, schedule meetings, and also record those meetings. In addition, each user has up to 1 TB of storage space.
From an administrator’s standpoint, Teams offers tools for managing users and third-party applications. There are reports to glean usage and settings that can be configured with policies specific to the organization. For peace of mind, Microsoft offers a 99.9 percent financially backed service-level agreement (SLA) uptime for Teams.
Touring the Microsoft Teams user interface
Tabs, bots, @mentions, and red bangs are just part of the new lingo you’re going to need to add to your vocabulary to use Teams. That’s assuming you’re already a savvy social media user who knows what emojis, stickers, and giphys are all about.Let’s take a tour of the Teams user interface. When you run the desktop application, the first screen you see after you log in is shown below.

- App bar: Here you can navigate to the various sections in Teams. From the top, you’ll see the following icons:
- Activity is where you’ll find mentions, replies, and other notifications.
- Chat is where you’ll see your recent one-on-one or group chats and your Contacts list.
- Teams displays all the teams you are a member of.
- Meetings or Calendar is synched with your Outlook calendar and displays all your upcoming meetings.
- Files aggregates all the files from all the teams you are a member of. It is also where you access your personal OneDrive for Business storage.
- Calls allows you to see a history of all incoming and outgoing video and audio calls. You can also call others in your organization, simply by typing their name.
- […> includes links to apps that are tied to Teams and the channels within Teams.
- Store takes you to apps and services that can be integrated into Teams.
- Feedback takes you to the Microsoft Teams user voice page where you can leave feedback about the service.
- Teams section: In the image above, the Teams icon is selected in the App bar, so the list of one's teams is displayed.
- Channel: A dedicated section within a team to organize conversations and tasks into specific topics or projects.
- Join or Create a Team button: Clicking this button takes you through the process of creating or joining a team. This button is only visible when the Teams icon is selected in the App bar.
- New Chat button: Clicking this button selects the Chat icon in the App bar and allows you to start a new chat with an individual or a group.
- Command bar: This bar at the top is used to query apps or perform a search in Teams.
- Tabs: Switch between different Teams pages with these tabs. Conversations and Files are automatically included; the + sign tab allows you to add shortcuts to content in Teams.
- Channel Conversations: This section displays all the conversations in the selected channel. Chats in Channel Conversations are persistent, so if you’ve been away, it’s easy to scroll through to get caught up when you get back. Chats can include visual indicators such as the @mention, which indicates that the chat specifically mentions a user, or a red bang to indicate high importance. Take note that chats are open by design so everyone in the team has visibility to the conversation to help speed up the decision-making process when needed.
- Compose box: This is where you can type a message to start a conversation. You can send a quick chat or expand the Compose box to access rich formatting tools.
- Send icon: When you’re ready to share your chat, click the Send icon to post your chat to the team.
Getting help from the Microsoft Teams Command bar
Teams is intuitive to use, but you if you need quick assistance, the Command bar is your one-stop destination for help. You can do a search across conversations, users, files, and apps. For example, if you enter the word “launch” in the command bar, the left pane will display the search results grouped by Messages, People, and Files.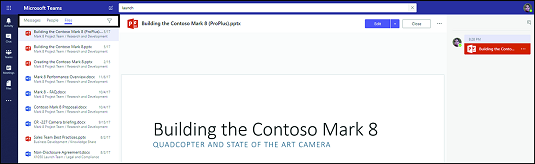 Command bar search results.
You can also run a command right from the Command bar by entering a slash ( / ). This action will display the available commands or shortcuts. Select the appropriate command from the list to initiate the command.
 Slash command shortcuts.
Collaborating in the Microsoft Teams Hub
Many think that the “email tree” phenomenon was isolated to big enterprise environments, but it often rears its ugly head in small organizations, too.Imagine the following scenario: Someone sends an email to three people asking for their input on something. Two of the recipients immediately respond. Recipient #3 replies to Recipient #2 but forgets to reply to all. Now Recipient #2 has information the others don’t have. Recipient #1 then forwards the email to yet another person (Recipient #4) who replies to all with his feedback, which doesn’t account for what’s already been discussed prior to him being involved. Pretty soon, everyone’s mailbox explodes with replies to replies and replies to all so that the sender finally throws her hands up in frustration because now the conversation has gotten out of hand and she's spending too much time getting everyone up to speed. On top of that, she now must consolidate all the feedback manually.
Teams makes email trees go away. In Teams, the sender can avoid the previous scenario by uploading the file into the Teams channel, @mention the people she needs feedback from, and start a conversation right from the document in Teams. This way, everyone sees everyone’s comments and edits. A new person joining the conversation can just scroll up to get up to speed and everyone is well-informed and happy.
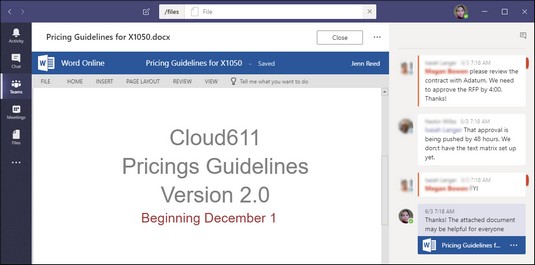 Starting a conversation about a document in Teams.
Creating and managing a Microsoft Teams hub
To collaborate in Teams, you first need to be either a member of a Teams hub or the creator of one. To create a team:- Click Teams from the App bar.
- Click the Join or Create a Team link that appears at the bottom of the App bar.
- Click the Create a Team card.
- Enter the name and description of the team.
- Choose the privacy settings for your team (Private or Public). A Private team means only team owners can add members, while a Public team means anyone in your organization can join the Team.
- Click Next.
- Add members to your team by adding a name, email address, a distribution list, or a mail-enabled security group in the Add box. A team can have a maximum of 2,500 members from either your organization or external users through secure guest access.
- Optionally, you can choose the role of the team member (Owner or Member) by clicking the drop-down arrow next to Member. If you forget to do this, you can update the membership type later.
- Click Close. Team management features are accessed by clicking the ellipses next to your team name in the App bar. The following management options are available:
- Manage team launches the Members tab where you can add or remove members, change the role of a member, or search for a member.
- Add a channel launches a dialog box where you can enter a channel name and the description for the channel.
- Add members launches a dialog box where you can enter the names of people, distribution lists, or mail-enabled security groups to add to your team.
- Leave the team launches a validation window that asks you to confirm your intent to leave the team.
- Edit team launches a dialog box where you can change the team name, the team description, and privacy settings.
- Get link to team launches a dialog box where you can copy the URL for the team to share with others.
- Delete the team launches a validation window that asks you to confirm your intent to delete the team.
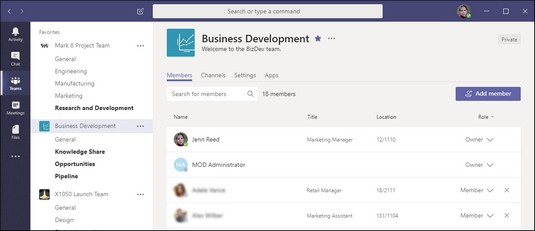 Managing members of the Team.
Chatting in Microsoft Teams
When a new member is added to a team, that member automatically gets access to all previous conversations, files, and other types of information shared in the team’s hub. This is especially helpful for onboarding a new team member to a project. There is no need to think about what files to forward to get the new member up to speed, since they can self-serve from the content available in the hub or simply ask for help from others through chat.To start a chat, click on the Compose Box and start typing your message while in either the Activity, Chat, or Teams sections. When you’re done, click the Send icon to post your message. Depending on the culture of your team, you can spice up your chats with emojis, giphys, or stickers. You’ll find a variety of options when you click these icons below the Compose Box.
Sometimes conversations in a team can become noisy when there are many members talking about different topics. To help with that, take advantage of the threaded messages feature in Teams by replying directly to a specific message so the reply in in context with the original message.
Sharing files in Microsoft Teams
When you create a Teams hub, a SharePoint site is automatically created in the backend, which, in turn, creates a document library for each channel. Files uploaded in a Teams channel show up in the Files tab and are stored in a SharePoint document library. In fact, you can click the ellipses next to the file name and then choose to open the file from its location in SharePoint.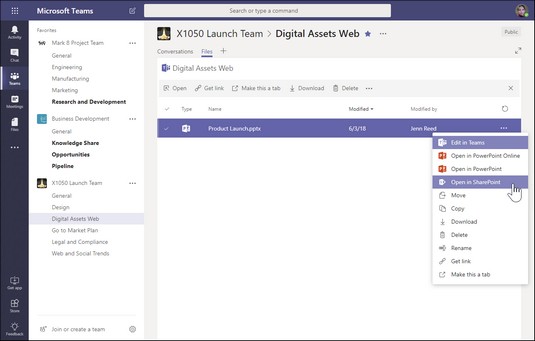 Opening a file in SharePoint from Teams.
To share a file in Teams:
- Select Teams from the App bar.
- Compose a message in the Compose box from a channel.
- Click the Attach icon (it looks like a paperclip) below the Compose box and select the source for the attachment you want to share.
- Select the file from the source and upload it. The file you uploaded will now be embedded in the message.
- Click the Send icon (it looks like an airplane) to post your message. The file you shared will also show up in the Files tab. Alternatively, you can go directly to the Files tab and click the Upload button to upload a file. Once the file is uploaded, click the name of the file to open it. Once opened, you can start a conversation with others regarding the document.
Meeting and conferencing the Microsoft Teams way
Chats and conversations in Teams are fun ways to communicate with others. Sometimes, however, it’s more efficient to get on a quick call with team members to resolve an issue versus going back and forth in a chat. Fortunately, Teams provides a complete meeting solution with support for audio and video conferencing. Because calling capabilities are built into Teams, you don’t need to log out of Teams and open a separate application to start an ad-hoc meeting.For more formal meetings, you can schedule a meeting much like how you set up meetings in Outlook. Meetings you create in Teams will show up in your Outlook calendar.
Setting up an impromptu Microsoft Teams meeting
Let’s say for example you are chatting with three members of your team about an issue. After a lengthy back and forth and waiting times in between, you decide it’ll be much faster to just get on a call and talk about the issue. To start an impromptu meeting:- Reply to the conversation thread and click the Video icon that appears at the bottom of the Compose box.
- From the video window that pops up, enter a subject for your call.
- Toggle the video camera on or off to choose between sharing your video or just audio.
- Click Meet Now to start the conference. A conference window will open with a pane on the right where you can invite others to join the meeting.
 Starting an impromptu meeting.
 - When you’re done with the meeting, click the red phone icon to end the call and leave the meeting.
Scheduling a Microsoft Teams meeting
You can set up a formal meeting ahead of time to give the invited participants notice about a meeting. Like Outlook, formal meeting requests in Teams include a Meeting Title (the equivalent of Subject in Outlook), Location, Start and End Date or Time, Details, and a list of participants. In Teams, you can select a channel to meet in. When a channel is selected, artifacts from the meeting are posted in the channel.To schedule a Teams meeting:
- Click Meetings from the Apps bar.
- Click the Schedule a Meeting button that appears at the bottom of the left pane.
 Scheduling a Teams meeting.
 - From the New meeting window, enter the Title, Location, Start and End Date/Time, Details, Channel, and the names of the people you want to invite to the meeting.
- If you want to check people’s availability, click Schedule Assistant above the Details section to display your participants’ availability based on their Outlook calendars.
- Click the Schedule a Meeting button. The meeting is now scheduled and will appear in the Meetings section in Teams as well as in your Outlook calendar.
