


The most critical audio-recording control on your Nikon D5300 is the Microphone setting, which affects sound volume when you are shooting video with your digital camera. You have three options:
Auto Sensitivity: The camera automatically adjusts the volume according to the level of the ambient noise. This setting is the default.
Manual Sensitivity: You specify the volume level, with settings ranging from 1 to 20.
Microphone Off: Choose this setting to record a movie with no sound or when you're using an off-camera microphone and you don't want the camera itself to record audio.
Symbols representing the current setting appear in the display. The microphone symbol indicates that audio recording is enabled; the letter A next-door indicates the Auto Sensitivity option. If you set the camera to Manual Sensitivity, your selected volume level appears instead.
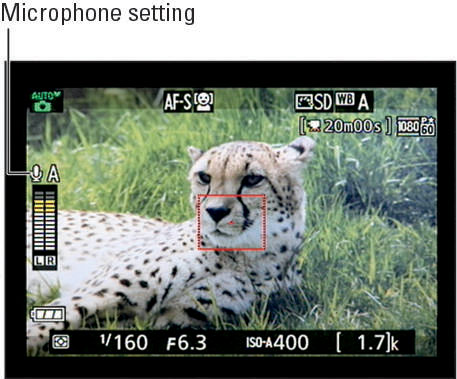
Beneath those symbols, you see two vertical bars that indicate the volume level of the left and right audio channels that are recorded when you use a stereo microphone. (The built-in mic offers stereo recording.) For monaural recording, both bars reflect the same data.
Audio levels are measured in decibels (dB), and levels on the volume meter range from –40 (very soft) to 0 (as loud as can be measured digitally). Ideally, sound should peak consistently in the –12 range. The indicators on the meter turn yellow in this range. If the sound level is too high, the bar at the top of the meter turns red—a warning that audio may be distorted.
To adjust the Microphone setting, you can go two routes:
Shooting menu: Choose Movie Settings from the menu and then select Microphone. Press the Multi Selector right to display the second screen, where you can select the setting you want to use.
On the second screen, the two bars at the bottom are the horizontal version of the volume meter displayed on the Live View screen. For stereo sound, the top bar represents the left audio channel; the bottom bar, the right channel. Again, both bars show the same thing when you're not using a stereo microphone.

Control strip: Press the i button to display the control strip, highlight the Microphone icon and press OK to display the second screen. Again, you see the volume meter plus symbols representing the Auto, Manual, and Off settings. If you choose Manual, press the Multi Selector up and down to adjust the recording volume.

Either way, choose the Microphone setting before starting the recording; you can't change it while recording is in progress.
