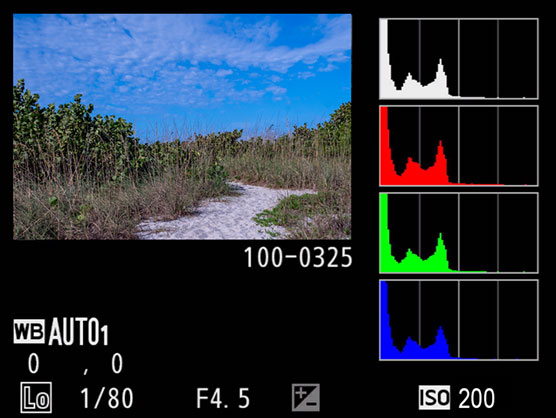
The information you can display on the tilting monitor gives you the opportunity to examine each image and make sure you got it right in the camera.
Photographers should always do their best to get it right in the camera and rely as little as possible on programs such as Adobe Photoshop or Adobe Lightroom to correct exposure problems and other issues that could’ve been avoided when taking the picture. After all, Photoshop is a noun, not a verb. So instead of taking the picture and saying you’ll “Photoshop it,” rely on the information your camera supplies to determine whether you got the exposure right. Programs like Photoshop are designed to enhance images, not fix them.
Your tilting monitor can be viewed easily in most lighting conditions. However, if you want to increase or decrease the tilting monitor’s brightness to suit your personal preference, or to deal with bright light, you can.To change the tilting monitor’s brightness, follow these steps:
- Press the MENU button.
- Press the down arrow on the multi selector to select the setup menu, and then press the left arrow on the multi selector. The setup menu icon is highlighted.
- Press the right arrow on the multi selector to place the cursor inside the setup menu, and then press the down arrow on the multi selector to select Monitor Brightness.
 The Monitor Brightness command.
 - Press the right arrow on the multi selector to view the monitor brightness options.
 Choose the desired monitor brightness.
 - Press the up arrow or down arrow on the multi selector to select a higher or lower value. Choose a higher value to increase monitor brightness or a lower value to decrease monitor brightness.
- Press OK. The monitor brightness changes.
How to use the Nikon D780 histogram
Even though your Nikon D780 is a very capable camera, it can get it wrong when you’re shooting under difficult lighting conditions. That’s why your camera lets you display a histogram with the image on your camera’s tilting monitor. Your camera can display a single histogram and display a histogram for the red, green, and blue channels. Analyzing exposure with the histogram.
You can display one histogram when you choose Overview as a display option, or an RGB histogram when you choose that as a display option. A histogram is a wonderful thing: It’s a graph — well, sometimes it looks more like a mountain — that shows the distribution of pixels from shadows to highlights. Study the histogram to decide whether the camera — or you, if you manually exposed the image — properly exposed the image. The histogram can tell you whether the image was underexposed or overexposed.
A peak in the histogram shows a lot of pixels for a brightness level. A valley shows fewer pixels at that brightness range. Where the graph hits the floor of the histogram, you have no data for that brightness range. If you see a sharp spike on the right wall of the histogram, this indicates that the image is overexposed and all detail has been lost in some of the highlights. If you see a sharp spike on the left wall of the histogram, the image is underexposed and detail has been lost in the shadow areas of your image.
You can correct for overexposure and underexposure to a degree in your image-editing program, but it’s always best to get it right in the camera. If you analyze a histogram and notice that the image is overexposed or underexposed, you can use your camera’s exposure compensation feature to rectify the problem.
The histogram is a tool. Use it wisely. When you’re analyzing a scene that doesn’t have any bright highlights, you may end up with a histogram that’s relatively flat on the right side. When that happens, judge whether the image on the tilting monitor looks like the actual scene. If you rely on the histogram when you see a flat area in the highlights and add exposure compensation, you may make the image brighter than the scene actually was.


