


But because these are semiautomatic modes, the Nikon D3500 ultimately controls the final exposure. If your picture turns out too bright or too dark in P mode, you can’t simply choose a different f-stop/shutter speed combo, because they all deliver the same exposure — which is to say, the exposure that the camera has in mind. And changing the shutter speed in S mode or adjusting the f-stop in A mode won’t help either. In S mode, as soon as you change the shutter speed, the Nikon D3500 automatically adjusts the f-stop to produce the same exposure it initially delivered. In A mode, changing the f-stop causes the camera to compensate by adjusting the shutter speed.
Not to worry: You actually do have final say over exposure in P, S, and A modes. The secret is Exposure Compensation, a feature that tells your Nikon D3500 to produce a brighter or darker exposure on your next shot, whether or not you change the aperture or shutter speed (or both, in P mode).
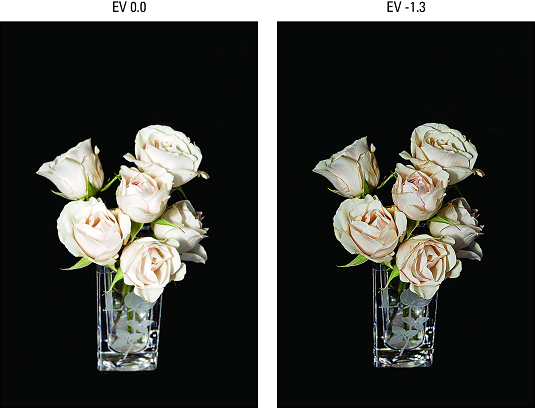
As an example, see the left image below. The initial exposure selected by the camera overexposed the roses, destroying some subtle details in the petals. Exposure Compensation was used to produce the slightly darker rendition on the right.
 For a darker exposure, lower the Exposure Compensation value.
It’s important to note that both shots were captured using matrix (whole frame) exposure metering. So the reason the flowers are overexposed in the first shot is because the Nikon D3500 included the large expanse of dark background in its exposure calculation — it had no way of knowing that the flowers were the main concern. Why not just change to center-weighted or spot metering instead of fixing the problem with Exposure Compensation? Well, that’s certainly one option, and it would definitely alter the resulting exposure in this instance because of the placement of the subject. But a change in metering mode may not produce the exact amount of exposure shift you want. You get a finer degree of control over how much the exposure changes when you use Exposure Compensation.
For best results, Nikon recommends that you do use either center-weighted or spot metering when you enable Exposure Compensation. If, however, you’re not up to fiddling with multiple settings when an exposure is off, concentrate on Exposure Compensation and leave the Metering mode option for another day.
How the Nikon D3500 arrives at the brighter or darker image when you use Exposure Compensation depends on the exposure mode:
- In A mode, the camera adjusts the shutter speed but leaves your selected f-stop in force.
- In S mode, the camera adjusts the f-stop and keeps its hands off the shutter speed control.
- In P mode, the camera decides whether to adjust aperture, shutter speed, or both. In all three modes, the camera may also adjust ISO if you enable Auto ISO Sensitivity Control.
With that background out of the way, here are the details about using Exposure Compensation on your Nikon D3500:
- You also can apply Exposure Compensation in the Scene modes and Night Vision Effects mode. In these modes, the camera decides which exposure setting to adjust to produce a brighter or darker picture.
- Exposure Compensation settings are stated in terms of EV numbers, as in EV +2.0. Possible values range from EV +5.0 to EV –5.0. (EV stands for exposure value.) Each full number on the EV scale represents an exposure shift of one stop. A setting of EV 0.0 results in no exposure adjustment. For a brighter image, raise the Exposure Compensation value; for a darker image, lower the value.
- Where and how you check the current setting depends on the display, as follows:
- Information display: This one’s straightforward: The setting appears in the area labeled on the left. In addition, the meter shows the amount of compensation being applied. In the image below, for example, the meter indicator appears one and one-third stop toward the negative end of the meter, reflecting the EV –1.3 setting used for the second rose image. (Again, don’t get confused by the fact that the meter is indicating that the camera thinks your picture will be too bright or too dark — if you liked the results the camera produced at the settings that would put the exposure indicator at the 0 mark, you wouldn’t be turning on Exposure Compensation.)
 These indicators tell you whether Exposure Compensation is enabled.
 - Live View display: If Exposure Compensation is turned on, you see the plus/minus symbol labeled on the right; otherwise, that area of the display appears empty.
To view the selected adjustment amount in Live View mode, press the Exposure Compensation button on top of the camera. While the button is pressed, the EV value appears next to the plus/minus symbol.
- Viewfinder: The viewfinder also displays the plus/minus symbol only, but again, you can press the Exposure Compensation button to temporarily view the EV setting. Or just look at the exposure meter: As in the Information display, the exposure meter tells you how much exposure shift is in force.
- Information display: This one’s straightforward: The setting appears in the area labeled on the left. In addition, the meter shows the amount of compensation being applied. In the image below, for example, the meter indicator appears one and one-third stop toward the negative end of the meter, reflecting the EV –1.3 setting used for the second rose image. (Again, don’t get confused by the fact that the meter is indicating that the camera thinks your picture will be too bright or too dark — if you liked the results the camera produced at the settings that would put the exposure indicator at the 0 mark, you wouldn’t be turning on Exposure Compensation.)
- You can change the Exposure Compensation setting in two ways:
- Press and hold the Exposure Compensation button while rotating the Command dial. Pressing the button automatically activates the setting and you can just spin the Command dial to enter the amount of adjustment you want to apply. (Although the image shows the Information display, this technique also works in Live View mode.) Remember to keep pressing the button while rotating the Command dial; when you release the button, you can no longer adjust the setting.
 Hold down the Exposure Compensation button and rotate the Command dial to adjust the setting.
Notice that in the image, the A in the upper-left corner indicates that the camera is set to aperture-priority (A) exposure mode. In that mode, the camera doesn’t mess with your selected f-stop, so that setting is dimmed. Instead, the shutter speed value is visible and changes to achieve the Exposure Compensation value you set. If Auto ISO Sensitivity is enabled, the ISO value may also change even though that part of the display remains dimmed.
- Use the control strip. You know the drill: Press the i button to activate the strip, highlight the Exposure Compensation value, and then press OK to display the screen where you can set the amount of adjustment.
 You can also change the setting via the control strip.
- Press and hold the Exposure Compensation button while rotating the Command dial. Pressing the button automatically activates the setting and you can just spin the Command dial to enter the amount of adjustment you want to apply. (Although the image shows the Information display, this technique also works in Live View mode.) Remember to keep pressing the button while rotating the Command dial; when you release the button, you can no longer adjust the setting.
- As you adjust the setting in Live View mode, the monitor brightness updates to show you how the change will affect exposure. However — and this is a biggie, so stop texting and pay attention — the preview can show an adjustment only up to +/– EV 3.0, even though you can set the adjustment as high as +/– EV 5.0. The Exposure Compensation value in the display shows the actual setting; the display just doesn’t get any brighter or darker when you request more than a +/– EV 3.0 adjustment.
- When you use flash, the Exposure Compensation setting affects both background brightness and flash power. But you can further modify the flash power through a related option, Flash Compensation.
- Exposure Compensation affects the meter in M exposure mode. Although the camera doesn’t change your selected exposure settings in M (manual) exposure mode if Exposure Compensation is enabled, the exposure meter is affected: It indicates whether your shot will be properly exposed based on the Exposure Compensation setting. So if you don’t realize that Exposure Compensation is enabled, you may mistakenly adjust your exposure settings when they’re actually on target.
- Whether the Exposure Compensation setting is retained when you turn the camera off depends on your exposure mode. In P, S, A, and M exposure modes, the camera doesn’t reset the value to EV 0.0 when you power down the camera. In other modes, the value is reset to EV 0.0 when you turn off the camera and also when you choose a different exposure mode.
