


If your picture turns out too bright or too dark in P mode, you can't simply choose a different f-stop/shutter speed combo because they all deliver the same exposure — which is to say, the exposure that the camera has in mind. And changing the shutter speed in Tv mode or adjusting the f-stop in Av mode won't help either because as soon as you change the setting that you're controlling, the camera automatically adjusts the other setting to produce the same exposure it initially delivered.
Not to worry: You actually do have final say over exposure in these exposure modes. The secret is Exposure Compensation, a feature that tells the camera to produce a brighter or darker exposure on your next shot, whether or not you change the aperture or shutter speed (or both, in P mode).
Best of all, this feature is probably one of the easiest on the camera to understand. Here’s all there is to it:
- Exposure compensation is stated in EV values, as in +2.0 EV. Possible values range from +5.0 EV to –5.0 EV.
Each full number on the EV scale represents an exposure shift of one full stop. In plain English, it means that if you change the Exposure Compensation setting from EV 0.0 to EV –1.0, the camera adjusts either the aperture or the shutter speed to allow half as much light into the camera as it would get at the current setting. If you instead raise the value to EV +1.0, the settings are adjusted to double the light.
- A setting of EV 0.0 results in no exposure adjustment.
- For a brighter image, you raise the EV value. The higher you go, the brighter the image becomes.
- For a darker image, you lower the EV value. The picture becomes progressively darker with each step down the EV scale.
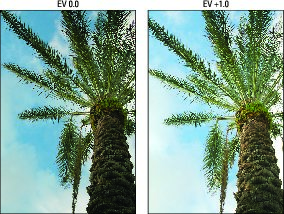
Exposure compensation is especially helpful when your subject is much lighter or darker than an average scene. For example, take a look at the image on the left. Because of the very bright sky, the camera chose an exposure that made the tree too dark. Setting the Exposure Compensation value to EV +1.0 resulted in a brighter image, allowing the details of the tree to be more visible.
 For a brighter exposure than the autoexposure mechanism chooses, dial in a positive Exposure Compensation value.
Sometimes you can cope with situations like this one by changing the Metering mode. But in cases like the shot above, the results would have been much the same in all the metering modes because the brightest part of the frame — the area that caused the original underexposure — is in the center. That area would have been part of the exposure calculation in all three metering modes. Also, it usually takes more time to experiment with metering modes than to simply adjust exposure compensation.
You can take several roads to applying exposure compensation:
- Exposure Compensation button: The fastest option is to press and hold the Exposure Compensation button while rotating the Main dial. As you adjust the setting, the exposure meter in the Shooting Settings and Live View displays indicates the current Exposure Compensation amount. For example, the amount of adjustment below is +1.0. The viewfinder meter also displays the amount of adjustment.
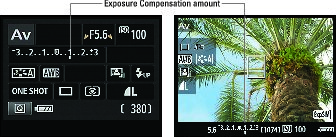 In the P, Tv, and Av exposure modes, the meter indicates the amount of Exposure Compensation adjustment.
Note that even though the meters initially show a range of just +/– three stops, you can access the entire five-stop range. Just keep rotating the Main dial to display the far ends of the range.
- Quick Control screen (not available in Live View mode): Highlight the exposure meter in the Quick Control display and rotate the Main dial to move the exposure indicator left or right along the meter.
- Shooting Menu 2: Select Expo Comp/AEB, as shown on the left below, and press Set to display the screen shown on the right. You can access this same screen by pressing Set when the meter is highlighted on the Quick Control screen.
 Be careful that you adjust Exposure Compensation and not AEB (Automatic Exposure Bracketing).
Either way, this is a tricky screen, so pay attention:
-
The screen has a double purpose: You use it to enable automatic exposure bracketing (AEB) as well as exposure compensation. So if you're not careful, you can wind up changing the wrong setting.
-
To apply exposure compensation, press the left/right cross keys to move the exposure indicator (the red line on the meter) along the scale.
-
Notice the triangles at the right end of the meter? They're there to remind you to use the cross keys to make this adjustment. The symbol just below — the jagged half circle — represents the Main dial, which sets up automatic exposure bracketing.
-
When you dial in an adjustment of greater than three stops, the notch under the viewfinder meter disappears and is replaced by a little triangle at one end of the meter — at the right end for a positive Exposure Compensation value and at the left for a negative value. However, the meter on the Shooting Settings and Live View screens and on Shooting Menu 2 adjust to show the proper setting.
Whatever setting you select, the way that the camera arrives at the brighter or darker image you request depends on the exposure mode:- In Av (aperture-priority) mode, the camera adjusts the shutter speed but leaves your selected f-stop in force.
- In Tv (shutter-priority) mode, the opposite occurs: The camera opens or stops down the aperture, leaving your selected shutter speed alone.
- In P (programmed autoexposure) mode, the camera decides whether to adjust aperture, shutter speed, or both to accommodate the Exposure Compensation setting.
Keep in mind, too, that the camera can adjust the aperture only so much, according to the aperture range of your lens. The range of shutter speeds is limited by the camera; when you use flash, the fastest available shutter speed is 1/200 second. (Otherwise, the shutter speed can go up to 1/4000 second.) If you reach the end of those ranges, you have to compromise on either shutter speed or aperture, or adjust ISO.
A final, and critical, point about exposure compensation: When you power off the camera, it doesn't return you to a neutral setting (EV 0.0). The setting you last used remains in force for the P, Tv, and Av modes until you change it. So it's always a good idea to zero out the setting at the end of a shoot.
