How to set payroll in QuickBooks preferences
The Payroll & Employees Preferences set includes only the Company Preferences tab, shown. The QuickBooks Payroll Features radio buttons let you tell QuickBooks how you want to handle payroll: Full payroll (if you have signed up for Enhanced or Assisted Payroll), No payroll (if you use an outside service like Paychex/ADP or don’t process payroll), or Online payroll (if you’ve signed up for that service from Intuit). Note that QuickBooks displays only radio buttons that make sense given the version of QuickBooks you’ve selected.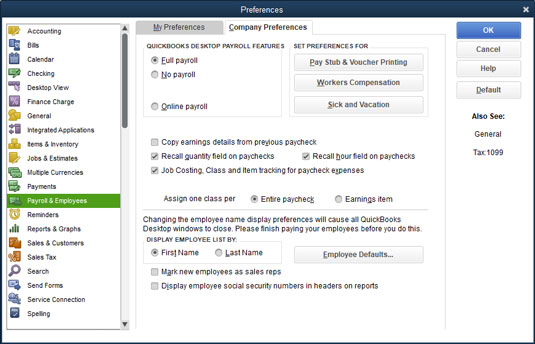 The Company Preferences tab of the Payroll & Employees Preferences dialog box.
The Pay Stub & Voucher Printing button lets you tell QuickBooks what employee information to print on the payroll check: employee address, company address, sick-pay information, vacation-pay information, and pay-period information. You can figure out how this works by clicking the button and looking at the dialog box that QuickBooks displays.
The Workers Compensation button lets you fiddle with the way that QuickBooks tracks information related to your workers’ compensation tax. The Sick and Vacation button lets you fine-tune how QuickBooks monitors employee sick- and vacation-pay accrual and use. Again, click either of these buttons to see a screen that provides more information about how the button works.
In roughly the middle of the Company Preferences tab of the Payroll & Employees Preferences dialog box, QuickBooks supplies several other check boxes and radio buttons:
- Copy Earnings Details from Previous Paycheck: Another duh.
- Recall Quantity Field on Paychecks: QuickBooks recalls or reuses paycheck quantity information from the last pay period’s paychecks. (The QuickBooks Help file suggests that you use this option when you have a “fixed quantity that occurs from paycheck to paycheck.” The Help file uses the example of tiered sales commissions where the commission amount is set for each tier.)
- Recall Hour Field on Paychecks: QuickBooks recalls or reuses hours-worked information from the last pay period’s paychecks. You use this option when you have a fixed number of hours that occurs from paycheck to paycheck.
- Job Costing, Class, and Item Tracking for Paycheck Expenses: QuickBooks lets you track payroll expenses not just by account, but also by job, class, or item.
- Assign One Class Per: The Entire Paycheck and Earnings Item options enable you to break wage expenses into classes more finely. You can indicate, for example, that you want to use a different class for each item that appears on an employee’s paycheck. (Note: These options appear only if classes are enabled.)
If you click the Employee Defaults button, QuickBooks displays a dialog box that you can use to set employee payroll default information, such as deductions for taxes or health insurance.
Finally, at the bottom of the dialog box, QuickBooks provides two other options for handling payroll. The Mark New Employees As Sales Reps check box, if selected, does what you’d expect: It marks new employees that you add to the Employee list as sales reps. And the check box titled Display Employee Social Security Numbers in Headers on Reports, if selected, also does what you’d expect: It adds employee Social Security numbers to reports.
Specify how sales are taxed in QuickBooks
Although no personal QuickBooks preferences are available for sales tax, company preferences do exist. The figure shows the Company Preferences tab of the Sales Tax Preferences dialog box. The Do You Charge Sales Tax? radio buttons, which appear at the top of the tab, control whether you can charge sales tax within QuickBooks. You select the radio button — Yes or No — that answers the question.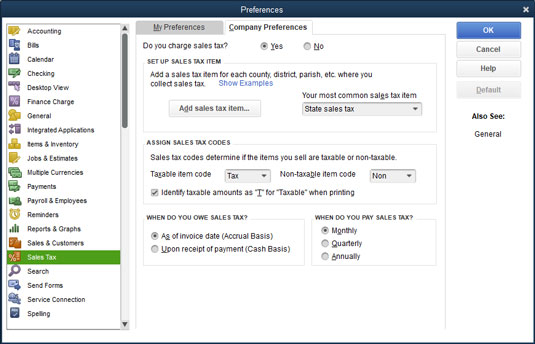 The Company Preferences tab of the Sales Tax Preferences dialog box.
The Taxable Item Code and Non-Taxable Item Code drop-down lists let you define what code QuickBooks should use to identify taxable and nontaxable sales. By default, QuickBooks uses the clever “tax” code for taxable sales and the equally clever “non” code for nontaxable sales. You can choose the Add New entry from either drop-down list, however, and use the dialog box that QuickBooks displays to create your own taxable and nontaxable codes.
The Set Up Sales Tax Item and Assign Sales Tax Codes sections let you set up an item for the sales tax that you charge on invoices. You can indicate the default (or most common) sales tax item that you want to include by entering this sales tax item name in the Your Most Common Sales Tax Item combo box. To add the sales tax item, choose Add New from this drop-down list and complete the dialog box that QuickBooks displays. The New Item dialog box lets you name the sales tax item and identify the sales tax rate.
You can also add a new sales tax item by clicking the Add Sales Tax Item button.
The Taxable Item Code and Non-Taxable Item Code drop-down lists let you select the code words to designate invoice items as subject to sales tax. The check box titled Identify Taxable Amounts as “T” for “Taxable” When Printing, if selected, tells QuickBooks to flag taxable amounts on an invoice with the code T.The When Do You Owe Sales Tax? radio buttons let you indicate when the taxing authority says you owe sales tax: as of the invoice date (which means that the taxing authority requires accrual-basis accounting) or upon receipt of payment (which means that the taxing authority allows cash-basis accounting).
The When Do You Pay Sales Tax? radio buttons (Monthly, Quarterly, and Annually) let you tell QuickBooks how frequently you must remit sales tax amounts. You select the radio button that corresponds to your sales tax payment frequency.
How QuickBooks 1099 Preferences Work
No personal preferences exist for 1099 tax reporting. Company preferences exist, however, as indicated by the Company Preferences tab, shown. This tab lets you tell QuickBooks when you’re required to file 1099-MISC forms (answer the Do You File 1099-MISC Forms? question by selecting the Yes radio button). The tab also lets you map QuickBooks accounts to the different boxes on the 1099 form you use to report payments to independent contractors. (To do this, click the Click Here hyperlink.) Confer with your tax adviser if you have questions about these boxes or the 1099 reporting threshold amounts, or visit the IRS website.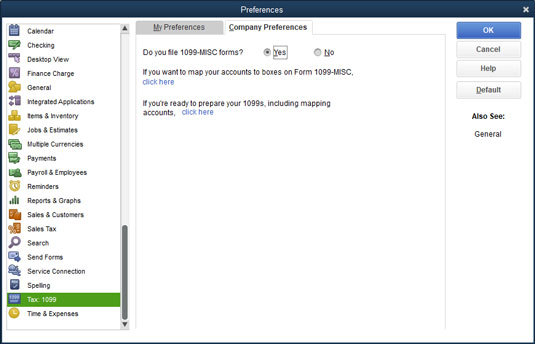 The Company Preferences tab of the Tax: 1099 Preferences dialog box.
How to Set Checking Preferences in QuickBooks 2019
If you display the Preferences dialog box and click the Checking icon, QuickBooks displays either the My Preferences tab or the Company Preferences tab.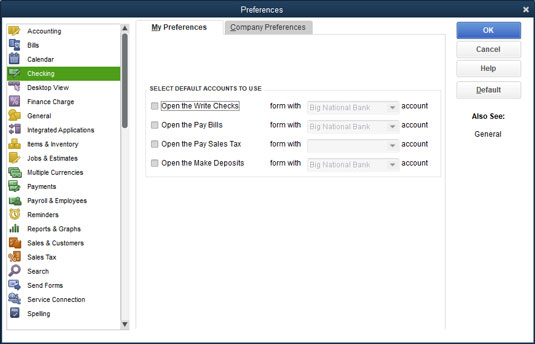 The My Preferences tab of the Checking Preferences dialog box.
 The Company Preferences tab of the Checking Preferences dialog box.
The My Preferences tab of the Checking Preferences dialog box lets you tell QuickBooks which account it should suggest as a default account when you open particular types of windows within QuickBooks. If you look closely at the My Preferences tab, you see the Open the Write Checks box, which is the first check box on the tab. To the right of the Open the Write Checks box, you see the Form with X Account drop-down list. If you select the Open the Write Checks check box, you can choose an account from the Form with X Account drop-down list. This setting tells QuickBooks to use or suggest the specified account every time you open the Write Checks window.
The My Preferences tab also includes check boxes that you can use to specify the default account for the Pay Bills window, the Pay Sales Tax window, and the Make Deposits window. If you have multiple checking accounts set up, setting the default accounts by using the My Preferences tab is a good idea. Setting these preferences makes it less likely that you’ll erroneously write checks on or pay bills from the wrong account.
The Company Preferences tab, shown, provides check boxes that you can use to describe how checks work within QuickBooks:
- Print Account Names on Voucher: This check box lets you indicate to QuickBooks that it should print account names on the voucher portion of the check.
- Change Check Date When Non-Cleared Check Is Printed: Select this check box to tell QuickBooks to use the current system date as the printed check date.
- Start with Payee Field on Check: Select this check box to tell QuickBooks to place the insertion point, or text cursor, in the Payee field when you open the Write Checks window.
- Warn about Duplicate Check Numbers: Selecting this check box tells QuickBooks to alert you to duplicate check numbers. (You want to leave this check box selected, obviously, so that you don’t use duplicate or erroneous check numbers.)
- Autofill Payee Account Number in Check Memo: Select this check box to tell QuickBooks to automatically fill in the payee account number when you write a check. QuickBooks retrieves the account number for a payee from the Vendor list or from the Other Names list.
- Select Default Accounts to Use: These check boxes let you specify which account QuickBooks suggests when you open the Create Paychecks window or open the Pay Payroll Liabilities window. Essentially, then, these boxes let you tell QuickBooks which checking account you use to write payroll checks and to pay payroll liabilities, such as federal income tax withholding amounts.
- Bank Feeds: If you’ve turned on online banking for QuickBooks, QuickBooks provides option buttons you can use to change the way that online transaction information appears in the online banking window.