The Client Overview page
This page can help you get a sense of where things stand in your client’s QBO company. To display the Client Overview, open the client QBO company using the Go to Client’s QuickBooks list box on the QuickBooks Online Accountant (QBOA) toolbar. Then, click the Overview tab in the Navigation bar. At the top of the Client Overview page (see figure), you see information on the client’s subscriptions and connected apps.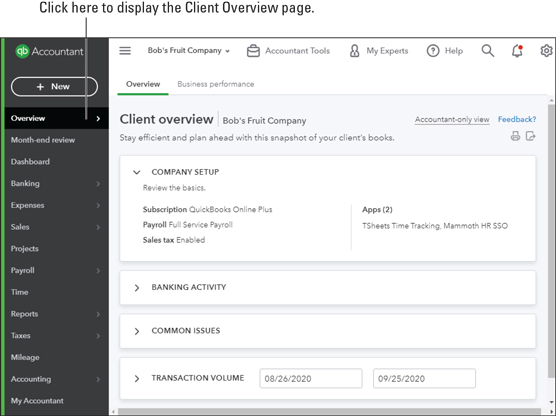 In a QBO client company, the top of the Client Overview page shows details of the client’s subscriptions and connected apps.
In the second section of the Client Overview page, shown in the following figure, you see information on the client’s banking activity; the accounts in the list are set up either as bank accounts or as credit card accounts.
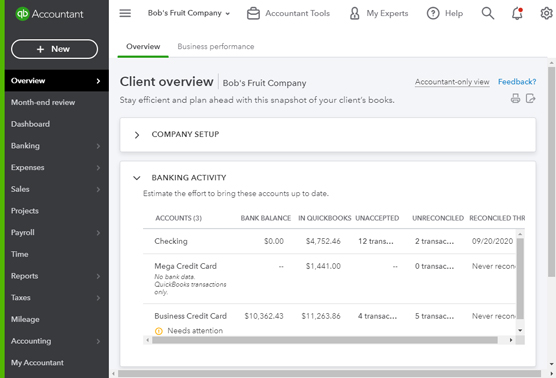 The Banking Activity section of the Client Overview page
The third section of the Client Overview page shows the status of the client QBO company related to issues you commonly find as problems in client QBO companies (see the following figure), giving you leads on information you may need to examine in the client QBO company.
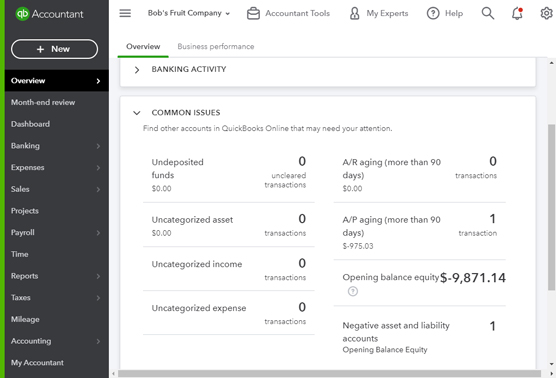 The Common Issues section of the Client Overview page
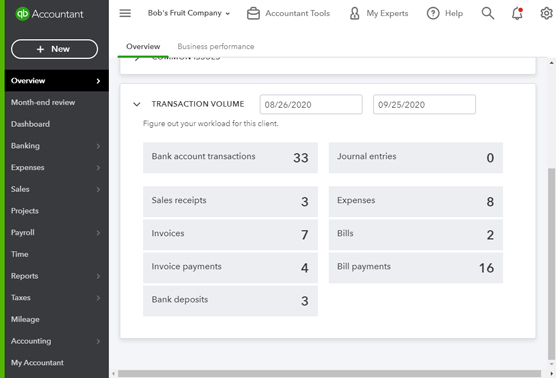
The final section of the Client Overview page shows the transaction volume for a given date range. As you can see in the following figure, it’s designed to help you determine how much time you’ll need to spend on a given client’s books.
 The Transactions section of the Client Overview page
Be aware that there are no links on the Client Overview page except at the bottom of the Client Issues section, where you can click View Chart of Accounts. However, before clicking on that link, you may first want to review the company setup information.
Company setup information
You review company setup information to make sure that the client QBO company uses the correct accounting method, employer EIN, and legal business organization. You also can turn on (or off, but we’ve never met an accountant who wanted to turn off this option) the option to use account numbers in the Chart of Accounts. To review company settings, follow these steps:- Open the client QBO company you want to review. You can click the QuickBooks logo to the left of the client’s name on the Clients page of QBOA, or you can use the list of clients in the QBOA toolbar under Go to QuickBooks
- Click the Gear button on the right side of the QBOA toolbar to display the Gear menu.
 The Gear menu
 - From the Your Company group on the left side of the Gear menu, click Account and Settings. The Company tab (selected on the left side of the Account and Settings dialog box) appears.
 The Account and Settings dialog box for a client QBO company
If you set up the company for your client, QBO displays the Company Profile dialog box, requesting the company email, company address, city, state, and zip be filled in. All the fields are required, but you can bypass the dialog box by clicking the X in the upper-right corner.
- Review the settings. In particular, set or correct the Company Name, Legal Name, and Employer ID (EIN). To make changes, click any setting or click the pencil that appears in the upper-right corner of the section of settings. QBO makes the setting options available; make your changes and click Save.
- Click Usage on the left side of the Account and Settings dialog box. QBO displays the Usage Limits tab shown, where you can review how the client QBO subscription fits within the usage limits Intuit applies to the chosen subscription.
 Usage limits went into effect in April, 2019.
 - Click Advanced on the left side of the Account and Settings dialog box. The settings on the Advanced page of the Account and Settings dialog box appear.
 Review and, if necessary, make changes to settings on the Advanced tab of the Account and Settings dialog box.
 - Review the settings. In particular, set or correct the following:
- The settings in the Accounting section, which include fiscal and tax year information as well as the QBO company’s accounting method
- In the Company Type section, the tax form setting
- The settings in the Chart of Accounts section; this is where you control the use of numbers in the Chart of Accounts
- The settings in the Other Preferences section, which isn’t shown but includes displaying warnings when duplicate check numbers and bill numbers are used
- Review any other settings on any of the pages in the Account and Settings dialog box that you feel might need your attention.
- Click Done to save your changes. QBO displays a message at the top of the screen indicating that your changes were saved.
The Chart of Accounts
In addition to checking company settings, you’ll probably want to review your client’s Chart of Accounts to make sure it looks the way you want. You can click the link at the bottom of the Client Overview page to display your client’s Chart of Accounts. Or, you can use the Navigation bar: In the client QBO company Navigation bar, click Accounting →Chart of Accounts. The Chart of Accounts page appears.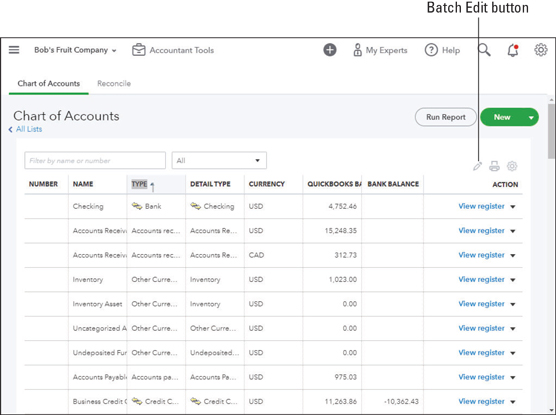 From the Chart of Accounts page, you can add and edit accounts.
You also can open the Chart of Accounts from the Accountant Tools button. All roads lead to Rome.
If you chose to enable the option to use account numbers while you were reviewing company settings, the Chart of Accounts page displays a column for account numbers at the left edge of the page and the Batch Edit button in the upper-right corner—it looks like a pencil. You can use the Batch Edit button to add account numbers.Importing a Chart of Accounts
When you create a new company, QBO automatically sets up the Chart of Accounts it thinks you’ll need. But you don’t need to use it. Instead, you can replace it by importing a Chart of Accounts that you’ve set up in Excel or as a CSV file that can include sub-accounts along with their parent accounts, if your client’s company needs sub-accounts.To import subaccounts, use the convention of Account: Subaccount, meaning you’ll list the parent account first, followed by a colon, and then list the subaccount. The file you import needs to follow a particular format, and you can download a sample file to get the hang of the layout before you set up your file. On the Chart of Accounts page, click the arrow beside the New button and then click Import. QBO displays the Import Accounts page shown here. Click the Download a Sample File link and open the file in Excel to see the format your file should follow.
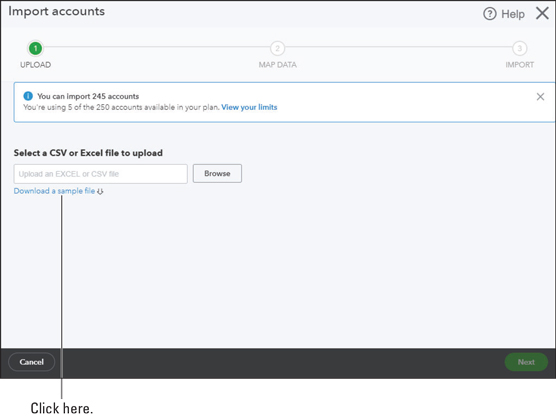 The Import Accounts page
Once you set up your Chart of Accounts file, you return to the Import Accounts page; click the Browse button to select your file and click Next in the lower-right corner of the Import Accounts page. On the page that appears, shown in the following figure, you map the headings in your file to the fields in QBO by selecting your field names from the list boxes in the Your Field column of the table; then, click Next.
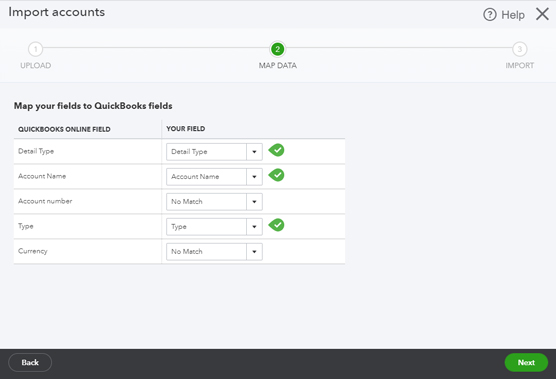 Map the fields in your file to the fields in QBO.
QBO displays the accounts it expects to import; if all looks well, click Import and QBO imports your Chart of Accounts.
Editing or adding accounts
You might need to edit an account to change an account’s Category Type or its name, and you use the Account window to make the change.If you decide to add account numbers to the Chart of Accounts, you can add an account number in the Account window, but there’s a much easier way, which we show you in the next section, “Adding account numbers.”
To display the Account window, click the down arrow in the Action column at the right side of the account and, from the menu that appears, click Edit.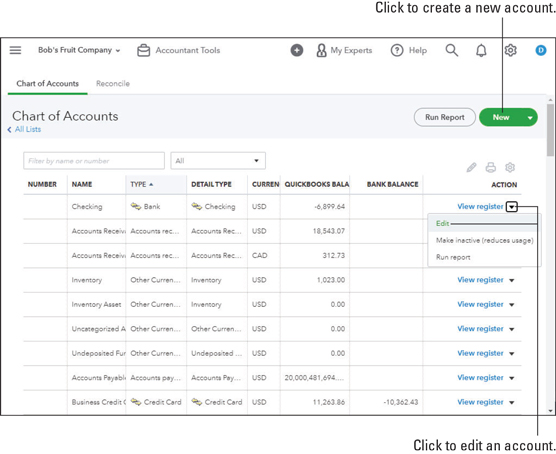 To edit an account, use the down arrow in the Action column.
Or, if you need to create a new account, click the New button above the list. The window you see when creating a new account looks just like the one you see when you edit an existing account.
You can click View Register beside any Asset, Liability, or Equity account to display the account’s register. Retained Earnings is the exception; it functions like Income and Expense accounts. You can click Run Report to the right of Income or Expense account, to display a QuickReport for the account.
Adding account numbers
We promised we’d show you an easy way to add account numbers to a QBO company Chart of Accounts. First, make sure you enable the setting on the Advanced tab of the Settings dialog box (in the Chart of Accounts section) shown previously.Then, on the Chart of Accounts page, click the Batch Edit button (the one that looks like a pencil on the right side of the table above the table headings) to display the page shown.
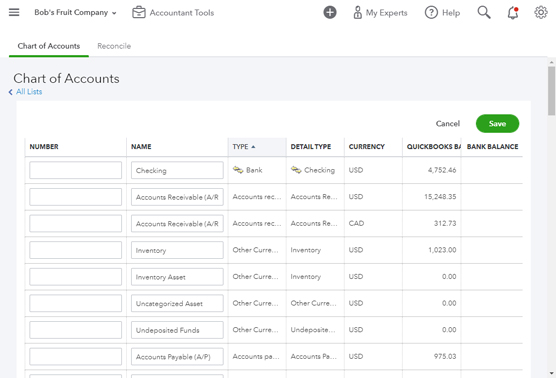 Use this page to set up account numbers for the Chart of Accounts.
Type account numbers in the Number column. Save buttons appear at the top- and bottom-right corners of the page (you can’t see the bottom of the page); click either button after you finish entering the account numbers.
Because a QBOA session times out by default after 60 minutes of inactivity, you might want to save periodically as you enter account numbers in case something unexpected pulls you away from your work. After you add account numbers you can sort the Chart of Accounts in account-number order by clicking Number in the column headings on the Chart of Accounts page.
List information
You also can review list information. Using the links in the Navigation bar, you can view overview information about customers, vendors, and employees. To view customers, as shown, you click Sales in the Navigation bar (it might say Invoicing, depending on the choices made when creating the company) and then click Customers.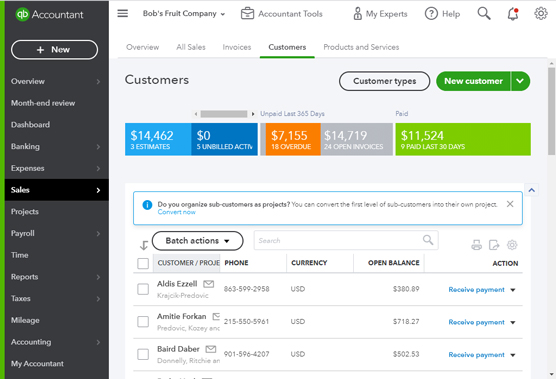 The Customers page
To view vendor information, click Expenses in the Navigation bar and then click Vendors. To review employee information, click Workers in the Navigation bar and then click Employees. When you click Workers→ Contractors, QBO displays the 1099 vendors set up by the client.
On any of these pages except the Contractors page (and payroll needs to be set up before you can use its status bar), you can use the status bar at the top of the page to identify activity over the last year and, if you click one of the elements on the status bar, QBO filters the list to view that particular subset of the list. For example, you can filter the list of customers on the Customers page to view only those customers with overdue invoices or only those customers with unbilled activity. And you can use the Batch Actions button (just above the table) to perform, well, batch actions, such as emailing a batch of customers.
If your list is long, use the text box beside the Batch Actions button to search for a particular list entry. You also can sort the list by name or by open balance; just click the appropriate heading below the Batch Actions button. Note that you can import names into a people list.
To review other lists, click the Gear button in the QBOA toolbar. In the Lists section of the Gear menu that appears, you can opt to view any of three common lists (the Products and Services list, the Recurring Transactions list, or the Attachments list). Or, you can click All Lists at the top of the Lists section to display the Lists page shown, which you can use to navigate to any list other than a people-oriented list.
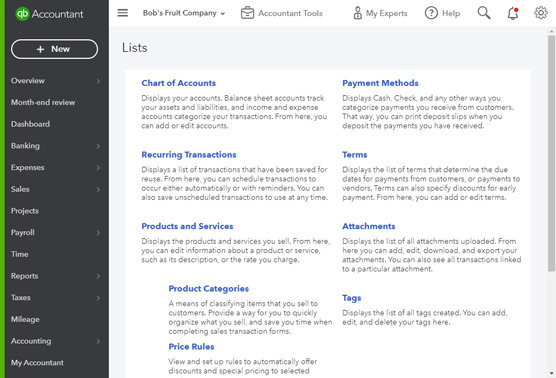 Use this page to open any list other than the Customers, Vendors, or Employees list.
Export and import bank feed rules
When your client takes advantage of bank feeds and downloads transactions from the bank to his QBO company, you can help ensure that the transactions post properly. In many cases, the rules used by one client can apply to another, so, rather than re-creating rules, export them from one client and import them to another.When you export rules, QBO exports all the rules in the client’s company. You can then selectively import rules using the Import Rules wizard.
To export rules from a client company, open that company and follow these steps:
- Choose Banking→Rules from the Navigation bar. QBO displays the Rules page (see the following figure).
- Click the down arrow beside the New Rule button.
- Click the down arrow beside the New Rule button and choose Export Rules. QBO creates an Excel file containing the rules and stores it in your Downloads folder. The name of the file includes the name of the client whose rules you exported and the words “Bank_Feed_Rules.” Click Close in the QBO message.
- Switch to the company to which you want to import these rules.
- Repeat the preceding Steps 1 to 3; in Step 3, choose Import Rules. QBO starts a wizard that helps you import the rules.
- On the first Import Rules wizard screen, select the file you created in Step 3 and click Next.
- On the second wizard screen, select the rules you want to import and click Next.
- On the third wizard screen, you have the option to select categories for the rules that match the Chart of Accounts of the client to which you are importing the rules; make any changes and, when you finish, click Import. QBO tells you how many rules imported successfully.
- Click Finish. QBO redisplays the Rules page for the client you opened in Step 4, where you can verify that the rules you wanted to import appear.
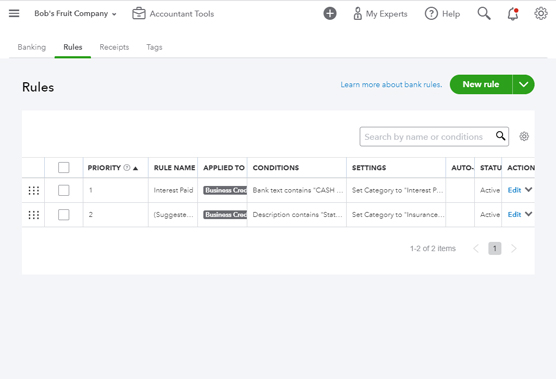 Use this page to export rules from one client and import them into another.