In these circumstances, you don’t want to have an invoice go out to the customer with one line in it that says, for example, “Legal services, 100 hours, $20,000” — unless you don’t want to stay in business. Instead, you want an invoice that details each of the tasks that the lawyer performed: estate planning for 1.5 hours, review of a contract for 4 hours, preparation of a new real estate lease for 2 hours, and so forth. To provide this level of detail — detail that’s really beneath the item — you use the QuickBooks Time Tracking feature.
QuickBooks supplies two methods for tracking the time spent that will be billed in an invoice as an item. You can use the weekly time sheet, or you can time or record individual activities. I briefly describe how both time-tracking methods work; neither is difficult. Professional service providers (accountants, attorneys, consultants, architects, etc.) who bill based on the time spent should consider using one of these features to make sure they keep accurate records of the time spent working for a client or customer.
How to use a weekly timesheet
To use the weekly time-sheet method, choose Customers→Enter Time→Use Weekly Timesheet. QuickBooks displays the Weekly Timesheet window, shown. To use the Weekly Timesheet window, first use the Name box to identify the employee, vendor, or other person performing the service.You should be able to select this person’s name from the Name drop-down list. If you can’t choose the person’s name from the Name drop-down list, enter it in the box; then, when prompted, tell QuickBooks to which list (employee, vendor, or other names) the name should be added. After you’ve added the name of the person who performed the work, use the columns of the Weekly Timesheet window to describe the customer or job for which the work was performed, the service code, a brief description or note, the payroll item (if you’re using QuickBooks for payroll), the class (if you’re tracking classes), and then the hours spent per day.
You can enter as many lines in the Weekly Timesheet window as you want. Each line appears separately in an invoice. The notes information appears in the description area of the invoice. For this reason, you want to use appropriate and descriptive notes.
 The Weekly Timesheet window
Timing single activities
If you want to record service activities as they occur, choose Customers→Enter Time→Time/Enter Single Activity. QuickBooks displays the Time/Enter Single Activity dialog box, as shown.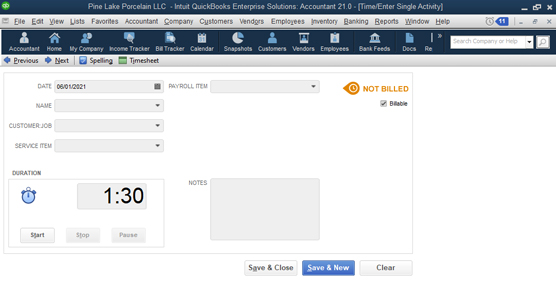 The Time/Enter Single Activity dialog box
To time or record a single activity, record the activity date in the Date box. Use the Name box to identify the person who performed the service. In the Customer:Job box, identify the customer or the job for which the service was performed. Choose the appropriate service item from the Service Item drop-down list and (if you’re tracking an employee) the appropriate payroll item from the Payroll Item drop-down list. If you’re tracking classes, predictably, you can also use the Class drop-down list to classify the activity. Use the Notes box to record a brief, appropriate description of the service. This description appears in the invoice, so be thoughtful about what you write.
After describing or providing this general information about the service, you have two ways to record the time spent on the service:
- Record time manually. You can manually record the time spent on an activity by using the Duration box to enter the time. If you spent 10 minutes, for example, enter 0:10 in the Duration box. If you spent 3 hours and 40 minutes, enter 3:40 in the Duration box.
- Have QuickBooks record the time. You can also have QuickBooks record the time that you spent on the activity. Just click the Start button in the Duration box when you start the activity, and click the Stop button when you stop the activity. If you want to pause the timer (while you take a phone call, for example), click the Pause button.
Verify that the Billable check box (in the top-right corner of the dialog box) is selected. By selecting the Billable box, you tell QuickBooks that it should keep this record of a billable activity for later inclusion in an invoice.
You can use the Previous and Next buttons, which appear at the top of the dialog box, to page back and forth through your records of activity timing. Note, too, that a Spelling button is available. Click that button to spell-check the notes description that you enter — which is a good idea, because this information will appear in an invoice later.How to include billable time on an invoice
To add billable time and cost to an invoice, create the invoice in the usual way, as I describe previously. After you identify the customer (if you’ve entered time for the customer), and if you’ve been tracking costs for the customer, QuickBooks displays a message box asking whether you want to bill for any of the time or costs. If you answer yes, QuickBooks displays the Choose Billable Time and Costs dialog box, shown here.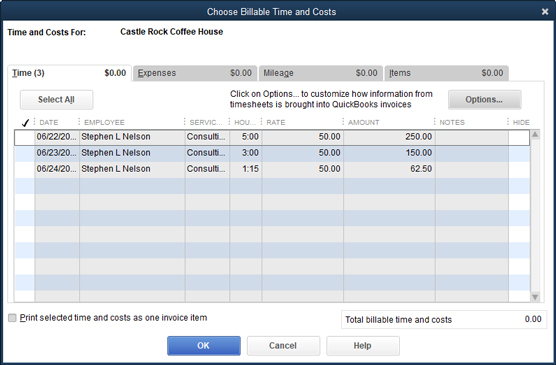 The Choose Billable Time and Costs dialog box
The Time tab of this dialog box shows each of the times that you’ve recorded for a customer. To add these times to the invoice, click the Use column for the time. (The Use column is the leftmost column, displaying a check mark.) Or, if you want to select all the times, click the Select All button. Then click OK. QuickBooks adds each of these billable times to the invoice as separate lines. This figure shows how billable time information appears in the Create Invoices window.
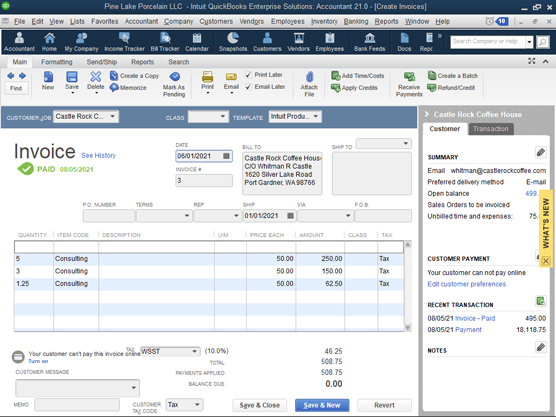 The Create Invoices window, billing for billable time
If you leave the check box titled Print Selected Time and Costs As One Invoice Item unselected, QuickBooks puts each time recording you log on a separate line of the invoice, as shown. If you check the box, however, QuickBooks lets you combine individual time recordings into a single invoice line item. (You may want to experiment with this feature a bit if you’re interested.)
You can click the Items, Expenses, or Mileage tab to see lists of the items, out-of-pocket expenses, or business miles incurred on behalf of a customer. You add charges to an invoice for these sorts of things in the same way that you add charges for time. You can even apply a markup to your out-of-pocket expenses. By the way, if you want to return to the Choose Billable Time and Costs dialog box, and you’re viewing the Create Invoices window, click the Add Time/Costs button, which appears at the top of the Create Invoices window.