


Easy navigation in the client's company
For the most part, navigating with a mouse is obvious with a click here and a click there. But you can use a few not-so-obvious tricks to navigate easily, including some keyboard shortcuts. Some common navigation techniques are specific to Chrome.Using keyboard shortcuts
Hidden away in QBO companies are keyboard shortcuts that you might want to use. We show them here in the figure, and you also can find them on this cheat sheet.To view these shortcuts within QBO, along with the current client QBO Company ID, press and hold Ctrl+Alt and then press the forward slash (/) key. Mac users, use Ctrl+Option here and in the next paragraph. If you press Ctrl+Alt+/ without opening a client QBO company, the Company ID you see is your own.
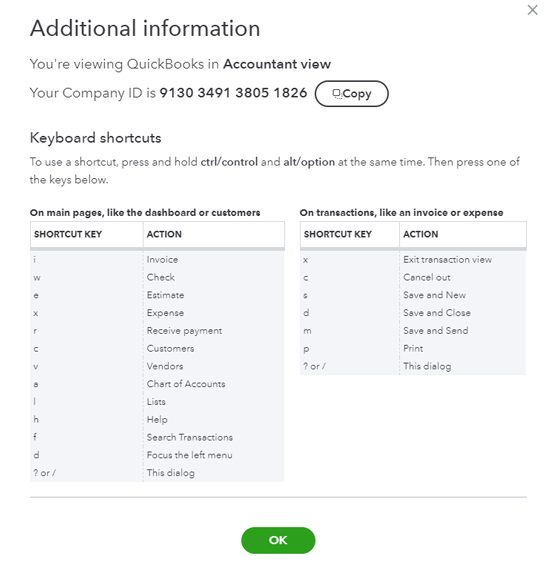 Keyboard shortcuts you can use while working in a client QBO company
To use any of these shortcuts, press and hold Ctrl+Alt and then press the appropriate key to perform its associated action. For example, to open the Invoice window, press Ctrl+Alt+I.
Opening multiple windows
Many times, accountants want to work with multiple windows, and you can do that in QBO. Within the same QBO company, you can duplicate a browser tab using the New Window command on the Accountant Tools menu on the QuickBooks Online Accountant (QBOA) toolbar (see the following figure).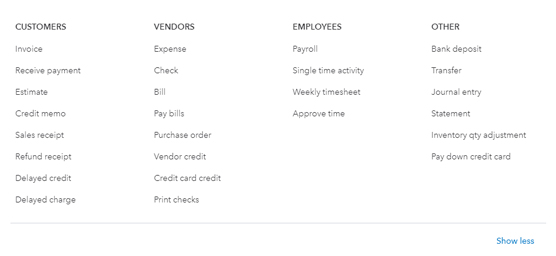 Use the New Window command while working in a QBO company to duplicate the window you’re viewing.
If you’re using Chrome, you also can duplicate a browser tab by right-clicking the tab and choosing Duplicate or, if you’re a keyboard person, press Alt+D followed by Alt+Enter (that would be the same as holding down the Alt key and pressing D followed by pressing Enter). In Firefox, you can duplicate a browser tab by clicking in the address bar and pressing Alt+Enter.
When you click the New Window command, QBO opens a new browser tab and displays the same information that appears in the original browser tab. But, from that point, you can display different information for the same company in each browser tab. And, if you’re working in Chrome on multiple monitors, you can split the tabs on to different monitors. Drag the tab you want to place on a different monitor in a downward direction, and it splits away from the browser. You can immediately drag it to another monitor, or you can release the mouse button, in which case a second instance of Chrome appears. You can then drag either instance to a different monitor.The same technique works in Firefox; drag a Firefox tab downward and release the mouse button. The tab splits away and appears in a second instance of Firefox. You can then drag either instance to a different monitor.
If you’re a fan of “split screen,” you can use a Windows shortcut to display two tabs side by side. Follow these steps in either Chrome or Firefox:There’s no short, easy way to display two windows vertically one on top of the other. You’ll have to manually resize the windows and place them where you want them.
- Duplicate a browser tab using any technique already described.
- Drag the current tab down. The browser displays the tab you dragged in its own browser window.
- Press and hold the Windows key (the one that appears between the left Ctrl and the left Alt keys on the keyboard) and press an arrow key:
- Press the left arrow key to pin the active window to the left side of the monitor.
- Press the right arrow key to pin the active window to the right side of the monitor.
- Click the other available window to make it the active window and repeat Step 3.
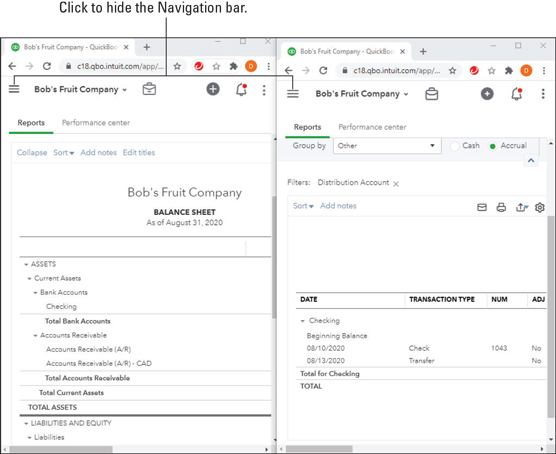 Two windows pinned side by side
You can click the menu button in either or both windows to hide the Navigation bar (giving more screen real estate to the data, as we did in the figure).
When you finish working in two windows, simply close one and maximize the other.Working in two companies simultaneously
Suppose you’re done working with one client and want to open a different client. You can click the Go to QuickBooks button on the QBOA toolbar and select a new client. Or, you can click the Accountant button in the upper-left corner of the QBOA interface to redisplay the Clients page and then click the QuickBooks icon to the left of the company name you now want to open. Either way, QBOA displays the information for the newly selected client.That brings up the question, “How do I work in two different companies simultaneously?” Well, you can open a different browser, sign in to QBOA, and open a second client QBO company. For example, if you’re working in Chrome, you could open Windows Edge, Firefox, Safari, or another browser using the same QBOA login information. You can then open two different companies, as we did with Chrome and Microsoft Edge in this figure.
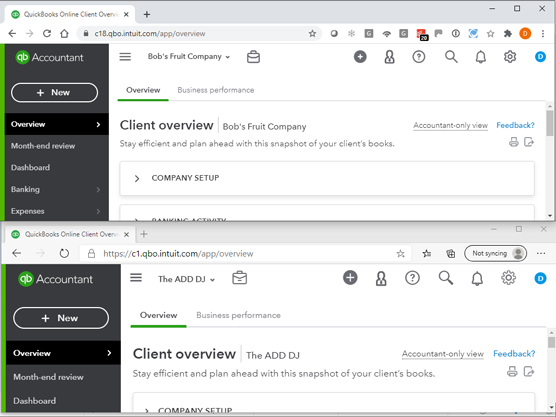 To work in two companies at the same time, you can use two browsers.
If you’re working in Chrome, you also can take advantage of Chrome users and open Chrome as a different user. You’d have, effectively, two instances of Chrome running simultaneously.
Available transaction types
You can see the available transactions by opening a client QBO company and then clicking the New menu. This figure shows the New menu open. The transactions you can create while working in a QBO companyAvailable transactions are organized on the menu by the type of people to which they pertain. And the Create menu contains an “Other” category for transactions that don’t pertain to particular types of people — like bank deposits.
If you want to view only a few commonly used transactions, click the Show Less link at the bottom of the New menu. The link changes to the Show More link so that you can redisplay all types of transactions.
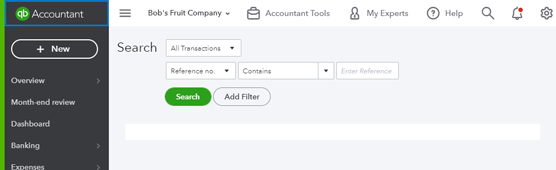
How to search for transactions
More often than not, you’ll be searching for transactions in a client QBO company rather than creating them. You can search for transactions using the Search box on the QBOA toolbar at the top of the client QBO company window (see the following figure). When you click in the Search box, QBO displays a list of recent transactions, and possibly a Jump To list of tasks, contacts, reports, and accounts.The search box allows you to search QBO from top to bottom, meaning a search term can enable you create transactions, access contact records, view reports, and access accounts.
 Type any phrase you want to use as a search filter or click Advanced Search at the bottom of the Search list.
If you see what you want, click to open the appropriate window. If you don’t see what you want, click Advanced Search in the lower-right corner of the menu, and QBO displays the Search page.
 Set criteria for a more specifically defined search.
You can limit the search to a particular transaction type, choose to search for any of several types of data, and specify whether the search should contain, not contain, be equal to, or not be equal to the search criteria.
From any transaction window, you can view recent transactions of that type by clicking the button that appears in the transaction’s title bar, immediately to the left of the name of the transaction type. The button image looks a bit like a clock.
Make client notes
You and your team members can use the Notes feature in QBOA to document any kind of information about any of your clients. For each note, QBOA automatically assigns the time the note was created and the team member who created the note. Team members who have access to the client can view and edit that client’s notes. And, you can “pin” notes to make them easy to find. You can think of QBOA’s Notes feature as a way to create electronic sticky notes.To create a note, display your QBOA Home page (you can click the QB Accountant symbol in the upper-left corner of the QBOA interface) and then click Clients in the Navigation bar. In your Client list, click the name of the client for whom you want to create a note (not the QB symbol, but the client’s name). QBOA displays the page shown here.
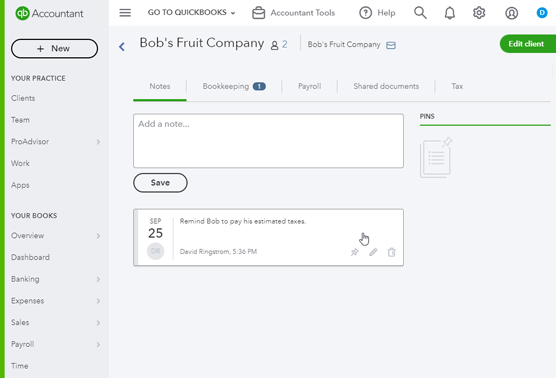 The page where you create a client note.
Type your note and click Save. After you save a note, you can pin it; move the mouse pointer over the note (the pointer appears as a hand) and options for the note appear in the lower-right corner:
- Click the push-pin button to pin the note.
- Click the pencil button to edit the note.
- Click the trash can button to delete the note.
Communicate with a client
Communication is essential in all walks of life, including between a client and an accountant. You can use tools in QBO and QBOA to communicate with your clients who have QBO subscriptions.If you prefer, you can skip using QBO and QBOA to communicate and just use email.
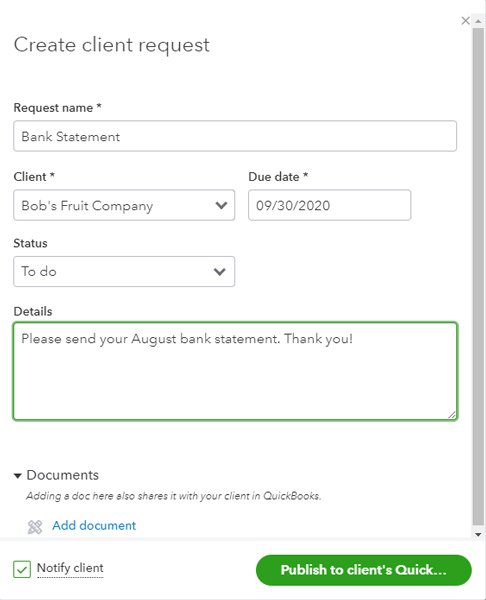
For example, you can use Client Requests to request, for instance, that your client send you a bank statement. Such messages that you send from QBOA appear on the My Accountant page of the client’s QBO company. Follow these steps:- From QBOA, click Work in the Navigation pane.
- Click Create Client Request. QBOA displays the Client Request panel on the right side of the screen.
- Type a name for the request. Think of this as the subject line of an email message.
- Select a client. Only clients with QBO subscriptions appear in the list.
- Supply the due date for the request.
- Optionally, complete the rest of the fields on the request form, including adding any documents you want to send to your client.
- You can optionally select the Notify Client check box to send a QBOA-generated email to the client, notifying him of the request.
- Click Publish to Client’s QuickBooks.
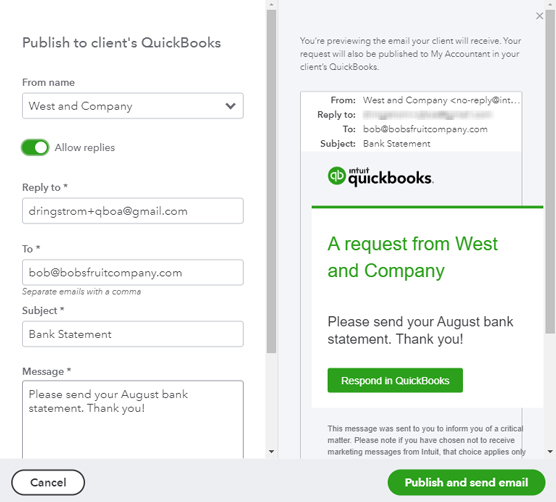
 Use this panel to communicate with a QBO client in a general way.
If you selected Notify Client in Step 7, QBOA displays a preview of the message you will be sending to your client. After you review it, click Publish and Send Email.
 A preview of a Client Request message
When your client opens his QBO company, he can click My Accountant in the Navigation pane to see the message and respond to it.
 A Client Request in a client’s QBO company
To respond to the message using QBO, the client clicks the message on the My Accountant page to display a panel like the one shown, where the client can write a message and attach any needed documents.
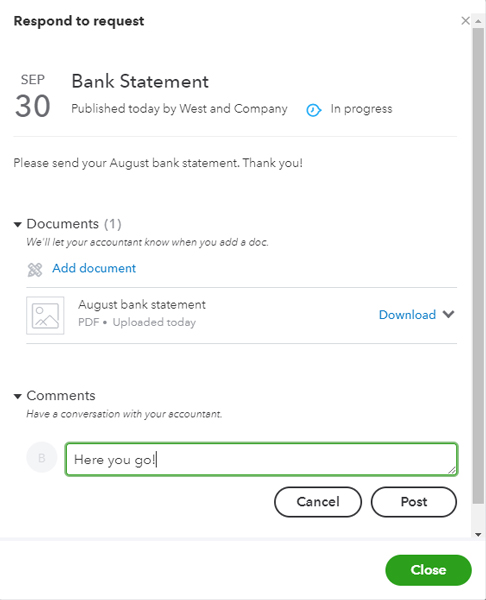 The panel your client uses to respond to a Client Request you generated
Documents can be no larger than 30MB.
Once you receive a document from a client, you can retrieve it in QBOA. Click Clients from the Navigation pane and, in the Client list, click the name of the client. QBOA opens the client’s Details page, where you click the Shared Documents tab shown.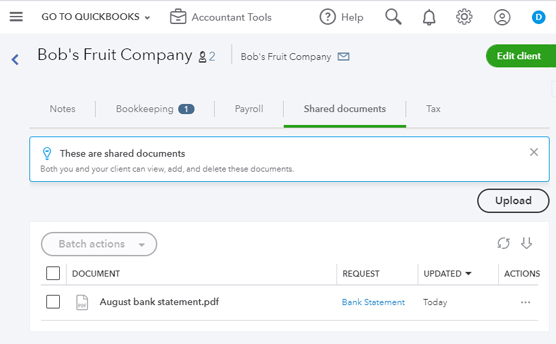 The Shared Documents page in a client QBO company after an accountant receives a client’s documents
From there, you can download the document or click the link in the Request column to view/update the original request. Any changes you make appear on the Work tab.

