


Enough of this blather. I get started by describing how you reconcile an account.
Give QuickBooks information from the bank statement
In a reconciliation, as you probably know, you compare your records of a bank account with the bank’s records of the same account. You should be able to explain any difference between the two accounts — usually by pointing to checks you wrote that haven’t yet cleared. (Sometimes, deposits fall into the same category; you record a deposit and mail it, but the bank hasn’t yet credited your account.)The first step, then, is supplying the bank’s account information to QuickBooks. You get this information from your monthly statement. Give QuickBooks the figures it needs, as follows:
1. Choose Banking→Reconcile, or click the Reconcile icon on the home screen.
QuickBooks displays the Begin Reconciliation dialog box, as shown.
If you have several bank accounts, you may have to choose the account you want to reconcile.
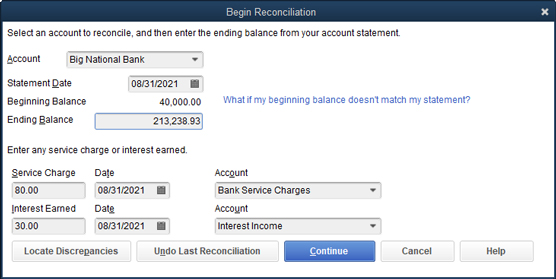 The Begin Reconciliation dialog box
2. If the bank account shown isn’t the one you want to reconcile, open the Account drop-down menu, and choose the correct account.
3. Enter the bank statement date in the Statement Date text box.
You can adjust a date one day at a time by using the plus (+) and minus (–) keys. You can also click the Calendar button at the right end of the Statement Date text box to select a date from the calendar.
See the online Cheat Sheet for a list of other secret date-editing tricks.
4. Verify the bank statement opening balance.QuickBooks displays an amount in the Beginning Balance section of the screen.
5. Enter the ending balance from your bank statement in the Ending Balance text box.6. Enter the bank’s service charge.
If the bank statement shows a service charge, and you haven’t already entered it, move the cursor to the Service Charge text box, and type the amount. (Type 10 for a $10 service charge, for example.)
7. Enter a transaction date for the service-charge transaction.QuickBooks adds one month to the service-charge date from the last time you reconciled. If this date isn’t correct, type the correct one.
8. Assign the bank’s service charge to an account.Enter the expense account to which you assign bank service charges in the first Account text box — the one beside the Date text box. Activate the drop-down menu by clicking the down arrow, highlight the category by using the arrow keys, and then press Enter. I’ll bet anything that you record these charges in the Bank Service Charges account that QuickBooks sets up by default.
If you told QuickBooks that you also want to track income and expense amounts by using classes, QuickBooks adds Class text boxes to the Begin Reconciliation dialog box so that you can collect this information.
9. Enter the account’s interest income.If the account earned interest for the month, and you haven’t already entered this figure, type an amount in the Interest Earned text box.
10. Enter a transaction date for the interest income transaction.You already know how to enter dates. I won’t bore you by explaining it again (but see step 3 if you have trouble).
11. Assign the interest to an account.In the second Account text box, enter the account to which this account’s interest should be assigned. I bet that you record this one under the Interest Income account, which is near the bottom of the Account drop-down menu. To choose a category from the Account menu, activate the menu by clicking the down arrow, highlight the category, and then press Enter.
12. Click the Continue button.QuickBooks displays the Reconcile window, as shown.
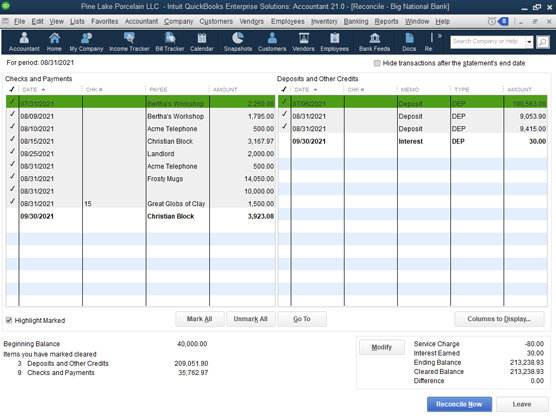 The Reconcile window
Mark cleared checks and deposits
In the Reconcile window, you tell QuickBooks which deposits and checks have cleared at the bank. (Refer to your bank statement for this information.) Follow these steps:1. Identify the first deposit that has cleared.
You know how to do this, I’m sure. Just leaf through the bank statement to find the first deposit listed.
2. Mark the first cleared deposit as cleared.Scroll through the transactions listed in the Deposits and Other Credits section of the Reconcile window, find the deposit, and then click it. Alternatively, you can highlight the deposit by using the Tab or arrow keys and then pressing the spacebar. QuickBooks places a check mark in front of the deposit to mark it as cleared and updates the cleared statement balance.
If you have a large number of deposits to clear, and you can identify them quickly, click the Mark All button and then simply unmark the transactions that aren’t on the bank statement. To unmark a transaction, click it. The check mark disappears.
3. Record any cleared but missing deposits.If you can’t find a deposit in the Reconcile window, you haven’t entered it into the register yet. I can only guess why you haven’t entered it. Maybe you just forgot. Close or deactivate the Reconcile window by clicking the Leave button. Now open the register and enter the deposit in the register in the usual way. To return to the Reconcile window, either reopen it or reactivate it. Or, if you like, choose Banking→Make Deposits and open the deposit screen right on top of the Reconcile window. Record the deposit and then click the Save & Close button. When you open the Reconcile window again, the deposit appears in the Deposits and Other Credits area.
4. Repeat steps 1–3 for all deposits listed on the bank statement.Make sure that the dates match and that the amounts of the deposits are correct. If they’re not, go back to the transactions to correct them. To get to a transaction, click the Go To button. You see the Write Checks or Make Deposits window where the transaction was originally recorded. Make the corrections there and then click Save & Close. You return to the Reconcile window.
5. Identify the first check that has cleared.No sweat, right? Just find the first check or withdrawal listed on the bank statement.
QuickBooks enables you to sort the transactions listed in the Reconcile window by clicking the column headings in the Checks and Payments section and in the Deposits and Other Credits section. You may want to experiment a bit with this handy feature. Sorting and re-sorting transactions — particularly in high-transaction volume bank accounts — often eases the work of reconciling a bank account.
6. Mark the first cleared check as cleared.Scroll through the transactions listed in the Checks and Payments section of the Reconcile window; find the first check; and then click it. You also can highlight it by pressing Tab and an arrow key. Then press the spacebar. QuickBooks inserts a check mark to label this transaction as cleared and updates the cleared statement balance.
7. Record any missing but cleared checks.If you can’t find a check or withdrawal in QuickBooks, guess what? You haven’t entered it in the register yet. Close or deactivate the Reconcile window by clicking its Leave button or by activating another window. Then display the register and enter the check or withdrawal. To return to the Reconcile window, reopen or reactivate it. Or you can choose Banking→Write Checks, create the check right on top of the Reconcile window, and then click Save & Close to return to the Reconcile screen and carry on from where you left off.
8. Repeat steps 5–7 for all withdrawals listed on the bank statement.These steps don’t take very long. Reconciling my account each month takes me about two minutes. I’m not joking or exaggerating. By two minutes, I really mean two minutes.
If the difference equals zero
After you mark all the cleared checks and deposits, the difference between the Cleared Balance for the account and the bank statement’s Ending Balance should equal zero. Notice that I said should—not will. The background window in the above figure is a Reconcile window in which everything is hunky-dory. See that there’s zero difference in the bottom-right corner of the Reconcile window in the above figure? That means your bank account and QuickBooks file are in sync. If the difference is small, look for small differences between the amounts of the checks in the register and the actual cleared checks in the bank statement. If you find a discrepancy with a particular check, click the Go To button to go to the check and change the amount. Click Save & Close to go right back to the Reconcile window.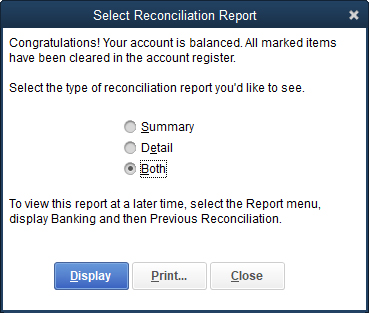 The Select Reconciliation Report dialog box
If the difference does equal zero, you’re finished. Click the Reconcile Now button. QuickBooks displays a congratulatory message box (see figure above) telling you that the reconciliation is complete. As a reward for being such a good boy or girl, the message box asks whether you want to print a free, all-expenses-paid Summary or Detail reconciliation report. Click Summary or Detail and then click OK if you want to print the report; otherwise, just click Close.
Can’t decide whether to print the reconciliation report? Unless you’re a business bookkeeper or an accountant who is reconciling a bank account for someone else — your employer or a client, for example — you don’t need to print the reconciliation report. All that printing does is prove that you reconciled the account. (Basically, this proof is the reason why you should print the report if you’re a bookkeeper or an accountant. The person for whom you’re reconciling the account will know that you did your job and will have a piece of paper to refer to later with any questions.) Also, you can always come back and print the report later, if necessary. To access the reconciliation reports that QuickBooks saved, choose Reports→Banking→Previous Reconciliation.
Now each deposit, withdrawal, and check that you cleared is marked with a check mark in your register. If you don’t believe me, open the register and find out.If the difference doesn’t equal zero
If the difference doesn’t equal zero, you have a problem. If you click the Reconcile Now button, QuickBooks shows you the Reconcile Adjustment dialog box, shown below. This dialog box tells you how unbalanced your account is and asks whether you want to adjust your maladjusted account.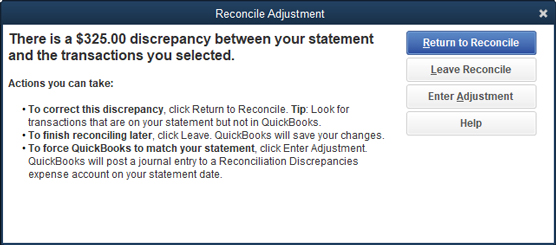 The Reconcile Adjustment dialog box
Click the Return to Reconcile button if you want to go back to the Reconcile window and start the search for the missing or incorrectly entered transaction.
If you want to force the two amounts to agree, click OK. Forcing the two amounts to agree isn’t a very good idea. To do so, QuickBooks adds a cleared transaction equal to the difference.
Postponing a reconciliation (by clicking the Leave Reconcile button) and not choosing to adjust the bank account balance usually is the best approach, because you can locate and correct the problem later, when you have fresh eyes. Then you can restart the reconciliation and finish your work. (You restart a reconciliation the same way that you originate one.)
