You absolutely don’t want to lose the data file. Losing the data file might mean that you don’t know how much money you have, you don’t know whether you’re making or losing money, and you won’t be able to easily or accurately prepare your annual tax returns.
Backing-up basics
Fortunately, backing up the QuickBooks data file is rather straightforward. You need to complete only nine steps:1. Choose the File→Create Copy command.
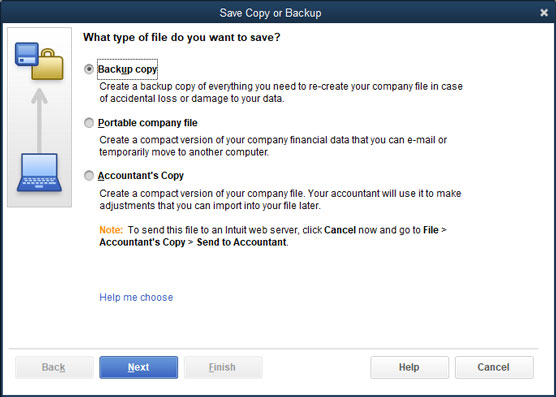
QuickBooks displays the first Save Copy or Backup dialog box (see the following figure), which provides three options: the option to save a backup copy of your QuickBooks file, the option to create a portable company file, and the option to create an accountant’s copy.
 The first Save Copy or Backup dialog box
2. You want to save a backup copy, so select the Backup Copy option button; then click Next to continue.
You can create either a full backup file or a portable company file when you copy the QuickBooks file. A portable company file is smaller than a backup file, so it’s more convenient to move around. You can more easily email a portable company file, for example. The rub with portable company files is this: QuickBooks must work hard to scrunch the portable company file to a small size. QuickBooks also has to do more work to unscrunch the file later, when you want to work with it.
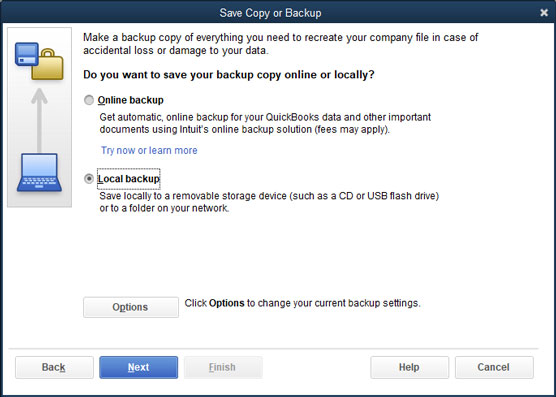
After you click Next, the second Save Copy or Backup dialog box appears.
 The second Save Copy or Backup dialog box
You can go directly to the Save Copy or Backup dialog box by choosing the File→Create Backup command.
3. Indicate whether you want to save your QuickBooks backup file on your company’s computer or to QuickBooks’s offsite data center.Choose Local Backup to indicate that you want to store the backup copy of your file on your computer’s hard drive or some removable storage device, such as a USB flash drive.
4. Click the Options button to choose a backup location.QuickBooks displays the Backup Options dialog box, as shown.
 The Backup Options dialog box
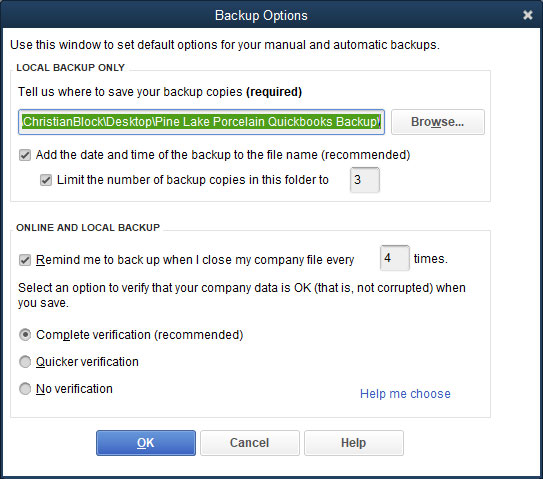
5. Specify the folder or drive location to which the company file should be backed up.
Enter a pathname directly in the text box to tell QuickBooks where to save your backup copies.
If you don’t know how to enter a pathname, click the Browse button. When QuickBooks displays the Browse for Folder dialog box, use its folder list to select the drive or folder you want to use for QuickBooks backups.
6. (Optional) Select your backup options.You can also use the Backup Options dialog box to specify when QuickBooks should remind you to back up and how QuickBooks should back up:
- Adding time stamps: To add the date and time of the backup operation to the backup file’s name, select the check box titled Add the Date and Time of the Backup to the File Name (Recommended).
- Limiting backup copies: To tell QuickBooks to get rid of old backup copies, select the check box titled Limit the Number of Backup Copies in This Folder to X and then specify how many backup copies you want to keep by using the adjoining text box.
- Setting backup reminders: Select the check box titled Remind Me to Back Up When I Close My Company File Every X Times to specify that you want to be reminded to back up the QuickBooks file when you close QuickBooks. Your interval options include every time, every other time, every third time, and so forth.
- Enabling data verification: Use the verification buttons to tell QuickBooks that it should check for data integrity when it backs up your data. Select the Complete Verification (Recommended) radio button for QuickBooks’s best and most comprehensive verification. If you’re someone who doesn’t have time for the extra few seconds of double-checking that data verification takes, sure, select the Quicker Verification radio button. Better yet, throw caution completely to the wind — caution is for babies anyway — and select the No Verification radio button.
QuickBooks displays a dialog box (see the following figure) that asks when you want to back up.
 The Save Copy or Backup dialog box asks when you want to back up.
8. Specify when you want to back up.
Typically, you want to back up when you choose the Save Copy or Backup command. In this case, when QuickBooks displays the Save Copy or Backup dialog box that asks the “when” question, click the Save It Now radio button. Alternatively, you can tell QuickBooks to schedule regular backups of the QuickBooks data file according to some clever scheme by — when QuickBooks asks the “when” question — clicking the Save It Now and Schedule Future Backups radio button or by clicking the Only Schedule Future Backups radio button. If you tell QuickBooks that you want to schedule backups, QuickBooks displays a couple of dialog boxes that you use to create the new backup schedule by naming the schedule and by setting the days and times when backups should be scheduled.
9. Click Finish to close the Save Copy or Backup dialog box.When you’ve specified how the backup operation should work, click Finish. QuickBooks backs up (or creates a copy of) the current QuickBooks company file and stores that new file copy in the backup location.
What about online backup?
If you’re observant, you may have noticed that the Save Copy or Backup dialog box includes an Online Backup radio button. If you want to find out more about backing up the QuickBooks company data file online — which means using Intuit’s computer network rather than your computer or some removable disc to store the backup — you can select that radio button.For what it’s worth, I strongly recommend that you consider using the online backup method, for two reasons:
- Reasonable cost: Online backup is extremely reasonable (it might even come at no additional charge if you have QuickBooks Desktop Pro Plus, Premier Plus, or Enterprise), with pricing based on the timeline (a monthly subscription will cost more per month than an annual subscription) and on whether you’re backing up just QuickBooks or all files on your PC. Backing up all files with an annual subscription seems to be the best value.
- Less effort: Online backup can make the task of backing up less difficult and more regular as long as you have a reliable Internet connection. You don’t need to remember to back up and then remember to take the backup disc home.
You can store backup files in a folder that syncs with a cloud-based backup, such as Dropbox, Google Drive, or Microsoft’s OneDrive. Each of these services offers a free set-and-forget, cloud-based backup if you use the free storage space offered by any of them. This type of service is definitely an option for users who are on a budget or have limited resources.
Some backup tactics
Backing up is mostly a matter of common sense. That being said, however, let me give you some ideas about how, when, and maybe why you should back up:- Make it easy. I mention this in my recommendation concerning the online backup option, but the point deserves mention again. The most important thing you can do regarding QuickBooks data file backup is this: Make backing up easy. This probably means considering the online option, but if you do go local, you want to have a high-density, removable storage device that you can use with the computer you use to run QuickBooks. I use a small USB flash drive. Choose what device works best for you, but you definitely want some similarly easy-to-employ storage device. In this case, easy means that backing up is more likely to occur.
- Back up regularly. I recommend that you back up every time you enter transactions in the QuickBooks data file. Obviously, if backing up represents a lot of work, you won’t want to do it. But if you have an easy way to back up and a convenient storage device to back up to, you can — and should — back up regularly. Daily isn’t too often.
- Store a backup copy of the QuickBooks data file offsite. One final important point worth mentioning: Many of the events that may destroy or corrupt your data file are specific to your computer, such as a hard drive failure, a virus, a user accident, and so forth. Some of the events that may corrupt or destroy your QuickBooks data file, however, are location-specific. Fire, flood, or theft can cause you to lose the QuickBooks data file and its backup. For this reason, you want to store a copy of the backup offsite. At the end of the week, for example, you may want to pop the flash drive in your shirt pocket or purse and take it home. Make sure that if something corrupts or destroys the QuickBooks data file, that same something doesn’t also destroy the backup QuickBooks data file.