


Graphics in a Word 2016 document must cohabit well with the text. To keep both happy, you must understand Word's image layout options. For smaller images, or images that otherwise break up a document in an inelegant manner, choose one of the text-wrapping layout options. Heed these steps:
Click to select the image.
A selected image appears with eight handles, as shown here.
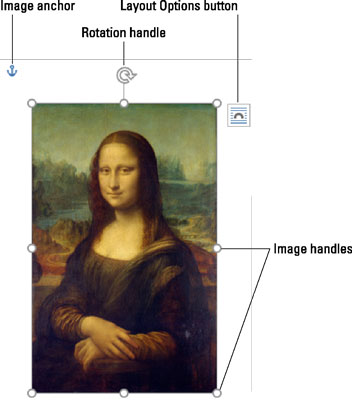 Selected images in Word 2016 have eight handles.
Click the Layout Options button.
Word features four text-wrapping options, found in the With Text Wrapping area of the Layout Options menu. These options are Square, Tight, Through, and Top and Bottom:
Square. Text flows around the image in a square pattern, regardless of the image's shape.

Tight. Text flows around the image and hugs its shape.

Through. Text flows around the image but also inside the image (depending on the image's shape).

Top and Bottom. Text stops at the top of the image and continues below the image.

Choose a text-wrapping option.
Examine your image and the text to see whether it wraps the way you like. If it doesn't, repeat these steps and choose another setting in Step 3.
To remove text wrapping, choose the Inline option from Step 3.


