


- Click the mouse at the spot in the text where you desire the image to appear. You don’t need to be precise, because you can always move the image later.
- Click the Insert tab.
- Use one of the command buttons to choose which type of image to add. You can also paste a previously copied image.
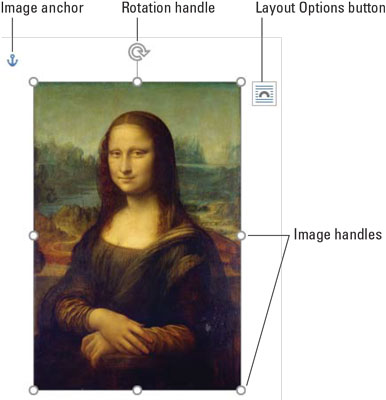 An image in a document.
While the image is selected, a new tab appears on the Ribbon. For pictures, it’s the Picture Tools Format tab; for other types of graphics, the Drawing Tools Format tab appears. Both tabs offer tools to help you perfect the recently inserted graphic.
Beyond pictures and images, shapes are drawn on the page. In this case, they appear in front of or behind the text.
- To remove an image, click to select it and then tap the Delete key. If the graphical object, such as a shape, contains text, ensure that you’ve clicked the object’s border before you tap the Delete key.
The more graphics you add in Word, the more sluggish it becomes. My advice: Write first. Add graphics last. Save often.
How to copy and paste an image in Word 2019
A simple way to stick an image into a document is to paste it in from elsewhere. Follow these steps:- Select the image in another program or from the web.
- Press Ctrl+C to copy the image. For a web page image, right-click and choose the Copy or Copy Image command.
- Switch to the Word document window. In Windows, press the Alt+Tab keyboard shortcut to deftly switch program windows.
- In Word, position the insertion pointer where you want the image to dwell.
- Press Ctrl+V to paste the image into the document.

You can also obtain an image from the web directly, by performing a web image search from within Word: On the Insert tab, in the Illustrations group, click the Online Pictures button. Use options in the Insert Pictures window to locate an online image, courtesy of Microsoft’s Bing search engine.
How to plop down a picture in Word
Your computer is most likely littered with picture files. No matter how the image was created, as long as it’s found somewhere on your PC, you can stick it into your document. Follow these steps:- Click the mouse in the text where you want the image to appear.
- Click the Insert tab; in the Illustrations group, click the Pictures button.
 After clicking the Pictures button, the Insert Picture dialog box appears.
 - Locate the image file on your PC’s storage system.
- Click to select the image.
- Click the Insert button. The image is slapped down in the document.
A nifty picture to stick at the end of a letter is your signature. Use a desktop scanner to digitize your John Hancock. Save the signature as an image file on your computer, and then follow the steps in this section to insert that signature picture in the proper place in the document.
Refer to the book Word 2016 For Professionals For Dummies (Wiley) for details on adding a caption to an image and creating a list of captions for the manuscript.How to slap down a shape in Word
Word comes with a library of common shapes ready to insert in a document. These include basic shapes, such as squares, circles, geometric figures, lines, and arrows — plus popular symbols. Graphics professionals refer to these types of images as line art.To place some line art in a document, follow these steps:
- Click the Insert tab.
- In the Illustrations group, click the Shapes button.
 The button holds a menu that lists shapes organized by type.
 - Choose a predefined shape. The mouse pointer changes to a plus sign (+).
- Drag to create the shape. The shape is placed into the document, floating in front of the text.
- Instantly change the image by using the Shape Styles group on the Ribbon’s Drawing Tools Format tab. Choose a new style from the Shape Gallery. Styles are related to the document’s theme.
- Other items in the Shape Styles group affect the selected shape specifically: Click the Shape Fill button to set the fill color; use the Shape Outline button to set the shape’s outline color; choose an outline thickness from the Shape Outline button’s menu, on the Weight submenu; use the Shape Effects button to apply 3D effects, shadows, and other fancy formatting to the shape.
To more effectively format a shape, click the Launcher in the lower right corner of the Shape Styles group. Use the Format Shape pane to manipulate settings for any selected shape in the document.
How to stick things into shapes in Word
Shapes need not be clunky, colorful distractions. You can use a shape to hold text or a picture, which makes them one of the more flexible graphical goobers to add to a document.To slip a smidgen of text into a shape, right-click the shape and choose the Add Text command. The insertion pointer appears within the shape. Type and format the text.
To place a picture into a shape, select the shape. Click the Drawing Tools Format tab. Click the Shape Fill button and choose the Picture menu item. Use the Insert Pictures window to hunt down an image to frame inside the shape.
- Yes, it’s possible to have both a picture and text inside a shape.
- To further deal with text in a shape, click the shape and then click the Drawing Tools Format tab on the Ribbon. The Text group contains buttons to manipulate the shape’s text.
- To remove text from a shape, select and delete the text.
- To remove a picture, select a solid color from the Shape Fill menu.
How to use WordArt
Perhaps the most overused graphic that’s stuck into any Word document is WordArt. This feature is almost too popular. If you haven’t used it yourself, you’ve probably seen it in a thousand documents, fliers, and international treaties. Here’s how it works:- Click the Insert tab.
- In the Text group, click the WordArt button to display the WordArt menu. word2019-wordart
- Choose a style from the WordArt gallery. A WordArt graphic placeholder appears in the document.
- Type the (short and sweet) text that you want WordArt-ified.
Use the Word Art Styles group on the Drawing Tools Format tab to customize WordArt’s appearance. If you don’t see the Drawing Tools Format tab, first click the WordArt graphic.


