


- Choose File → Info. In the Project Information section on the right side of the screen, as shown in the following figure, you can enter the start, finish, current, and status dates for the project. All you have to do to make an entry or change an entry is click on it to display the controls — for example, to change the date, just click on the date picker.
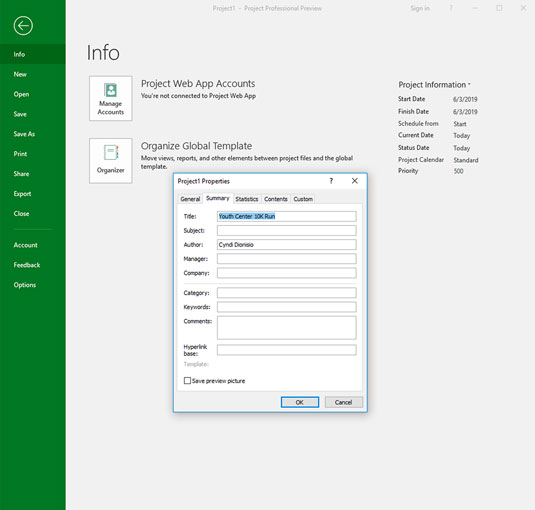 The result of choosing the File→ Info command.
After choosing File → Info, you can click the Project Information down arrow, then click Advanced Properties. The Properties dialog box opens. Enter the name of the project where it says “Title” and enter your name where it says “Author.” You can also enter company name, keywords, and other information. This information is used in many of the automated reports that Project creates.
- On the Ribbon, go to the Project tab and click the Project Information icon. You see the Project Information dialog box, shown here. It holds the same information as the Project Information section on the Info screen in the Backstage view.
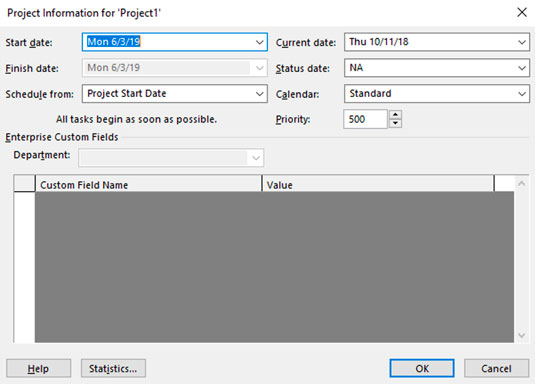 The Project Information dialog box.
This list describes the settings within the Project Information dialog box:
- Start Date and Finish Date: For a project scheduled forward from the start date (see the next bullet), enter only the start date. Or if you schedule backward from the finish date, enter a finish date.
- Schedule From: You can choose to have tasks scheduled backward from the finish date or forward from the start date. Most folks move forward from the start date.
Although you can schedule backward, use this feature only to schedule the work backward initially, by selecting the finish date and clicking the OK button. Immediately after doing so, return to this dialog box and revert to the (newly calculated) start date. If you don’t, you may encounter problems down the road if you eventually record progress. At that point, the end date will be fixed because you’ve backward-scheduled, and the start date will be fixed because you’ve recorded actuals, so the schedule will no longer be dynamic and won’t expand or contract.
- Current Date: By default, this setting matches the computer clock setting. However, you can change it so that it doesn’t match the computer clock setting. Changing this date is useful for looking at what-if scenarios or for tracking progress as of a certain date in the past or any date you choose.
- Status Date: You typically set the current date to track the progress on the project. When tracking, you usually want to see the status of the project as of the current moment, so you can ignore this setting. However, if you want to track as of the end of a fiscal period or another time frame, change it to track the status of tasks as of any other date.
- Calendar: Select from this drop-down list the Base calendar template to use for the Project calendar. I list this setting first because it’s the only one you have to deal with when you start a new project. For now, assume you will use the Standard calendar.
- Priority: This field is useful if your organization has many projects and you create links among them. If you use a tool such as resource leveling to resolve conflicts, it can consider this project priority setting when calculating what to delay and what to keep on track.
Microsoft Project scheduling options
One of the most valuable aspects offered by Project has traditionally been its ability to recalculate task schedules, such as when you change the project start date or there is a change to one task’s schedule that affects one or more dependent (linked) tasks. This powerful behavior saves the project manager — you — from having to rethink and reenter dates to rescheduled tasks throughout the project.But flip sides to the benefits of automation always exist, and in the case of project scheduling, automatic scheduling can lead to unwanted schedule changes based on software behavior and not on human expertise.
To retain the helpful aspects of automation that make scheduling less time-consuming while allowing project managers to retain schedule control when needed, Project 2019 allows user-controlled scheduling.
In user-controlled scheduling, you can select one of these scheduling modes for each task:
- Auto Schedule: Project calculates task schedules for you based on the project start date and finish date, task dependencies, calendar selections, and resource scheduling.
- Manually: Project enables you to skip entering the duration and dates, and specifying them later. When you enter the duration and dates, Project fixes the schedule for the task and doesn’t move it unless you do so manually. The manually scheduled tasks move if you reschedule the entire project, in most cases. The Gantt bars for manually scheduled tasks also differ in appearance from those for automatically scheduled tasks.
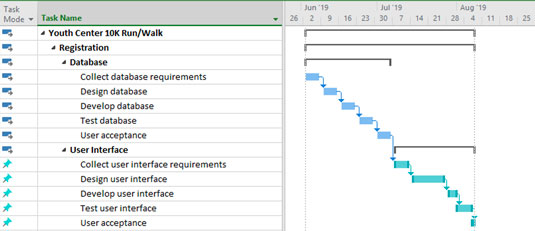 Manually and automatically scheduled tasks.
The summary task (the task with other tasks indented beneath it) should be auto-scheduled. That is because the start and finish dates of the tasks beneath it indicate when the summary task can can start and finish.
The project file can have all manually scheduled tasks or all auto-scheduled tasks — or any mix of the two. By default, all tasks that you create use the manually scheduled mode.You can change the task mode for the overall project in two ways:
- To change the mode for all new tasks, select the Task tab, click the Schedule Mode icon in the Tasks group (the button with the calendar and a question mark), and then choose Auto Schedule or Manually Schedule from the menu, as shown here.
- Another way to change the mode for all new tasks is to click the New Tasks link at the left end of the status bar at the bottom of the project, then select the mode you want.
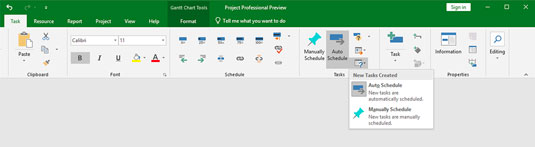 Changing the task mode from the Ribbon.
You can change the task mode for individual tasks in three ways:
- Select the task, click the Task tab on the Ribbon, and then click either Manually Schedule or Auto Schedule in the Schedule group.
- Select the task, click the Task Mode cell for the task, click the drop-down arrow that appears, and click either Manually Scheduled or Auto Scheduled in the drop-down list.
- Select the task, click the Task tab on the Ribbon, and click the Information button in the Properties group. On the General tab of the Task Information dialog box, go to the Schedule Mode area and click the Manually Scheduled radio button or the Auto Scheduled option button.
You need to balance the desires of your inner control freak versus the need to be an efficient project manager in determining how often to use manual scheduling. Though manual scheduling prevents Project from moving tasks that you want to stay put in the schedule, you may need to edit the schedules for dozens of dependent tasks in a long or complicated project. The best balance — particularly for beginning project managers — may be to use manual scheduling sparingly.
How to enter the Work Breakdown Structure (WBS)
The schedule should be set up the same way as the Work Breakdown Structure (WBS). If you want to continue the outline numbering scheme from the WBS, Project automatically extends to the schedule tasks the outline numbering used for the WBS. You can do this in two ways:- Select the Format tab.
- In the Columns group, click Insert Column.
- Select the Outline Number option.
- Click to open the Format tab.
- In the Show/Hide group, select the Outline Number check box.
- In the Task Name column, click a blank cell.
- Type the name of the WBS element. Using the example of the Youth Center 10K Run/Walk, the first element is Registration.
- Press Enter to move to the next cell in the column and then type the WBS element name.
- Repeat Step 3 until you enter all WBS names. You can edit the text that you type by pressing the Delete or Backspace key to clear characters.
This figure shows part of the screen display after you enter the WBS outline. This version shows the outline numbering as a separate column. Notice that after you indent a task, its parent task switches from manually scheduled to auto-scheduled because the duration and dependencies of the child tasks determine when the parent task can start and finish. Therefore, you don’t fill in the duration or start and finish dates for WBS elements — that information will auto-populate when you enter tasks beneath the WBS elements.
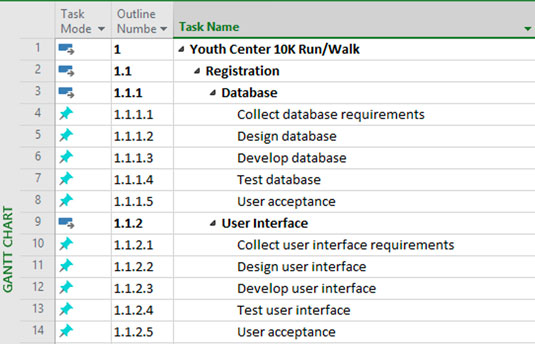 The WBS for a 10K run.
How to enter tasks in Microsoft Project 2019
After the WBS information is entered, you can start entering tasks. You can create tasks in a few different ways:- Type information in the sheet area of the Gantt chart.
- Enter information in the Task Information dialog box.
- Import tasks from Outlook.
- Import tasks from Excel.
Entering tasks in Gantt Chart view
Many people who work on lengthy projects find that entering all task names in the sheet pane of Gantt Chart view is the quickest and easiest method. This method is the same one I used to enter the WBS information. You can simply enter a task name in the Task Name column, press the Enter or down-arrow key on the keyboard to move to the next blank row, enter another task, and so on.Use the Task Mode column to change the task scheduling mode from Manually Schedule to Auto Schedule for any task not using the default method.
Entering tasks via the Task Information dialog box
If dialog boxes provide the kind of centralized information form that fits the way you like to work, consider using the Task Information dialog box to enter, well, task information. The series of tabs in this dialog box contain all the information about a task.Follow these steps to create a task via the Task Information dialog box:
- In the Task Name column, double-click a blank cell. The Task Information dialog box appears, as shown.
- In the Name field, type a task name. You can enter any other information you would like to while you are there.
- Click the OK button to save the new task. The task name appears in Gantt Chart view in the cell you clicked in Step 1.
- Press the down-arrow key to move to the next cell.
- Repeat Steps 1–4 to add as many tasks as you like.
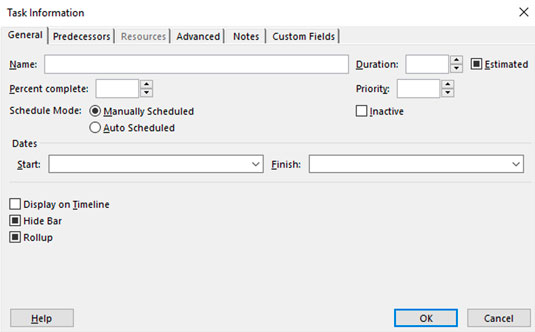 The Task Information dialog box.
As you name tasks, make task names in the project both descriptive and unique. However, if you can’t make all names unique (for example, you have three tasks named Hire Staff), you can use the automatically assigned task number or the outline number to identify tasks; these numbers are always unique for each task.
Naming tasks is a trade-off between giving a full description (which is much too long for a Task Name field) and being too brief (which can lead to misunderstandings and uncertainty). When in doubt, be brief in the Task Name and elaborate with a Task Note.
To insert a task anywhere within the list of tasks in Project, from the Task tab, Insert group, click a task name cell where you want the new task to appear, and click the Insert Task icon. The new task is inserted in the row above. You can also press the Insert key on the keyboard, or right-click and select Insert Task from the pop-up menu.


