


After you send the last memo related to the project and accept the final kudos or criticism from your boss, take a moment to look over the Microsoft Project scheduling one more time.
Review the Project
You won’t understand every aspect of project management during your first, second, or even third project. But you will become more comfortable with your skills. Similarly, you won’t understand every nuance of Microsoft Project scheduling on your first project. You won’t even uncover every capability of Project on your second project. But gradually, as you master the ins and outs of managing projects and using Project, you’ll more effectively apply project management skills and more easily absorb the information that Project generates — and you’ll more quickly understand how it can help you avoid mistakes on future projects.Review every project at the end of each phase and at the end of the project to see what you did right and what you did wrong. Then you can use what you discover to improve your skills on the next project.
It’s a good idea to do a review at the end of each phase of the life cycle, if a major risk or issue occurs, or if an unforeseen significant change takes place.
Learn from your mistakes
You know what they say: If you don’t study history, you’re doomed to repeat it. And repeating a mistake is the last thing you want to do when managing a project.Consider these strategies when reviewing your project:
- Compare the original baseline plan against the final actual activity, as shown. Even if you created interim or baseline plans to adjust for drastic changes, look at the widest gap between what you expected to happen in the initial plan and what did happen. This strategy can be the best way to see areas where you tend to underestimate the most or where changes in the project’s scope caused dramatic changes.
- Review the notes you made about tasks to remind yourself of changes or problems that cropped up. Insert the column named Notes into the Gantt Chart sheet and read all notes in one sitting.
- Note which resources failed to deliver as promised; if you manage them, provide them constructive feedback. If you don’t manage resources, maintain notes on their working speed and quality to assist in future assignments. Also note which outside vendors failed to perform as expected (and move them to the bottom of the contracting list).
- Assess your own communications in saved emails or memos. Determine whether you gave the team enough information to perform effectively and whether you informed management about project issues in a timely way.
- Assess feedback from your boss, your customers, and other stakeholders. Determine whether any overall constraints, such as the project budget or deliverables, changed dramatically during the course of the project. Ask whether end users were satisfied with the rate at which you completed the project and delivered the final product. Inquire about the team’s performance from their perspective and about whether they would rely on you to lead another, similar project.
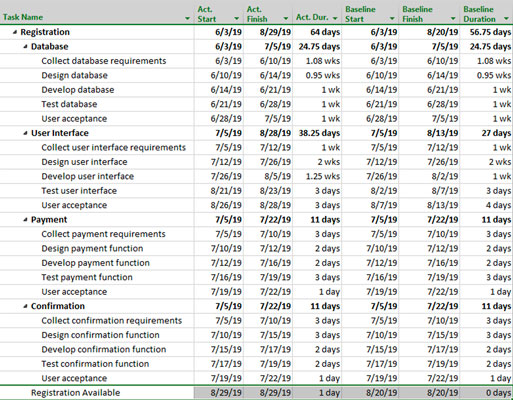 Baseline and actual figures.
Debrief the team
No project is the province of a single person. Even if no one else ever touched the Project plan, your team still provided input for that plan via the hours of activity they reported and the information they provided to you during the course of the project.Follow these suggestions for refining the communications process:
- Ask team members about the success of actual activity reporting. Did you send email, schedule notes, or use the Project Web App tools, such as TimeSheet, to gather resource information? Did you consider taking advantage of all the benefits of online collaboration? Should you do so on the next project?
- Determine whether your team rates your communications as frequent and thorough. Did you share with resources too little information about the project, or did you inundate them with too much? Did you send simple reports on specific aspects of the project or send entire (cumbersome) Project files? Did the management team feel that your reporting on the project was sufficient for their needs? Should you learn to take better advantage of other software, such as Excel and Visio, accessed via Visual Reports?
Compare Versions of a Project
Project managers sometimes prefer to save new versions of project plans rather than work with interim plans. This approach can work, but it doesn’t enable the project history to be captured in a single project file. No matter — Project’s Compare Versions feature lets you see the differences between two Project plan files. These files can be either two different versions of the plan for a single project or files for two separate projects that happen to be similar.You can use this method to either review events from a completed project or compare similar new projects as you’re building them. The finished comparison report shows you the project differences graphically and provides a legend to identify report features.
To compare two files in Project, follow these steps:
- Open the file that you want to compare. The active file is considered the current project.
- From the Report tab, click the Compare Projects button in the Project group.
The Compare Project Versions dialog box appears, as shown.
 Comparing project versions.
 - If the file to compare doesn’t appear in the drop-down list labeled Compare the Current Project (filename) to This Previous Version, click the Browse button to search for and select the appropriate file. The file you select is considered the previous project.
- To compare tables other than the default tables that are shown, select the appropriate tables from the Task Table drop-down list and Resource Table drop-down list.
- Click the OK button.
- If you see a message indicating that you have too many columns to compare, click OK to continue.
Project runs the comparison and displays the comparison report, as shown. The comparison report appears in the upper pane, and the individual project files show up in the two lower panes. The legend at the left describes the symbols in the Indicators column of the report.
 Comparing projects.
 - Click Resource Comparison in the View group on the Compare Projects tab. The Comparison Report pane changes to display resource information.
- Click the Close Comparison (X) button on the Legend for Comparison Report pane to close the pane. Click the Save button on the Quick Access toolbar and name the file so that the next time you want to view this comparison report, the projects and fields will already be set up.
Build on Microsoft Project Success
Although human nature often makes people focus unnecessarily on the shortcomings resulting from a project, the fact is that you’ve likely done many things well. Before you start planning another project, you want to store the positive aspects somewhere that you can easily find later.Create a template
One option for saving information from your current project is to create a template, which is simply a file you save that contains the settings you want to replicate. When you open a template, you can save it as a Project document with a new name and all those settings already built in.Project contains its own templates for common types of projects, but you can save any project as a template. If you often repeat the same set of tasks in a project — as people in many industries do — save yourself the time of re-creating all those tasks.
Templates can contain, in addition to any tasks in the project, any or all of these types of information for those tasks:
- All information for each baseline
- Actual values
- Rates for all resources
- Fixed costs
To save a file as a template, follow these steps:
- Open the file you want to save and then choose File→Save As.
- In the Save and Sync pane, select where you want to save the template. You can save it in SharePoint, on your computer, in the cloud, or in another location that you add.
- Navigate to where you want to save the template.
The Save As dialog box appears, as shown.
 Saving a file as a template.
 - From the Save As Type drop-down list, select Project Template (*.mpt). Be aware that this file extension doesn’t appear unless you’ve set Windows to display file extensions.
- Click the Save button. You will be asked to select the type of data you want to remove from the template, such as values of all baseline, actual values, and so on. Check the boxes you want to save in the template, and click Save. Microsoft saves templates in the central folder named Templates.
Master the Microsoft Project Organizer
The marvelously flexible nature of Project lets you customize many settings such as tables, filters, views, and reports. For example, you can create separate tables of data to display in views that contain sheet panes. You can also create separate filters, reports, and calendars. If you have any kind of a life, you may not want to spend evenings re-creating all these elements on the next project. Instead, use the Organizer to copy them to other Project files.You can use the Organizer to copy information from one file to another file. There are nine tabs to help organize the information you can copy:
- Views
- Reports
- Modules
- Tables
- Filters
- Calendars
- Maps
- Fields
- Groups
If you want to make a custom item that you’ve created in the current file available for use in all Project plan files, use the Organizer to copy the item into the global template Global.mpt. Though some items are copied to the Organizer by default, it never hurts to ensure that crucial items are saved there.
Follow these steps to use the Organizer:- Open the project that you want to copy items from and the project to copy items to.
- In the file you want to copy to, choose File →Info. Backstage view opens, showing the overall file choices.
- Click the Organize Global Template button.
The Organizer dialog box appears, as shown.
 The Organizer dialog box.
 - Click the tab for the type of information you want to copy.
- In the left column, click the line to copy from. By default, Project selects the Global.mpt template for the list on the left and the file from which you open the Organizer for the list on the right. If you want to copy items from another open file instead, choose it by clicking the drop-down list below the file list on the right. (Depending on the tab you display, the drop-down list may be named Views Available In, Groups Available In, Reports Available In, and so forth.)
- Click the Copy button. The item appears in the list on the right.
- (Optional) To rename a custom item that you’ve created, (a) Click it in the list on the right and then click the Rename button. (b) Enter a new name in the Rename dialog box that appears and then click the OK button.
- To copy additional items on the same tab, repeat Steps 5 and 6.
- To copy an item on a different tab, repeat Steps 4–8.
- When you finish copying items from one file to another, click the Close (X) button.
Don’t rename default items in the Organizer. Renaming them can cause errors and malfunctions, such as the inability to display a particular view.


