


Good news: You can! In fact, creating a video version of your presentation is a snap. First, you set up the timing you want for each slide and for each animation within each slide. You can even add a voice narration to each slide. After the timings and narration are all set up, you just click a few times with the mouse, and your presentation is converted to video.
How to add timings and narration to your PowerPoint slides
PowerPoint includes a nifty feature that lets you record the timings for each slide and for each animation element (such as bullet points appearing). At the same time, you can record your own voice to use as a narration for the presentation.To record the timings, you essentially rehearse the presentation as if you were giving it to an audience. PowerPoint keeps track of the time between each mouse click or other action and records those timings along with the presentation.
As for the narration, you simply speak your narration into a microphone, and PowerPoint attaches your recorded voice to each slide. Then, when you play back the presentation, the slides are automatically synchronized with the narrations you recorded.
Note that you can also record PowerPoint’s built-in laser pointer. Then, when you play back the show or create a video, the pointer will dance across the screen automatically!
You need a microphone plugged into your computer to record narrations. I recommend you get the kind that’s built into a headset rather than a hand-held microphone. The headset microphone will provide more consistent voice quality, plus it will leave your hands free to work your keyboard and mouse while you record the timings, narration, and laser pointer.
To record timings and narration, first plug a microphone into your computer’s microphone input jack. Then, open the presentation and follow these steps:1. Open the Slide Show tab, choose Record Slide Show and then choose Start Recording from Beginning.
PowerPoint switches to Presenter View.
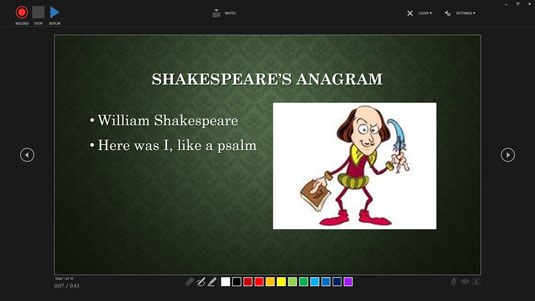 Recording a slide show in Presenter View.
2. Click the Record button begin recording the slide show.
A countdown appears on the screen: 3 … 2 … 1, and then the recording begins.
3. Speak your narration into the microphone. Press Enter or click the mouse button each time you want to advance to a new slide or call up a new animation element (such as a bullet point).4. If you want to use the laser pointer on a slide, hold down the Ctrl key and then click and hold the mouse button and use the mouse to control the laser pointer.
When you release the mouse button, the laser pointer disappears.
5. If you need to pause the recording at any time, click the Pause button that appears at the top left of the Presenter View screen.The recording is suspended; you can click Record again to resume recording.
6. When you’re finished recording, click Stop.Recording will automatically end when you exit the last slide, so you can skip this step if you record the entire presentation.
7. Switch to Slide Sorter View.Slide Sorter View allows you to see the timings associated with each slide, as shown here.
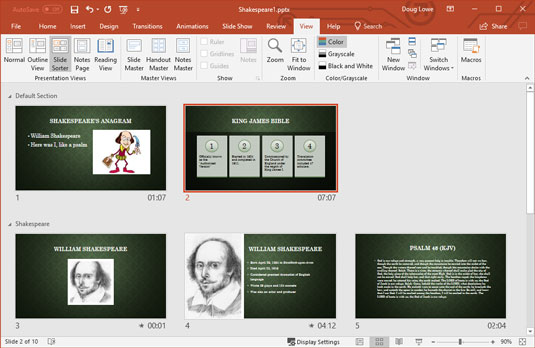 You can see the slide timings in Slide Sorter View.
8. If you messed up on any slide, select that slide, click Record Slide Show, and then choose Start Recording from Current Slide. Then re-record the timings and narration for that slide. Press Esc to stop recording.
You can re-record more than one slide in this way; just press Enter or click the mouse to advance through all the slides you want to re-record. Press Esc to stop recording.
9. Press F5 or click the Slide Show button on the right side of the status bar to begin the slide show so you can see whether your narration works.The slide show begins. The narration plays through your computer’s speakers, and the slides advance automatically along with the narration. The laser pointer should also appear if you used it during the recording.
Here are some additional things to keep in mind about narrations:- As you record the narration, leave a little gap between each slide. PowerPoint records the narration for each slide as a separate sound file and then attaches the sound to the slide. Unfortunately, you get cut off if you talk right through the slide transitions.
- The narration cancels out any other sounds you placed on the slides.
- To delete a narration, click the Record Slide Show button, click Clear, and then click either Clear Narrations on Current Slide (to delete narration from just one slide) or Clear Narration on All Slides (to delete all narration).
How to create a PowerPoint video
Creating a video from your presentation couldn’t be much easier. Here’s the procedure:1. (Optional) Record the slide timings and any narration you want to use.
For the procedure to record timings and narration, refer to the preceding section. If you skip this step, each slide will be displayed for a fixed duration in the resulting video.
2. Choose File → Export →Create a Video.The Create a Video Backstage View screen is displayed, as shown.
3. Select the video quality.The first drop-down list on the Create a Video page lets you choose whether your video is targeted at computer displays, the Internet, or portable devices.
4. Select whether to use recorded timings and narrations.If you choose not to use recorded timings, you can set the duration to display each slide. (The default is 5 seconds.)
5. Click Create Video.A Save As dialog box appears.
6. Select the folder where you want to save the file and enter the filename you want to use.By default, the video file will be saved in the same folder as the presentation and will have the same name, but with the extension .wmv.
7. Click Save.The video is created.
Depending on the size of the presentation and the quality you selected, the video may take a long time to create. A progress bar appears in the status bar to indicate the video's progress. You can continue doing other work in PowerPoint while the video is being created, but your computer will probably respond sluggishly until the video is finished.
8. When the progress bar completes, the video is finished!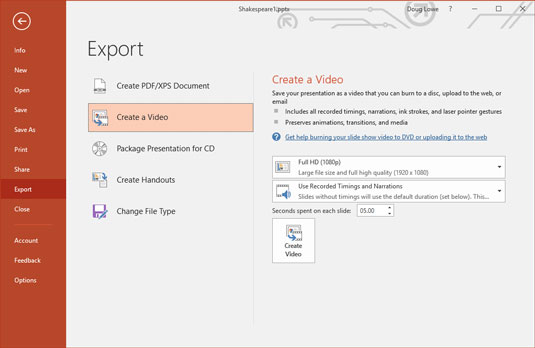 Creating a video.
You can view the video in Windows Media Player by navigating to it in Windows Explorer and double-clicking the video’s .wmv file.


