


In Excel 2016, you need to establish data-validation rules because by nature, people are prone to enter data incorrectly because the task of entering data is so dull. This is why data-validation rules are invaluable. A data-validation rule is a rule concerning what kind of data can be entered in a cell.
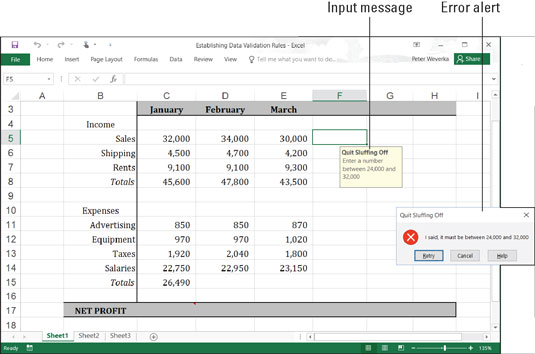
When you select a cell that has been given a rule, an input message tells you what to enter, as shown here. And if you enter the data incorrectly, an error alert tells you as much, also shown.
Data-validation rules are an excellent defense against sloppy data entry and that itchy feeling you get when you're in the middle of an irksome task. In a cell that records date entries, you can require dates to fall in a certain time frame. In a cell that records text entries, you can choose an item from a list instead of typing it yourself. In a cell that records numeric entries, you can require the number to fall within a certain range. The table describes the different categories of data-validation rules.
| Rule | What Can Be Entered |
|---|---|
| Any Value | Anything whatsoever. This is the default setting. |
| Whole Number | Whole numbers (no decimal points allowed). Choose an operator from the Data drop-down list and values to describe the range of numbers that can be entered. |
| Decimal | Same as the Whole Number rule except numbers with decimal points are permitted. |
| List | Items from a list. Enter the list items in cells on a worksheet, either the one you're working in or another. Then reopen the Data Validation dialog box, click the Range Selector button (you can find it on the right side of the Source text box), and select the cells that hold the list. The list items appear in a drop-down list on the worksheet. |
| Date | Date values. Choose an operator from the Data drop-down list and values to describe the date range. Earlier in this chapter, "Entering date and time values" describes the correct way to enter date values. |
| Time | Time values. Choose an operator from the Data drop-down list and values to describe the date and time range. Earlier in this chapter, "Entering date and time values" describes the correct way to enter a combination of date and time values. |
| Text Length | A certain number of characters. Choose an operator from the Data drop-down list and values to describe how many characters can be entered. |
| Custom | A logical value (True or False). Enter a formula that describes what constitutes a true or false data entry. |
Follow these steps to establish a data-validation rule:
Select the cell or cells that need a rule.
On the Data tab, click the Data Validation button.
As shown here, you see the Settings tab of the Data Validation dialog box.
 Settings tab of the Data Validation dialog box.
On the Allow drop-down list, choose the category of rule you want.
Enter the criteria for the rule.
What the criteria is depends on what rule category you're working in. The table describes how to enter the criteria for rules in each category. You can refer to cells in the worksheet by selecting them. To do that, either select them directly or click the Range Selector button and then select them.
On the Input Message tab, enter a title and input message.
You can see a title ("Quit Sluffing Off") and input message ("Enter a number between 24,000 and 32,000"). The title appears in boldface. Briefly describe what kind of data belongs in the cell or cells you selected.
On the Error Alert tab, choose a style for the symbol in the Message Alert dialog box, enter a title for the dialog box, and enter a warning message.
In the error message shown previously, the Stop symbol was chosen. The title you enter appears across the top of the dialog box, and the message appears beside the symbol.
Click OK.
To remove data-validation rules from cells, select the cells, go to the Data tab, click the Data Validation button, and on the Settings tab of the Data Validation dialog box, click the Clear All button, and click OK.


