


You can see the paragraph markers (which don’t print) by clicking the Show/Hide button on the Word 2019 Home tab (in the Paragraph group). This button toggles on/off the display of hidden characters such as spaces, paragraph breaks, line breaks, and tabs. The image below shows a document with the display turned on.

Some folks find seeing these characters very distracting. However, showing them can be very helpful when you’re trying to make sure you have only one space between words, or when you accidentally press the Tab key and make text skip like this — and then fix it.
Each paragraph in Word has a horizontal alignment, which determines how each line aligns between the right and left margins. The default is left alignment, where each line begins at the left margin. Left alignment is appropriate for most situations; the text in most books is left-aligned. The alternatives are- Right alignment: Each line ends at the right margin. You might use this to right-align the date in some styles of business letters.
- Center alignment: Each line is centered evenly between the margins. You might want to center your name and address on stationery you create.
- Justified: Each line has additional space added to it as needed so that it begins at the left margin and ends at the right margin. With justified alignment, all lines of the paragraph except the last one are spaced that way; the final line of the paragraph is left-aligned. If the paragraph consists of only a single line, it is left-aligned. Newsletter text is often justified, making for a tidier-looking page.

To change one paragraph’s alignment, move the insertion point into it, or select any (or all) text within it. Then click the paragraph alignment button you want.

To apply a different alignment to multiple paragraphs at once, select multiple paragraphs (or any part of them). Then click the paragraph alignment button you want.
By default, each paragraph starts in relation to the right and left margins, depending on what alignment you choose for your Word documents. For example, a left-aligned paragraph starts at the same position as the left margin, like this text. Sometimes you might want to indent one or more paragraphs, though: that is, shift their position in relation to the left and/or right margins. For example, in some styles of correspondence, it’s customary to indent the first line of each paragraph by one-half inch (or five spaces). Or, when citing a quotation, it’s common to indent a paragraph by one-half inch at both the right and the left.
Indenting almost always involves shifting the edge of a paragraph inward toward the center of the page, but it is possible to have negative indents, by using negative numbers to specify the indentation amount. Some people call these “outdents,” but that’s just a made-up word.
Here are the possible types of indents in Word.- First-line indent: Only the first line of the paragraph is indented.
- Hanging indent: Every line of the paragraph except the first one is indented.
- Left indent: All lines of the paragraph are indented in relation to the left margin.
- Right indent: All lines of the paragraph are indented in relation to the right margin.
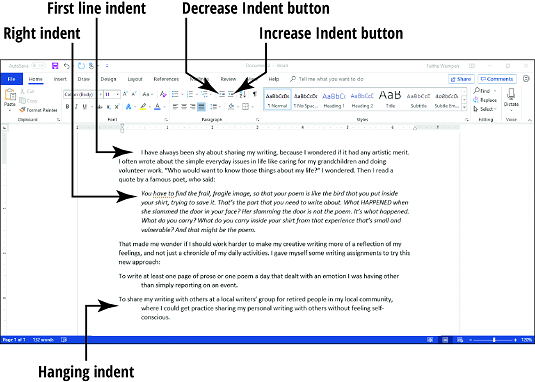
For a simple left indent, use buttons on the Home tab (Paragraph group): Increase Indent and Decrease Indent. Each time you click one of those buttons, it changes the left indent for the selected paragraph(s) by 0.5.”
If you want to specify the amount of indent or if you want to apply an indent to the right side, use the Indent controls on the Word 2019 Layout tab. (Check here to see more of the Word 2019 ribbon.) You can increment the amount of indent up or down in the Left and Right text boxes.

If you want a special indent (hanging or first-line), use the Paragraph dialog box. To do so, follow these steps:
- Select the paragraph(s) to which the setting should apply.
- On the Home or the Layout tab, click the small icon in the bottom right of the Paragraph group.
- In the Paragraph dialog box that opens, enter values in the Left and/or Right text boxes as desired to create overall indents for the paragraph(s).

- (Optional) If you want a special type of indent (such as hanging, or first-line), open the Special drop-down list and make your selection. Then enter the amount of the special indent in the text box to the right.
In the image above, for example, a hanging indent has been set of 0.9”. That means all lines except the first one will be left-indented by 0.9”.
- Click OK.
The indent settings are applied.


