
You may see some Microsoft documentation that says that the features described in this article are available only to Office 365 subscribers, but that warning is outdated and doesn’t apply to Office 2019.
Learning the learning tools
Learning Tools is a collection of tools to help with reading comprehension—a new Word 2019 feature. It offers a variety of helpful features to assist people who find it difficult to read regular text onscreen for any of a variety of reasons. Even people who can read online text easily may enjoy the extra boosts that these Word 2019 features provide.To access the new Word 2019 feature that contains learning tools, select View → Learning Tools. Then explore each of the buttons on the Learning Tools tab that appears.
 Access the Learning Tools tab by selecting Learning Tools from the View tab.
| Learning Tool | Function |
 |
Column Width opens a drop-down list from which you can select different column widths to display the document. Some people find that narrower column widths are easier to read than wider ones. |
 |
Page Color opens a drop-down list of page colors: None (white), Sepia (beige), and Inverted (white text on a black background). |
 |
Text Spacing increases the space between words, characters, and lines. This can help some people with visual or cognitive impairments see and process the text better. When you open the Learning Tools tab for the first time, this feature may be enabled; you can turn it off by selecting its button. |
 |
Syllables separates each word into syllables, with tiny dots between each syllable. Some people find it easier to read words this way. |
 |
Read Aloud reads the text out loud. If there is selected text, it reads the selection; if not, it starts reading at the insertion point. (More about this feature in the next section.) |
When you’re finished, you can click Close Learning Tools. You don’t have to close the Learning Tools tab, though; you can just click another tab to go about your work and keep the Learning Tools tab handy.
Read It to Me
Let’s look at Read Aloud in a bit more detail. Read Aloud is a new and improved version of a previous Office command called Speak. Speak is still available in Excel, PowerPoint, and Outlook (although you have to manually add it to the Ribbon or Quick Access toolbar in those apps, as it isn’t available by default). Outlook contains both Speak and Read Aloud.You can use Read Aloud from the Learning Tools tab on the Ribbon, as covered in the previous section. It’s also available on the Review tab in Word. You can also press Ctrl+Alt+Spacebar to read the selected text any time you like.
If you use Read Aloud often, you may want to add its button to the Quick Access toolbar. That’s easy to do: Just click the down arrow at the right end of the Quick Access toolbar to open a menu, and select Read Aloud from the menu to add it.
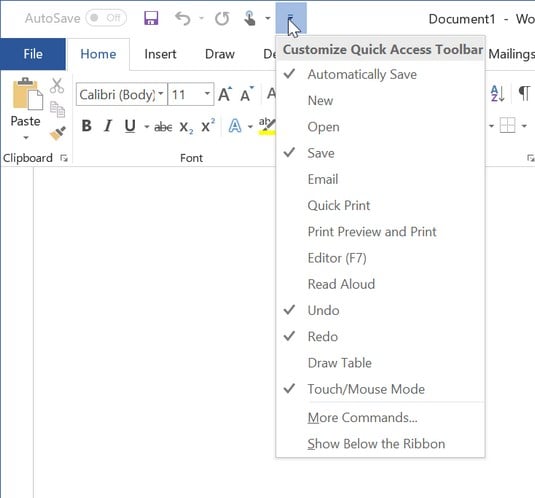 Add Read Aloud to the Quick Access Toolbar for easy access.
You can add the Read Aloud or Speak command to the Quick Access Toolbar in other Office 2019 apps too, but it’s a little bit more work to do so. After clicking the down arrow on the Quick Access toolbar, choose More Commands to open the Options dialog box. Set the Choose Commands From setting to All Commands, find the command in the list on the left, and then select Add to add it.
When you are using Read Aloud, a small toolbar appears in the upper-right corner of the text area. You can select the Settings button on that toolbar to open a menu. From here you can select a different voice and control the reading speed. You can also fast-forward (to the next paragraph), return to the previous paragraph, and close the toolbar.
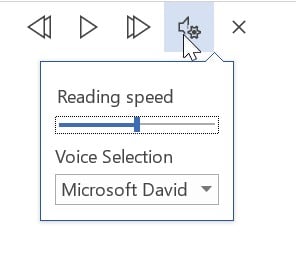 Change how Read Aloud works via its Settings menu.
Dictation: Take a Memo!
The Dictation option is a Word 2019 feature that enables you to enter text by speaking rather than by typing. Is this new? Well, sort of. People have been dictating into Word for a while now via the Windows Speech Recognition (or Speech Services) feature, but the new Dictation feature brings the activity under Word’s control and gives it more features and options.To use Dictation, open a document and place the insertion point where you want the text to appear. Then on the Home tab, select Dictate. If you click the top part of the button, the feature turns on with your default language selected. If you click the arrow at the bottom of the button, a menu appears from which you can select the language. From there you can choose a language, or if the language is already correct, you can choose Dictate.
 Select the dictation language from the menu.
You can tell the Dictate feature is active because a red dot appears on its icon. As long as Dictate is active, whatever you speak into the microphone will be converted to text in the document. You can also dictate punctuation marks, such as period, comma, and question mark, and breaks, such as new line and new paragraph.
Dictate stays on as long as you don’t type anything. If you start typing, the Word 2019 feature turns itself off.
Side to Side Scrolling
If a document has multiple pages, the traditional way to browse it is to scroll up and down, right? One page appears below the next. But Word 2019 features an alternative to that: the Side to Side feature.On the View tab, in the Page Movement group, you can choose between Vertical and Side to Side. With the latter, pages scroll from left to right, rather than up and down. Some quirks to this mode: You can’t change the zoom because it needs to view whole pages at a time. And there is no vertical scroll bar — only a horizontal one along the bottom.
 You can choose to scroll horizontally rather than vertically through a document.
Smart Lookup and Researcher: Research Papers Made Easy
Kids today don’t know how easy they have it with the luxury of writing their research papers in Microsoft Word. Back when in the day, as old folks say, we had to actually know the correct format for bibliography entries and the proper indents and spacing for footnotes. Word has been providing time-saving help for research writing for over a decade now, but Word 2019 it adds a few more tools to the References tab for making the process as painless as possible with Smart Lookup and Researcher.Smart Lookup
Smart Lookup is great for finding the answers to quick questions and getting simple summaries of complicated topics. Just select a word or phrase in the document and then choose References → Smart Lookup. There are two tabs in the results pane: Explore provides encyclopedia-like information, whereas Define offers simple definitions.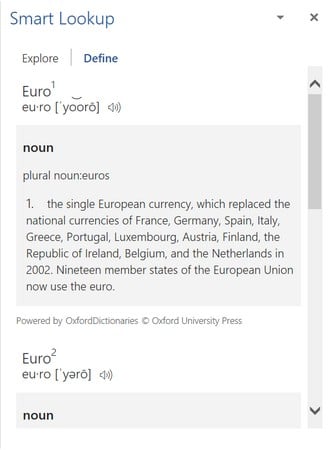 Search the web for basic facts using Smart Lookup.
Word 365’s version of the Smart Lookup feature works somewhat differently than the Word 2019 version. In Word 365, if you don’t have any text selected when you activate the feature, a Search box appears in which you can enter a word or phrase. In Word 2019, if there’s nothing selected when you activate the feature, an error message appears. The tabs in the results window are different too: Knowledge, Web, and Pictures.
Researcher
The Researcher option is a new Word 2019 feature (References → Researcher) that is similar to Smart Lookup, but more in-depth. Research finds articles about people, events, concepts, and places, but it doesn’t stop there. It sorts the results according to popularity of citation, and it lets you filter the list to show only books (very credible but can become out of date quickly), journals (generally considered more credible sources for academic writing) or websites (general knowledge).
Word 365’s Smart Lookup feature is a little bit different than the one in Word 2019 as well. There’s no Books category in the results filter, for example. You might notice other differences as well.
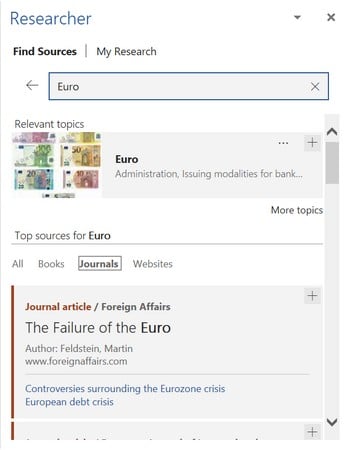 Look for research about a topic that might be suitable for quoting in academic work with Researcher.
Transform to Web Page
Word has been able to save in a variety of Web-based formats for several versions now, but frankly, it hasn’t done a very good job of designing attractive and functional web pages. They were more like awkward-looking Word documents posted on the web. A new feature called Transform to Web page changes all that. Choose File → Transform to open the Transform to Web Page pane, and then click the Transform button at the bottom of that pane to upload your page to Microsoft Sway, a web-based editor that can make your document look like it was actually designed for the web environment. I'm sure you’re skeptical. I was too. But try it out.And a Few More Things . . .
Here are just a few more little bonuses you’ll find as Word 2019 features:- In the original version of Word 2016, there was no Help tab on the Ribbon. We were supposed to use the Tell me what you want to do box to get help. People complained, so now there is a Help tab on the Ribbon. That’s true in all the apps, not just Word.
- The Spelling & Grammar feature is updated and improved, and the Grammar checker is more thorough and less prone to giving bad suggestions than ever before. By the way, this is one area where Word 365 and Word 2019 are quite different. In Word 2019, you access it with Review → Check Document; in Word 365, the command is Review → Spelling & Grammar. The Editor panes that appear are different too.
- The Check Accessibility button on the Review tab isn’t new if you’ve been using Word 365 (it was added several years ago during an Office update), but if you’ve been on Word 2016 all this time, you might not have seen it before. It opens a pane that checks the document for any potential problems that people using assistive technologies such as screen readers might encounter.
- Speaking of accessibility, on the Drawing Tools Format and Picture Tools Format tabs there’s now an Alt Text button that you can use to enter alt text for an image. This helps people who use screen-reading programs to understand the meaning of the pictures, even if they can’t see the pictures themselves.
- On the Insert tab you’ll find an Add-ins group from which you can get more add-ins and browse your existing ones. That’s an improvement from having to go through the Word Options dialog box to manage add-ins, which is how it was in Word 2016.