


What Are Microsoft Surface Devices?
Microsoft Surface is Microsoft's own line of computers with touch-sensitive screens. There are several models, all sharing one thing in common: the focus on touch-screen input. A stylus is preferred for touch-screen entry, but you can also use fingers. Early models came with a stylus pen, but with current models, the stylus pen is sold separately.There are several models available, each targeting a different kind of user. The Surface, Surface Go, and Surface Pro are tablets with optional detachable keyboards and also optional stylus pens. They're designed to be used primarily as tablets. The Surface Laptop and Surface Book are notebooks PCs with detachable screens. They're designed to be used primarily as laptops. The Surface Studio is an all-in-one desktop that can convert to a digital drafting table. The Surface Hub is a touch-screen whiteboard.
Stylus Pen Basics
Surface devices, as well as many other devices with touch-sensitive screens, are designed to accept input from stylus pens. However, not all stylus pens are created equal. Some pens are positional, which means they detect the location of the tip in relation to the screen. Other pens are camera-based, using digital-enabled paper to detect where the stylus touches the writing surface. Accelerometer pens detect the pen movement and the contact with the writing surface.The type of pen that works with the latest Microsoft Surface products is an active pen, which is a more advanced technology than any of the others. An active pen has its own electronic components inside the pen that transmit data to the pen controller in the computer (or added on to the computer). Some active pens also have buttons on them that have special functions in certain applications. (For example, a pen might have a clickable eraser button on the top that advances the slide show in PowerPoint.)
Microsoft Surface devices require an active pen if you want to take advantage of the full array of inking features in Office 2019 and other applications. That's not to say that other pens won't work at a basic level, though. If you are using the pen primarily as a mouse replacement, touching the screen to click or drag things, just about any pen will do. It's only when you get down to pen-specific functions such as creating shaded drawings or writing a lot of hand-written notes that the active pen becomes important.
The company that makes the latest Surface-compatible active pens is called N-Trig. It was purchased by Microsoft in 2015.
Here are some of the features that distinguish one pen from another:
- Pressure sensitivity: With a regular pen, the harder you push down, the darker or thicker the line is. Pressure-sensitive pens simulate that behavior.
- Latency: The delay between when you move the pen and when the results appear on your screen is the latency. Lower is better.
- Tilt functionality: Some real-life pens (pencils, crayons, markers, etc.) create a different type of line (wider, more shaded) if you tilt them as you draw. Pens with tilt-functionality simulate that feature.
Can I Use a Stylus Pen with Other PCs and Tablets?
Yes, as long as the device supports that type of stylus pen. You can use a Surface pen with a non-surface device that has a touch-screen that works with active pens, and you can use other brands of pens with a Microsoft Surface device. Compatibility is conditional though, depending on the generation and technology; you aren't going to be able to use the latest-technology pen with a 10-year-old tablet, and vice-versa.Now that you understand the basics of stylus pen technology, let's take a look at how Microsoft Office puts stylus pens to work.
Adding the Draw Tab to the Ribbon
In most Office 2019 applications, if you have a touch-sensitive screen, the Draw tab appears automatically on the Ribbon. If it doesn't for some reason, or if you don't have a touch-sensitive screen (but still want to try out the inking features using your mouse), you can enable it by doing the following:- Click File → Options → Customize Ribbon.
- In the righthand pane, click to place a check mark next to Draw.
 You can customize the Ribbon by adding the Draw tab.
 - Click OK.
Inking Features Common to All Office Applications
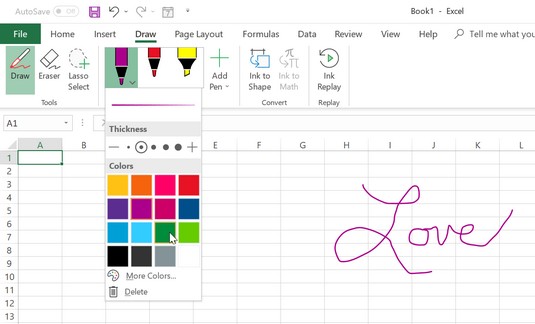
Some of the tools on the Draw tab are the same in every Office 2019 application. Excel has the fewest inking features available, so let's look at that app first.To draw, click the Draw button on the Drawing tab. This activates whichever pen, pencil, or highlighter is selected in the Pens group. When a pen is selected, it has a down arrow on its button. You can click this down arrow to open a menu to customize the tool (color, thickness, and so on). The color and thickness choices in Excel and PowerPoint are pretty basic, but in Word, you have a lot more choices, including sparkly glitter rainbow pens!
 You can access a variety of drawing tools.
To add a new pen to the Pens gallery, click Add Pen and then choose Pen, Pencil, or Highlighter as desired. A new pen is added to the gallery with a down arrow on it so that you can customize it.
- The Eraser button changes to an eraser so that whatever you touch or drag across is erased.
- The Ink to Shape button enables you to draw a shape and have it immediately converted into a vector-based line art shape, similar to the shapes you would draw using the Insert → Shapes command. It doesn't work on existing shapes; you have to select the command and then draw the shape. It also doesn't work with shapes more complex than a hexagon.
- The Lasso Select button enables you to draw a shape around the drawing parts to include in a selection. This enables you to select multiple drawings at once. This tool is not available in Word.
- The Ink to Math button enables you to write a math formula using a stylus pen (or your finger) and have it converted to an Equation Editor math formula. When you click Ink to Math, a math Input Control window opens. You can then write your math in the yellow shaded box. After you click OK, the converted formula appears as a floating object and the Equation Tools Design tab appears to enable further editing.
 The math equations you write are converted to Equation Editor object.
 - Ink Replay recreates the process of drawing your inked marks in a video clip. It only works for inked drawings, not for Ink to Shape or Ink to Math drawings.
Inking Features in Word
In addition to the basic tool set covered in the preceding section, Word 2019 has a couple of unique inking features.Ink Editor
The Ink Editor enables you to edit typed documents using your stylus pen. This feature can come in handy if you need to edit documents when your device is in tablet mode (no hardware keyboard available), for example.To try out the Ink Editor, do the following:
- Type some text in a Word document.
- Click Draw → Ink Editor to enable the feature.
- Click the bottom part of the Ink Editor button to open a menu and click Ink Gesture Help.
A Help pane opens explaining the basic editing gestures you can use; this is a great cheat sheet as you begin learning.
- Click the Draw button and then click any of the pens in the Pens gallery.
- Use the pen to draw a horizontal line straight through some text that you want to delete, or draw a squiggly line through it that crosses it out.
 Drawing a squiggly line deletes words.
 - Draw a circle around a word with the pen.
The word becomes selected.
- Try out several of the other editing marks in the Help pane.
When you're done, click Learn more about ink gestures at the bottom of the Help pane for more information.
- Close the Help pane.
Drawing Canvas
The Drawing Canvas creates a rectangular box within a document where you can draw. Sure, you can draw anywhere on a document, but the drawing tends to get intertwined with the document text. By creating a drawing canvas, you localize the drawing to one place, and you can work with the entire canvas as a single object.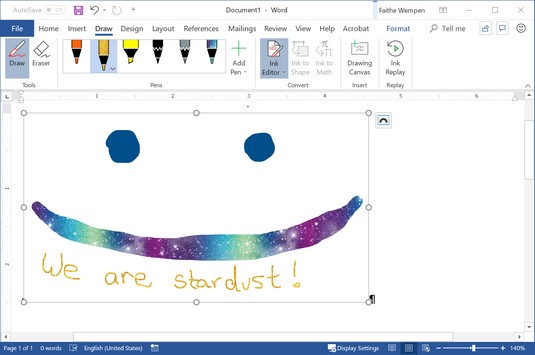 Have fun with the Drawing Canvas.
The Drawing Canvas is also a great place to try out the special drawing capabilities of an active stylus pen. Try, for example, varying the angle and pressure of the pen for interesting drawing effects.
Inking Features in PowerPoint
While PowerPoint doesn't have the glitter rainbow ink that Word does, it does have a couple of very good features: a drawing ruler and an Ink to Text feature.Drawing Ruler
Because PowerPoint is the go-to Microsoft Office application for creating simple graphics (because of the large, wide-open canvas areas that slides provide), it's not uncommon to want to draw freehand on a PowerPoint slide, either with the stylus pen or with the drawing tools (Insert → Shapes).The Ruler tool (on the Draw tab) gives you an on-screen ruler; you can then use your pen stylus to draw on the slide, and the line will align neatly with the ruler edge. You can even tilt the ruler to any angle and move it around.
To try it out, follow these steps:
- Start a new PowerPoint presentation and change the layout of the slide to Blank (Home → Slide Layout → Blank).
- Click Draw → Ruler.
- Drag the ruler to the desired location. (Use the mouse, a finger, or the stylus.)
Adjust the ruler's angle by rotating it with your fingers on the touchscreen, or if you have a wheel or ball on your mouse, by rotating that.
Use three fingers to rotate the ruler by five-degree increments.
- Choose a pen and drag along the ruler's edge to draw a straight line.
 Drawing a line with the Ruler tool.
 - Click Draw → Ruler to turn the ruler off.
The ruler disappears but the line you drew stays.
You can also use the ruler to align individual items or groups of items. Select an item and drag it until its selection handle snaps to the ruler. Or select multiple items (use the Ctrl key) and then drag the set to snap to the ruler.
Ink to Text
Sometimes when you are giving a presentation, you might annotate it with some handwritten notes onscreen. Later you may want to go back and convert those notes to typed text. PowerPoint 2019 makes it easy to do that. Try it out:- On a PowerPoint slide, use your stylus pen or finger to write some text.
- Click Draw → Ink to Text.
The pointer turns into a lasso.
- Drag across the handwritten text to select it.
The text is immediately converted into typed text.


