When it comes to doing retopo, Blender doesn't really have much in the way of dedicated tools built into it. A few very useful add-ons, such as Contours and Polystrips (or their bundled combination, RetopoFlow), have been created by third-party developers to help with the retopo process, but they don't ship with Blender by default.
That said, if you find that sculpting and modeling are your favorite aspects of 3D computer graphics, you'll be going through the retopo process a lot. In that situation, investigate and ultimately purchase those add-ons. But it's still worthwhile to know what Blender can do on its own as well. Retopo add-ons can get you part of the way there, but most of the time, you still need to finish with Blender's native tools.
So if there aren't any dedicated retopo tools in Blender, exactly how do you retopologize your mesh? The answer is deceptively simple. You combine Blender's native modeling tools with clever use of snapping. There are some shortcuts, such as trying to use the Shrinkwrap modifier to snap the vertices of a clean topology mesh to the surface of your sculpt. However, when it comes down to it, you're really going to need to do point-for-point modeling.
Once you finish your 3D sculpt, use the following steps as the basic process for retopologizing:
From Object mode, create a new mesh (Shift+A→Mesh→Plane).
In this example, a plane is used, but it could be any mesh, as you'll see in the next step. In fact, some modelers use an add-on that creates a zero-vertex mesh object for exactly this kind of thing.
Rename your new mesh object to something that makes sense.
It could be something like Character.retopo, for example, as long as it's anything other than the primitive mesh's name.
Tab into Edit mode on your new mesh.
Select all of the vertices in this new mesh and delete them.
Now you have a mesh object with no data inside.
Enable snapping (Shift+Tab or left-click the button with the magnet icon in the 3D View's header).
Also, make sure that the Snap Element drop-down menu is set to use face snapping. This step is important; it's what makes the rest of the retopo process possible.
Ctrl+left-click on the surface of your 3D sculpt.
This creates the first vertex of your retopo mesh. By enabling face snapping, your new vertex should be located right on the surface of your sculpt mesh.
Extruding from that first vertex (Ctrl+left-click or E), use point-to-point modeling techniques to lay out the vertices of your retopo'd mesh.
This step comprises the somewhat tedious and time-consuming process of retopologizing your mesh. However, when you've already made your sculpt, you have a clear plan that shows what your final mesh should look like. At this point, you're basically playing "connect the dots" on the surface of your 3D sculpt. Once you get up to speed, this is a much more effective way of modeling than traditional box modeling or point-to-point modeling methods.
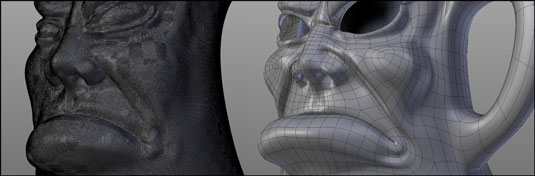
The figure shows a mesh sculpted using dyntopo and that same model after it's been retopo'd.