

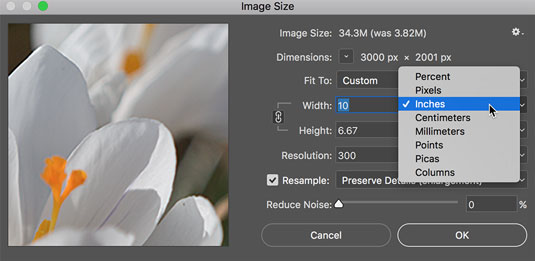
You can always check — or change — a picture’s resolution by choosing Photoshop Image --> Image Size. Photoshop CC’s new Image Size dialog box (which you can see here) offers the Fit To menu, which you can use to save and load presets for changes that you make regularly. The Resample box needs to be selected when changing pixel dimensions (otherwise you just change the image’s resolution). Next to Dimensions you can click the arrow to select a unit of measure, as you can next to Width, Height, and even Resolution. But the coolest new feature of the revamped Image Size dialog box is the preview. Position the cursor within the window and you can drag to reposition the preview and change the zoom factor. And rather than dragging and dragging and dragging in the small window to move the preview to a distant part of the image, simply click that area in the image itself to jump the preview to that location. The Reduce Noise slider can be used to minimize the amount of little speckles that sometimes appear when resampling an image.
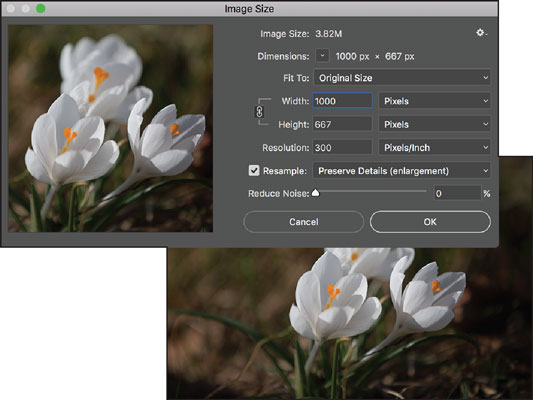 The Image Size dialog box includes a preview window and noise reduction.
You’ll find it very handy to change the pixel dimensions and the print size at the same time in the Image Size dialog box. And, much to the delight of math-challenged folks, the Image Size feature does most of the calculations for you. For example, with the Link option selected (note the tiny Link icon to the left of the Width and Height boxes), you enter a new Width and Photoshop calculates the new Height automatically! To disable this option so that you can change only the width or the height (which is rare), just click the Link icon.
Changing the size of your artwork with the Image Size command
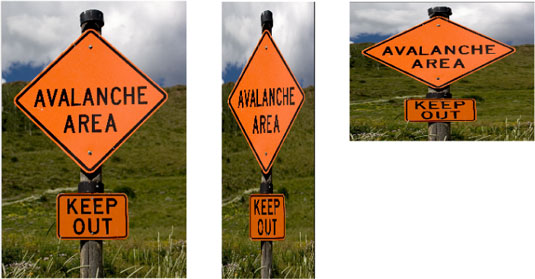
You have a number of ways to change the size of your photos and other art. Besides cropping (chopping off part of the artwork to make it fit a certain size or to improve its overall appearance and impact), you can also use Photoshop’s Image Size command to change the image dimensions or printing instructions without altering the composition, which is the visual arrangement of the image or artwork. All the content of the original image is there, just at a different size. Of course, as you can see, if you reduce the size of an image too much, some of that original content can become virtually unrecognizable.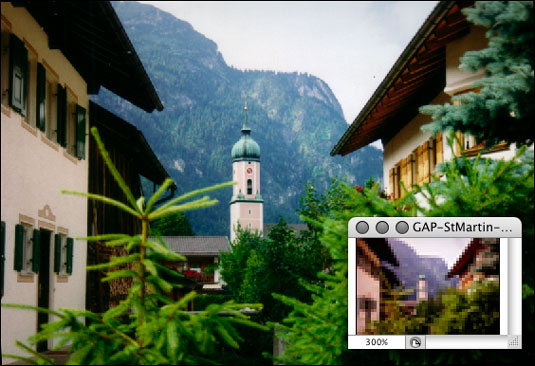 As the zoomed-in smaller image shows, you can reduce an image too much.
If you know the specific pixel dimensions that you need for the final image — say for a web page — you can simply type a new number in the Width or Height fields in the Image Size dialog box and click OK. Of course, you probably want a little more control over the process, don’t you? The figure gives you a closer look at the resampling options in the Image Size dialog box, with suggestions on when to use each.
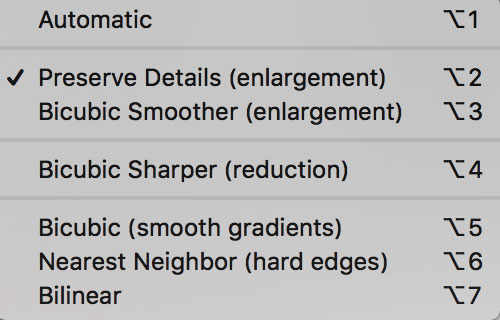 When the Preserve Details or Bicubic Smoother (enlargement) option is selected, you’ll also see a slider just below it in the Image Size dialog box to control noise in the enlargement.
If you’re resizing an image that uses layer styles, you want to click the gear button in the upper-right corner of the Image Size dialog box and make sure that the Scale Styles check box is selected to preserve the image’s appearance as it shrinks or grows. In a nutshell, layer styles (such as shadows, glows, and bevels) are applied to a layer at a specific size. You can scale the image without changing those sizes, or you can scale the image and change the style sizes proportionally. Not scaling layer styles can dramatically alter the appearance of a resized image, as you can see here. A slight bevel combined with a small drop shadow produces a subtle 3D effect in the original (upper) image. Below, when the image is scaled down to 1/4 the original size without scaling the effects, your chips change to chumps, and the artwork is ruined.
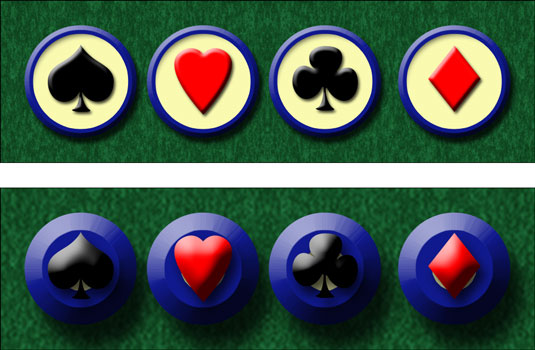 Scaling an image without scaling its layer styles can ruin your image.
The link to the left of Width and Height should almost always remain selected. Some exceptions might come up, but you normally want to preserve an image’s aspect ratio (the relationship between height and width) when resizing to prevent distorting the image. This figure shows you what can happen when you scale one dimension without constraining the image’s proportions.
 Resizing an image without constraining proportions. Interesting, yes, but useful?
The Resample option is the one that might require the attention of that gray matter within your skull. Not only do you need to decide whether you want to resample the image (change its pixel dimensions), but you also need to decide how you want to resample. You have seven different ways to calculate the change (called resampling algorithms).
When you deselect the Resample option (as shown), you’re changing the print dimensions without changing the pixel dimensions of the image.
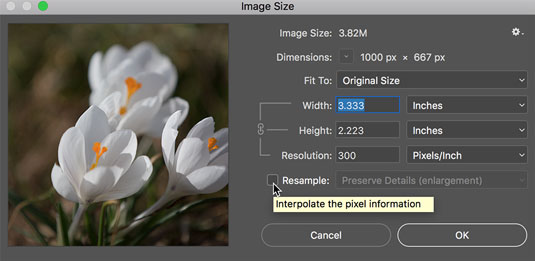 Clear the Resample Image check box to change print size, not pixel dimensions.
When using Image Size without resampling, you’re simply changing the instructions recorded in the image for your printing device. When you enter one dimension, either width or height, Photoshop does the math and fills in both the other dimension and the new resolution.
Take a look at the figure. The Resample Image check box is selected and 10 and inches are entered for your new print width to print this image to a letter-size (8.5 x 11 inches) sheet of paper. Photoshop fills in the new height (6.667 inches). But what if you want an 8x10 print? If you enter 8 and inches for the height, Photoshop recalculates the width to 12 inches. If you want a true 8 x 10, you have to crop some of the image because most digital photos have a different aspect ratio than an 8 x 10.
 Enter a value, and Photoshop recalculates the fields automatically.
Okay then, back to the subject of resampling! When you resample an image (change the pixel dimensions), Photoshop takes the image and maps it to the new size, attempting to preserve the image’s appearances as much as possible at the new size, using the new number of pixels. Of course, if you take an image that’s more than 3,000 pixels wide and resample it to 300 pixels wide, you’re going to lose some of the detail. And, conversely, resampling an image from 300 pixels wide to 3,000 pixels wide, even when using the Preserve Details resampling algorithm, is likely to introduce some softness to the image’s appearance.
Picking an image resolution
After you have the concept of resampling under your belt, how do you know what size you should be resampling to? How many pixels do you need? Here are your general guidelines:- Photos for your inkjet printer: Inkjet printers are stochastic printing devices: That is, they use a series of droplets to replicate each pixel in your image, as shown in Figure 2-12. In theory, the optimal image resolution is one-third of the printer’s rated resolution. However, most printers don’t need an image resolution higher than 300 ppi. (For fine art prints from my high-end Epson printers, I use an image resolution of 360 ppi.)
If you’re printing something that will only be viewed at a distance, such as a banner to be hung above the crowd or a poster that hangs on a wall, you can print at a substantially lower resolution to save ink and print faster. Banners, for example, can often be printed with a resolution of 100 ppi.
- Web images: Ignore resolution (including “72 ppi”). Consider only the image’s pixel dimensions. Determine what area of the web page the image will occupy and then resize to exactly those pixel dimensions. Remember, too, that some social media have specific guidelines for images uploaded to their sites. Check the site’s info before changing the image dimensions.
- Page layout programs and commercial printing: If your image is to be placed into a page layout program’s document and sent to a commercial printing facility, you need to know the line screen frequency (the resolution, so to speak) of the printing press on which the job will be run. Ask the print shop or the person handling the page layout. Your image resolution should be either exactly 1.5 times or exactly twice the line screen frequency. (You shouldn’t notice any difference in the final printed product with either resolution.)
- Presentation programs and word processing documents: Generally speaking, 72 ppi is appropriate for images that you place into a presentation or Word document. You should resize to the exact dimensions of the area on the page or slide that the image fills.
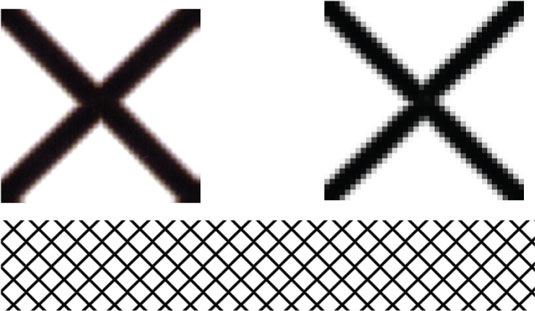 The close-up to the left shows inkjet printer droplets and to the right, pixels.


