

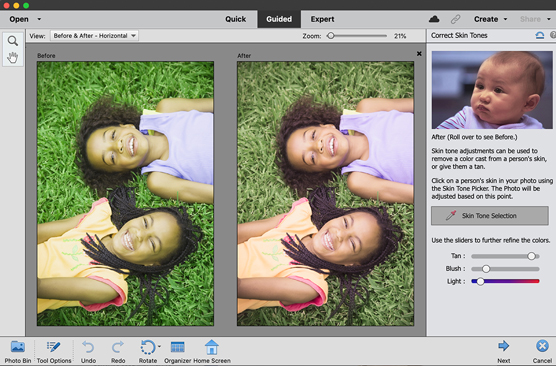
Correct Skin Tone Guided Edit
© Blend Images / Shutterstock Image #220912063
Occasionally, certain kinds of lighting can make the people in your portraits look a little green, yellow, magenta, or other color not normally associated with skin. The Correct Skin Tone Guided Edit easily fixes that problem.
Here are the steps to use this edit:
- In Guided mode, choose File→Open and select your image.
- Under Basic Edits, choose Correct Skin Tone.
- Specify your view to be Before & After – Horizontal or Before & After – Vertical. This view will give you a side-by-side comparison of your image while editing.
- Using the Skin Tone Selection eyedropper tool, click the person’s skin in the After image.
- If you feel that you need to refine your results further, use the Tan, Blush, and Light sliders, as shown. Note that the Light slider is pretty intense, so we recommend going easy on this adjustment.
- After you’re satisfied with the edit, click Next.
- Elements now asks what you would like to do next. Select from:
- Save: This option simply saves over your original image in the same location on your computer.
- Save As: With this option, you now have the choice of saving your image to the cloud or to your computer. Click Continue, name the file and click Save.
- Continue Editing: In Quick or In Expert: You can choose to continue editing the image in either Quick or Expert mode.
- Print: This option transports you to the Fujifilm Print & Gifts website and enables you to order prints, cards, and merchandise.
- Share: Share your image to the Flickr or Twitter websites.
- Click Done.
Sharpen Guided Edit
If you find that your image is a little soft or slightly blurry, you can apply a sharpening adjustment, which will increase the contrast between the pixels, giving the appearance that the focus is better.
Here are the steps to use this edit:
- In Guided mode, choose File→Open and choose your photo.
- Under Basic Edits, choose Sharpen.
- Specify your View to Before & After – Horizontal or Before & After – Vertical. This view will give you a side-by-side comparison of your image while editing.
- Either click the Auto Fix button to have Elements analyze the image and automatically make the adjustment, or use the Sharpen slider to manually apply the edit. Note that if your image is fairly soft to start with (ours was, as shown), you may have to apply quite a bit of sharpening to see a noticeable result. The drawback to doing this sharpening is that the image may start to look a bit grainy.
- After you’re happy with the edit, click Next.
- Elements now asks what you would like to do next. Select from:
- Save: This option simply saves over your original image in the same location on your computer.
- Save As: With this option, you now have the choice of saving your image to the cloud or to your computer. Click Continue, name the file, and click Save.
- Continue Editing: In Quick or In Expert: You can choose to continue editing the image in either Quick or Expert mode.
- Print: This option transports you to the Fujifilm Print & Gifts website and enables you to order prints, cards, and merchandise.
- Share: Share your image to the Flickr or Twitter websites.
- Click Done.
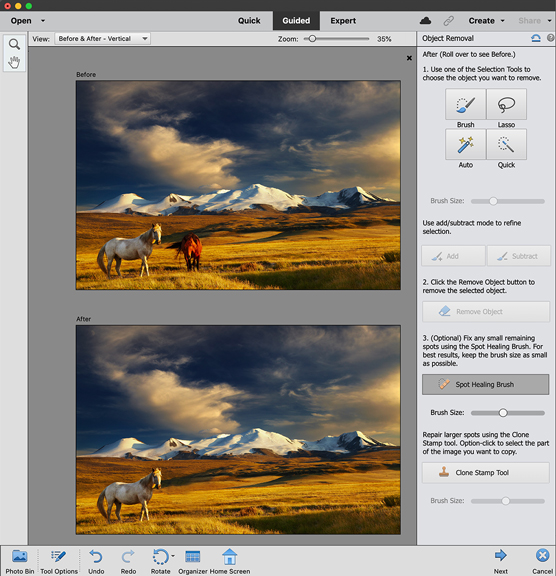
Object Removal Guided Edit
© Pichugin Dimitry/Shutterstock Image #84040771
Sometimes you don’t always have control over what you capture in your frame when taking a photo. Or maybe you’re given a photo and asked to eliminate something from the image. The Object Removal Guided Edit is what you need to accomplish this task easily.
Follow these steps to remove an object:
- In Guided mode, choose File→Open and select your image.
- Under Basic Edits, choose Object Removal.
- Specify your View to Before & After – Horizontal or Before & After – Vertical. This view will give you a side-by-side comparison of your image while editing.
- In the After image, choose your desired selection tool to choose the object you want to eliminate. We chose the Brush tool, adjusted our Brush size to a medium-size diameter, and brushed over the brown horse.
- If you need to add or subtract to fine-tune your selection, click the Add or Subtract buttons and brush over your desired areas.
- After you have adequately selected your object, click the Remove Object button.
- If you see any visible seams, smudges, or other imperfections, use either the Spot Healing Brush or Clone Stamp Tool to fix these. We started with the Clone Stamp tool to repair a couple of seams and then followed up with the Spot Healing Brush to fix a few smudges. As you can see in the figure, the brown horse is gone. It isn’t perfect, and we would choose to edit it a bit more in Expert mode, but it is a good start. Depending on your particular image and object, the Guided Edit could be all you need.
- When you’re happy with the removal, click Next.
- Elements now asks what you would like to do next. Select from:
- Save: This option simply saves over your original image in the same location on your computer.
- Save As: With this option, you now have the choice of saving your image to the cloud or to your computer. Click Continue, name the file, and click Save.
- Continue Editing: In Quick or In Expert: You can choose to continue editing the image in either Quick or Expert mode.
- Print: This option transports you to the Fujifilm Print & Gifts website and enables you to order prints, cards, and merchandise.
- Share: Share your image to the Flickr or Twitter websites.
- Click Done.
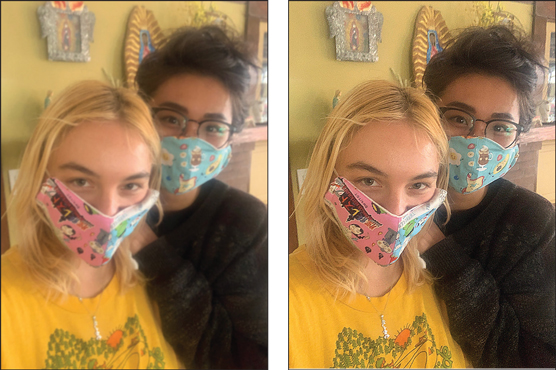
Perfect Portrait Guided Edit
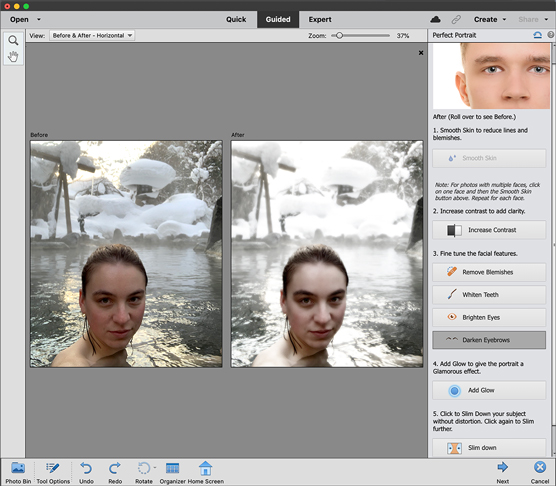
The Perfect Portrait Guided Edit is a kind of one-stop shop for enhancing your portraits. You can do most of these enhancements using the tools and techniques in Expert mode, and if you want more control over the results, that may be where you will end up. But for those who want their enhancing to be quick and easy, Perfect Portrait is the place to be.
Follow these steps to remove an object:
- In Guided mode, choose File→Open and choose your image.
- Under Special Edits, choose Perfect Portrait.
- Specify your View to Before & After – Horizontal or Before & After – Vertical. This view will give you a side-by-side comparison of your image while editing.
- Click the Smooth Skin button. Elements will apply a smoothing effect. If the effect is too strong, dial it back with the Strength ramp.
- Click the Increase Contrast button to do just that (increase the contrast). We recommend avoiding this edit because it does not give you enough control as to how you want to increase the contrast, plus it’s a little heavy handed. If your portrait needs a contrast adjustment, you are better off doing it in Quick or Expert mode and using the Levels or Color Curves adjustment.
- Fine-tune your portrait’s face by applying the following.
- Remove Blemishes: This option uses the Spot Healing Brush to eliminate blemishes, wrinkles, and so on. Click areas of the face that need healing. We skipped this option on our girl in the figure.
If you want to increase the diameter of your brush for this tool and the others, click the right bracket key. To decrease the diameter, click the left bracket key.
- Whiten Teeth: Click or brush over any teeth that need whitening. We skipped this option because our girl has a closed smile.
- Brighten Eyes: Click or brush over the eyes to brighten them. We clicked both the whites and irises of the eyes.
- Darken Eyebrows: Brush over the eyebrows to darken them. We gave our girl one swipe.
- Remove Blemishes: This option uses the Spot Healing Brush to eliminate blemishes, wrinkles, and so on. Click areas of the face that need healing. We skipped this option on our girl in the figure.
- Click Add Glow if you want to add a glow effect to the portrait. Clicking on this option will transport you into another window, the Filter Gallery, and into the Diffuse Glow filter settings. Specify your options and click ok. We applied a very distinct glow effect to give our girl an other-wordly look, as shown.
- If you want to slim down your subject, click the Slim down option. Unfortunately, this option really doesn’t give you any settings to control how slim you want your subject. We recommend skipping this option and using the Liquify filter in Quick or Expert mode instead.
- After you’re happy with the removal, click Next.
- Elements now asks what you would like to do next. Select from:
- Save: This option simply saves over your original image in the same location on your computer.
- Save As: With this option, you now have the choice of saving your image to the cloud or to your computer. Click Continue, name the file, and click Save.
- Continue Editing: In Quick or In Expert: You can choose to continue editing the image in either Quick or Expert mode.
- Print: This option transports you to the Fujifilm Print & Gifts website and enables you to order prints, cards, and merchandise.
- Share: Share your image to the Flickr or Twitter websites.
- Click Done.
Replace Background Guided Edit
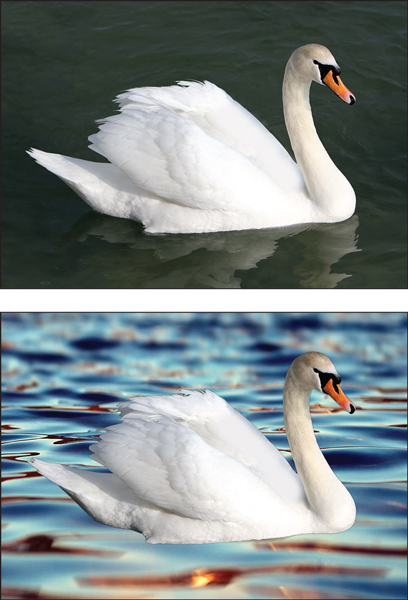
© Denis Kuvaev / Shutterstock Image #98052245, © S. Hermann and F. Richter / Pixabay Image lake-2063957-1920
Sometimes you want to pluck your subject out and put it into another scene. Other times, you want to leave your subject where it is and bring a different scene into the background. This Guided Edit enables you to do the latter.
Follow these steps to remove an object:
- In Guided mode, choose File→Open and select your photo.
- Under Special Edits, choose Replace Background.
- Specify your View to Before & After – Horizontal or Before & After – Vertical. This view will give you a side- by-side comparison of your image while editing.
- Click the Select Subject button (Elements will automatically detect and select your subject) or use the Auto Selection, Quick Selection, or Brush tools. To add to or delete from your initial selection, use the Refine Selection Brush tool. We chose the Select Subject button because we had good contrast between our subject and the background. If you don’t get good results with this automatic selection method, try one of the other selection tools.
- Choose a new background by
- Importing a photo: We wanted a nicer-looking body of water, so we imported another image.
- Choosing a Preset: Click your choice from a set of preset backgrounds.
- Choosing None: This option will delete the background and leave a transparent background.
- Choosing Color: Click within the color field or color ramp in the Color Picker and click OK.
- Use the Move tool to position your subject.
- If you have too much of the original background around the edges of your subject, use the Refine Edge Brush (Subtract) to brush it away. If you have inadvertently deleted part of your subject, use the same tool (Add) to brush it back in.
- If your subject and its new background don’t really match well in terms of lighting and looks a tad fake, click the Auto Match Color Tone option.
Our swan (see the top of the figure) was a bit too bright, but when we clicked the Auto Match Color Tone option, it made our swan too dark, so we chose Edit→Undo to undo the adjustment. - If you like your composite, click Next.
- Elements now asks what you would like to do next. Select from:
- Save: This option simply saves over your original image in the same location on your computer.
- Save As: With this option, you now have the choice of saving your image to the cloud or to your computer. Click Continue, name the file, and click Save.
- Continue Editing: In Quick or In Expert: You can choose to continue editing the image in either Quick or Expert mode. Because the Auto Match Color Tone option didn’t work for us, we took our swan into Expert mode and darkened it a bit using the Levels adjustment. You can see the final result in the bottom of the figure.
- Print: This option transports you to the Fujifilm Print & Gifts website and enables you to order prints, cards, and merchandise.
- Share: Share your image to the Flickr or Twitter websites.
- Click Done.
Remove a Color Cast Guided Edit
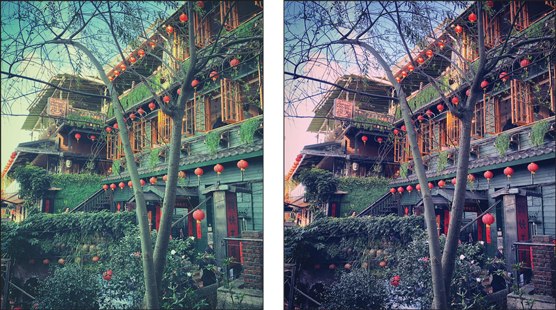
If your image has too much green or magenta or other color, it’s probably suffering from what is referred to as a color cast. Sometimes it is caused by the lighting; other times it can be an old photo whose green or magenta ink has faded. You can remove this unwanted color by using the Remove a Color Cast Guided Edit.
Here’s how to use this edit:
- In Guided mode, choose File→Open and choose your image.
- Under Color Edits, choose Remove A Color Cast.
- Specify your View to Before & After – Horizontal or Before & After – Vertical. This view will give you a side-by-side comparison of your image while editing.
- Click the Color Cast Selection button. With the eyedropper, click a portion of the image that should be the “truest” gray, black, or white. A word of warning: Selecting this portion may take several attempts. We had to click around several times before we got the results we wanted. We were successful by clicking the center of the left tree trunk in front of our tea house.
- Click Next.
- Elements now asks what you would like to do next. Select from:
- Save: This option simply saves over your original image in the same location on your computer.
- Save As: With this option, you now have the choice of saving your image to the cloud or to your computer. Click Continue, name the file, and click Save.
- Continue Editing: In Quick or In Expert: You can choose to continue editing the image in either Quick or Expert mode.
- Print: This option transports you to the Fujifilm Print & Gifts website and enables you to order prints, cards, and merchandise.
- Share: Share your image to the Flickr or Twitter websites.
- Click Done.
Levels Guided Edit
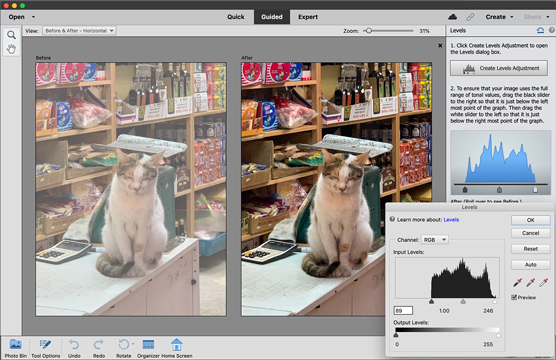
Adjusting the contrast in your image is a fix that you will find yourself doing quite often. Although you have several ways to make this fix, one of the best is to use Levels. It is a bit more complex than some of the automatic ways of contrast adjustment in Elements, but this Guided Edit walks you through the process.
Here’s the lowdown on using the Levels Guided Edit:
- In Guided mode, choose File→Open and select your photo.
- Under Basic Edits, choose Levels.
- Specify your View to Before & After – Horizontal or Before & After – Vertical. This view will give you a side-by-side comparison of your image while editing.
- Click the Create Levels Adjustment button. The New Layer dialog box appears. Name your layer and click OK.
- In the Levels dialog box that appears, adjust your shadows (black slider), midtones (gray slider), and highlights (white slider). The easiest way to get started with the adjustment is to drag your shadows slider to the right, to the beginning of the histogram (the graph that represents your tonal range). Then drag your highlights slider to the left, to the beginning of the histogram, as shown. If you feel that your midtones also need an adjustment, drag the midtone slider to the right to make the midtones darker and to the left to make them brighter. It isn’t uncommon to not have to adjust the midtones after the shadows and highlights have been adjusted. Our Taipei shop cat looks so much better.
- Click OK.
- Click Next.
- Elements now asks you what you would like to do next. Select from:
- Save: This option simply saves over your original image in the same location on your computer.
- Save As: With this option, you now have the choice of saving your image to the cloud or to your computer. Click Continue, name the file, and click Save.
- Continue Editing: In Quick or In Expert: You can choose to continue editing the image in either Quick or Expert mode.
- Print: This option transports you to the Fujifilm Print & Gifts website and enables you to order prints, cards, and merchandise.
- Share: Share your image to the Flickr or Twitter websites.
- Click Done.
Resize Your Photo Guided Edit
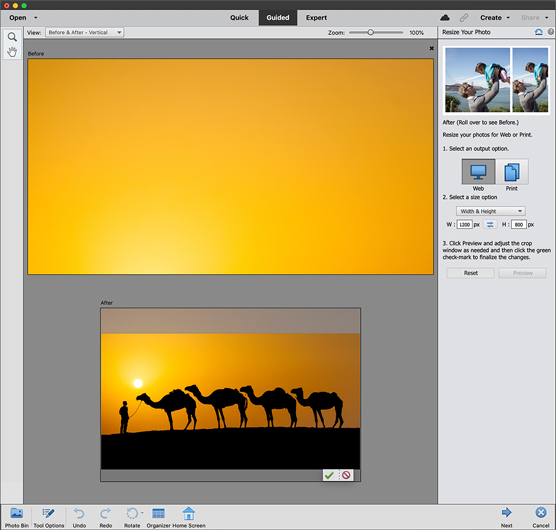
© Mariia Savoskula/Shutterstock Image #112835215
We realize that resizing your photo may not be the most interesting edit you want to make, but it is a very important. Here’s why, in a nutshell. Images need to be sized for their specific purpose. Preparing an image for a screen (a web site or social media post) or print will require different pixel dimensions for them to display or print properly and with good quality.
Here are the steps to resize your image:
- In Guided mode, choose File→Open and select your image.
- Under Basic Edits, choose Resize Your Photo.
- Specify your View to Before & After – Horizontal or Before & After – Vertical. This view will give you a side-by-side comparison of your image while editing.
- Select an output option: either Web or Print.
- Select a size option. For the Web output option, choose from Long Edge, Short Edge, Width & Height, or File Size. For Long Edge or Short Edge options, the height or width is automatically adjusted to keep the aspect ratio. We wanted to resize our image for a Facebook poster, so it is recommended to use 1200 x 630 pixels, as shown. For the Print output option, choose from Long Edge, Short Edge, Width & Height, or standard print dimensions in inches.
- Depending on the size you specified, you will be asked to Apply or to Preview and adjust the crop window as needed.
- Click the green check mark after you’re satisfied with your image.
- Click Next.
- Elements now asks you what you would like to do next. Select from:
- Save: This option simply saves over your original image in the same location on your computer.
- Save As: With this option, you now have the choice of saving your image to the cloud or to your computer. Click Continue, name the file, and click Save.
- Continue Editing: In Quick or In Expert: You can choose to continue editing the image in either Quick or Expert mode.
- Print: This option transports you to the Fujifilm Print & Gifts website and enables you to order prints cards and merchandise.
- Share: Share your image to the Flickr or Twitter websites.
- Click Done.
Recompose Guided Edit
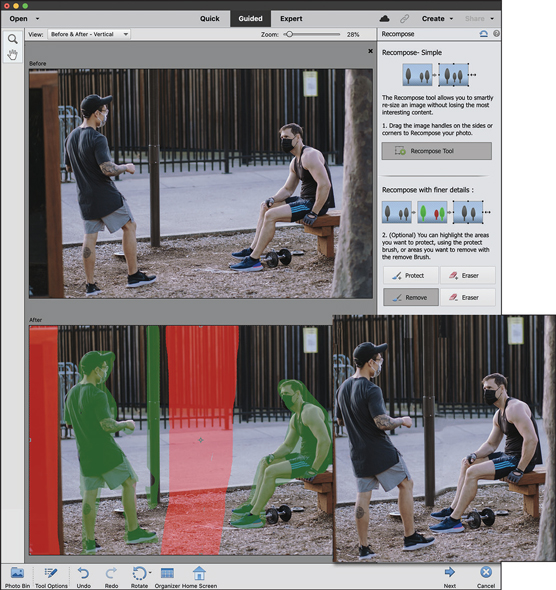
© Kate Trifo/pexels.com Image #4019406
If you’re like us, you may have sometimes wished that you would have taken a vertical or square photo instead of a horizontal one. Cropping it wouldn’t work because you would be slicing off an important part of the image. This particular Guided Edit can be a lifesaver in that instance. The Recompose Guided Edit enables you to resize your image without sacrificing your vital content.
Here are the steps to recomposing your photo:
- In Guided mode, choose File→Open and choose your photo.
- Under Special Edits, choose Recompose.
- Specify your View to Before & After – Horizontal or Before & After – Vertical. This view will give you a side-by-side comparison of your image while editing.
- You can start with the Recompose-Simple option. In the After image, drag the handles on the sides or corners to resize your image. Make sure to pay attention to both your main subjects and especially to the space between the subjects. If all is okay, you are good to go and can go to Step 6. If your results are less than desirable, go to Step 4 to Recompose with finer details.
- If Step 3 didn’t work, take the Protect brush and brush over any vital content that you want to keep or protect, as shown. You can then brush over any content you want to remove with the Remove brush. In the After image, drag the handles on the sides or corners to resize your image. Note that if you need to clean up your protected or removed areas, use the appropriate Eraser brush. You can adjust Brush Size diameter with the slider.
- If you want to use a preset size to resize your image, select it from the Preset drop-down menu.
- Click the green check mark when you’re satisfied with your image.
- Click Next.
- Elements now asks you what you would like to do next. Select from:
- Save: This option simply saves over your original image in the same location on your computer.
- Save As: With this option, you now have the choice of saving your image to the cloud or to your computer. Click Continue, name the file, and click Save.
- Continue Editing: In Quick or In Expert: You can choose to continue editing the image in either Quick or Expert mode.
- Print: This option transports you to the Fujifilm Print & Gifts website and enables you to order prints, cards, and merchandise.
- Share: Share your image to the Flickr or Twitter websites.
- Click Done.
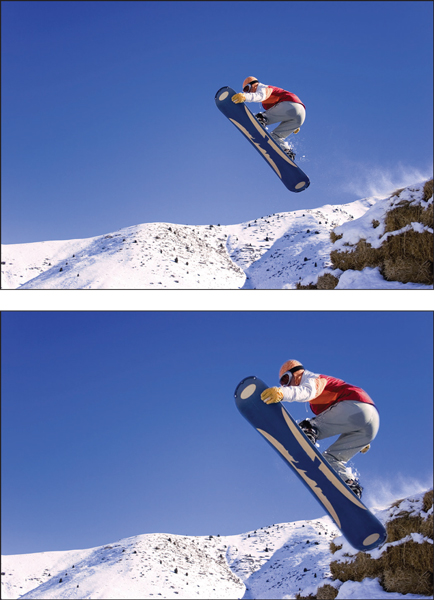
Depending on how much you resize your image you may have to do some retouching, especially in between your subjects. We had to do just that with our final image as shown. Use the Clone Stamp tool and Spot Healing Brush tool to eliminate these imperfections.
Move & Scale Object Guided Edit
© Abassaka / iStockphoto Image #5525490
Occasionally you wish that the subject of your photo were bigger, smaller, or in a different location within the frame. Although seamlessly changing any of those aspects sounds difficult, with the Move & Scale Object Guided Edit, each one is amazingly easy.
Here are the steps to resize as well as move (if you want) your image:
- In Guided mode, choose File→Open and choose your photo.
- Under Basic Edits, choose Move & Scale Object.
- Specify your View to Before & After – Horizontal or Before & After – Vertical. This view will give you a side-by-side comparison of your image while editing.
- Select your subject with either the Auto Selection or Quick Selection tools. If you choose the Quick Selection tool, you can adjust the Brush Size diameter.
- If you need to add or subtract to fine-tune your selection, click the Add or Subtract buttons and brush over your desired areas. Note that the Brush Size diameter slider works for this tool as well.
- Move or duplicate your selected subject by dragging it to your desired location. If you want to also scale your subject, drag a corner handle.
- Click the green check mark after you’re satisfied with your image.
- Retouch any seams or flaws around your subject, if needed, using the Spot Healing Brush (smaller flaws) or the Clone Stamp Tool (larger flaws) — and you can use both. You can adjust the Brush Size diameter to better eliminate the flaw.
- Click Next.
- Elements now asks you what you would like to do next. Select from:
- Save: This option simply saves over your original image in the same location on your computer.
- Save As: With this option, you now have the choice of saving your image to the cloud or to your computer. Click Continue, name the file, and click Save.
- Continue Editing: In Quick or In Expert: You can choose to continue editing the image in either Quick or Expert mode.
- Print: This option transports you to the Fujifilm Print & Gifts website and enables you to order prints, cards, and merchandise.
- Share: Share your image to the Flickr or Twitter websites.
- Click Done.

