


Resume SwiftUI’s live preview
My number-one pet peeve about SwiftUI is that the live preview feature in Xcode doesn’t always work. Very often, changes made to your code will cause the automatic previewing feature to pause. Even though your code is perfectly correct and there is no error, the live preview just can’t seem to update automatically.Of course, you could click the Resume button to update the preview, but you waste precious time moving your mouse to click the button.
A better way is to press ⌘+Option+P. This causes the live preview to resume and update itself. Now that you know this trick, there is no reason to click the Resume button anymore!
You may also want to check out the list of shortcuts for working in Xcode.Combine text views in SwiftUI
Here is a neat little trick that you should know if you want to display the various words in a sentence in different colors and sizes. Instead of using theHStack view to group various Text views together, you can simply use the plus (+) operator to add different Text views together, like this:
struct ContentView: View {
    var body: some View {
        Text("Red ")
            .foregroundColor(.red)
            .font(.largeTitle)
        +
        Text("Green ")
            .foregroundColor(.green)
            .font(.body)
        +
        Text("Blue")
            .foregroundColor(.blue)
            .font(.title)
    }
}
How cool is that? Here’s the output.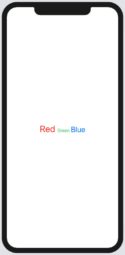 Concatenating different Text views together.
If you want all the texts to be of the same font size, group them together using a Group view and apply the font() modifier on the Group view:
struct ContentView: View {

    var body: some View {
        Group {
            Text("Red ")
                .foregroundColor(.red)
            +
            Text("Green ")
                .foregroundColor(.green)
            +
            Text("Blue")
                .foregroundColor(.blue)
        }
        .font(.largeTitle)
    }
}
Create custom modifiers in SwiftUI
Swift modifiers allow you to change the behaviors of views. Consider the following example:import SwiftUIHere, you apply the same set of modifiers to the twostruct ContentView: View { var body: some View { VStack { Text("Leonardo da Vinci") .bold() .font(.largeTitle) .foregroundColor(.blue) .shadow(radius: 2) Text("Vincent van Gogh") .bold() .font(.largeTitle) .foregroundColor(.blue) .shadow(radius: 2) } } }
Text views. You often do that when you want to ensure consistencies in your UI (for example, applying the same set of UI styles when displaying certain information in your application). Instead of repeating the same set of modifiers again and again, wouldn’t it be easier if you could just encapsulate all the modifiers into yet another modifier?What you can do it is create another struct that conforms to the ViewModifier protocol. This protocol requires you to implement a body() method that has a Content parameter. You then apply whatever modifiers you want to this Content argument and return it:
import SwiftUITo use the newly createdstruct Title: ViewModifier { func body(content: Content) -> some View { content .font(.largeTitle) .foregroundColor(.blue) .shadow(radius: 2) } }
Title struct on the Text view, apply the modifier() modifier and pass in the Title struct, like this:
struct ContentView: View {
    var body: some View {
        VStack {
            Text("Leonardo da Vinci")
                .bold()
                .modifier(Title())

            Text("Vincent van Gogh")
                .bold()
                .modifier(Title())
        }
    }
}
To make the Title struct look more like a true modifier, create an extension to the View protocol and give it a name — say, titleStyle:
import SwiftUIYou can now apply theextension View { func titleStyle() -> some View { self.modifier(Title()) } }
titleStyle() modifier to the two Text views:
struct ContentView: View {
    var body: some View {
        VStack {
            Text("Leonardo da Vinci")
                .bold()
                .titleStyle()

            Text("Vincent van Gogh")
                .bold()
                .titleStyle()
        }
    }
}
Display multiple alerts in SwiftUI
Usually, in SwiftUI you apply a singlealert() modifier to a single view. For example, when the user taps a button, you can display an alert by using the alert() modifier to the button. If you have multiple buttons, you can attach an alert() modifier to each button.However, there are times when you need to display multiple different alerts for a single view. Applying multiple alert() modifiers to a single view will not work correctly, because the last modifier will override the earlier ones. To solve this problem, you can use a single alert() modifier, and use a switch statement within the modifier to decide which alert to display.
The following example shows a button that, when it’s clicked, generates a random number of either 1 or 2 and uses it to decide which alert to display:
struct ContentView: View {
    @State private var displayAlert = false
    @State private var alertToDisplay = 0

    var body: some View {
        Button(action: {
            self.alertToDisplay = Int.random(in: 1..<3)
            self.displayAlert = true
        }) {
            Text("Display Alert")
        }
        .alert(isPresented: $displayAlert) {
            switch alertToDisplay {
            case 1:
                return Alert(title: Text("Alert 1"),
                    message: Text("This is Alert 1"))
            default:
                return Alert(title: Text("Alert 2"),
                    message: Text("This is Alert 2"))
            }
        }
    }
}
Enable debug preview in SwiftUI
By default, the preview canvas doesn’t display outputs printed using theprint() function. This isn’t useful, however, because often you want to use the print() function as a quick debugging option. The good news is, you can easily fix this.In the preview canvas, right-click the Play button and select Debug Preview.
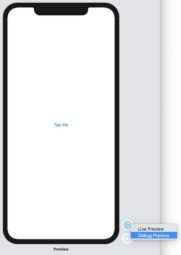 Enabling the Debug Preview feature in the preview canvas.
Now if you tap the button, your code will print the output in the Output window:
struct ContentView: View {
    var body: some View {
        Button ("Tap Me") {
            print("Button was tapped...")
        }
    }
}
If the Output window is not shown in Xcode, press ⌘+Shift+C and it should appear.
Preview your SwiftUI app using different devices
You’re familiar with using the preview canvas to preview your app. By default, Xcode automatically picks an appropriate device based on your target. The target set for your project (iPhone 11 Pro Max, in this example).
You can preview your app on different modes — light mode and dark mode — using the environment() modifier:
struct ContentView_Previews: PreviewProvider {
    static var previews: some View {
        Group {
            ContentView()
                .environment(\.colorScheme, .light)
            ContentView()
                .environment(\.colorScheme, .dark)
        }
    }
}
In addition to previewing in different modes, you can alter the size of the preview window, allowing you to have a glimpse of how your UI will look under different screen dimensions. You can do so using the previewLayout() modifier:
static var previews: some View {
        Group {
            ContentView()
                .environment(\.colorScheme, .light)
                .previewLayout((.fixed(width: 400,
                                       height: 600)))
            ContentView()
                .environment(\.colorScheme, .dark)
        }
    }
The image below shows the top preview displaying your UI in a dimension of 400 x 600 pixels. Note that clicking the Live Preview button will revert the preview back to the default size.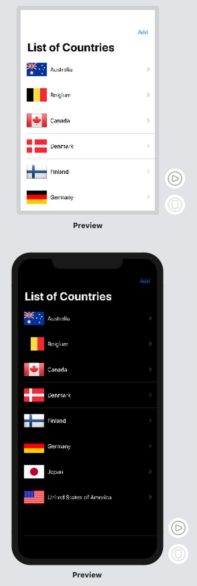 Previewing your app in the specified dimensions.
If you want to preview your UI on multiple devices, you can use a ForEach loop, supply a list of device names, and then use the previewDevice() modifier on the ContentView, like this:
    static var previews: some View {
        ForEach(["iPhone 11", "iPhone SE">,
            id: \.self) { deviceName in
            ContentView()
                .environment(\.colorScheme,
                    .light)
                .previewDevice(PreviewDevice(
                    rawValue: deviceName))
                .previewDisplayName(deviceName)
        }
    }
The following image shows the preview on the iPhone 11 and the iPhone SE. Notice that you can display the name of the device using the previewDisplayName() modifier.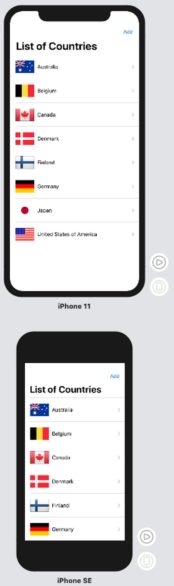 Previewing the app on an iPhone 11 and an iPhone SE.
Check out the full list of devices that you can preview.
Dark mode only works on NavigationView
As stated, you can use the environment() modifier to set the preview to dark mode so that you can see how your UI will look like in dark mode.However, it seems like the dark preview mode only works for the NavigationView. For example, consider the following example where you have two Text views contained within a VStack view:
import SwiftUISuppose you use thestruct ContentView: View { var body: some View { VStack { Text("Leonardo da Vinci") Text("Vincent van Gogh") } } }
environment() modifier to set the preview mode to dark, like this:
struct ContentView_Previews: PreviewProvider {
    static var previews: some View {
        ContentView()
            .environment(\.colorScheme, .dark)
    }
}
The words in the Text views automatically change to white, but the background remains white (running on the simulator or an actual device doesn’t have this issue), as shown below. So, essentially, you get a white screen. Previewing in dark mode but the background of the app is still white.
To fix this problem, wrap the ContentView view using a ZStack and set its background to black, like this:
struct ContentView_Previews: PreviewProvider {
    static var previews: some View {
        ZStack {
          Color(.black)
          ContentView()
        }
        .edgesIgnoringSafeArea(.all)
        .environment(\.colorScheme, .dark)
    }
}
The image below shows the text showing up on a black background.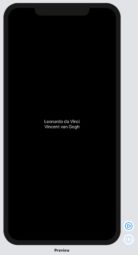 You can now preview the dark mode correctly.
Extract subviews in SwiftUI
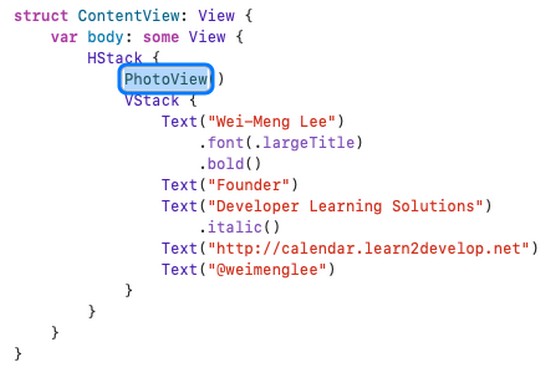
Your UI may contain quite a large number of views. This is very common if you have a complicated UI. However, you can simplify your UI by extracting some of the views as subviews. Consider the following example:import SwiftUITo break down the UI into smaller subviews so that your UI is more modular and manageable, follow these steps:struct ContentView: View { var body: some View { HStack { Image("weimenglee") .resizable() .frame(width: CGFloat(120), height: CGFloat(120)) .cornerRadius(CGFloat(15), antialiased: true) VStack { Text("Wei-Meng Lee") .font(.largeTitle) .bold() Text("Founder") Text("Developer Learning Solutions") .italic() Text("http://calendar.learn2develop.net") Text("@weimenglee") } } } }
- In the preview canvas, select the
Imageview and press the ⌘ key. Extracting views as subviews in the preview canvas.
 - Select Extract Subview.
- Name the new view PhotoView.
 Naming the newly extracted subview.
The Image view will now be extracted as a new struct named PhotoView:
struct ContentView: View {
    var body: some View {
        HStack {
            PhotoView()
            VStack {
                Text("Wei-Meng Lee")
                    .font(.largeTitle)
                    .bold()
                Text("Founder")
                Text("Developer Learning Solutions")
                    .italic()
                Text("http://calendar.learn2develop.net")
                Text("@weimenglee")
            }
        }
    }
}struct PhotoView: View {
    var body: some View {
        Image("weimenglee")
            .resizable()
            .frame(width: CGFloat(120),
                   height: CGFloat(120))
            .cornerRadius(CGFloat(15),
                          antialiased: true)
    }
}
You can now also extract the VStack and save it as another struct named DetailsView. Now your UI looks like the following, which is more maintainable:
struct ContentView: View {
var body: some View {
HStack {
PhotoView()
DetailsView()
}
}
}struct PhotoView: View {
...
}
struct DetailsView: View {
var body: some View {
VStack {
Text("Wei-Meng Lee")
.font(.largeTitle)
.bold()
Text("Founder")
Text("Developer Learning Solutions")
.italic()
Text("http://calendar.learn2develop.net")
Text("@weimenglee")
}
}
}
Display a context menu in SwiftUI
One of the innovative features of iPhone is the support for Haptic Touch (which replaces the 3D Touch on older iPhones). Using Haptic Touch, you can long-press an item on your iPhone and a context-sensitive menu appears (if the app you’re using supports it). You can support this feature in SwiftUI as well.To attach a context menu to a view, use the contextMenu() modifier:
To attach a context menu to a view, use the contextMenu() modifier:
struct ContentView: View {
    var body: some View {
        Image("Mac Pro")
            .resizable()
            .frame(width: 300, height: 280)
            .contextMenu {
                Button(action: {
                    print("Save Image button tapped...")
                }) {
                    Text("Save Image")
                    Image(systemName:
                        "tray.and.arrow.down")
                }
                Button(action: {
                    print("Add to Cart button tapped...")
                }) {
                    Text("Add to Cart")
                    Image(systemName: "plus")
                }
            }
    }
}
To create a context menu, you provide a list of Button views, and the content of each button is automatically wrapped using an HStack view. Now when you long-press the Image view, a context menu appears.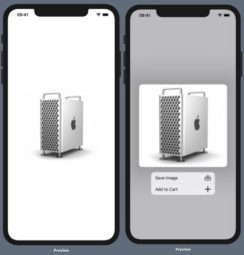 Implementing a context menu on an Image view.
Want to learn more? Check out our SwifUI Cheat Sheet.


